
I am going to do another (Cedro) for the #4.
So with my 15 degree jig I saw the scarf joint and clean it up with plane.
This has more or less become 2nd nature which is quite easy.
Next I will be making the head plate for the #3.
I joint 2 cut-off from back of #3 and it's ready for gluing onto the head.


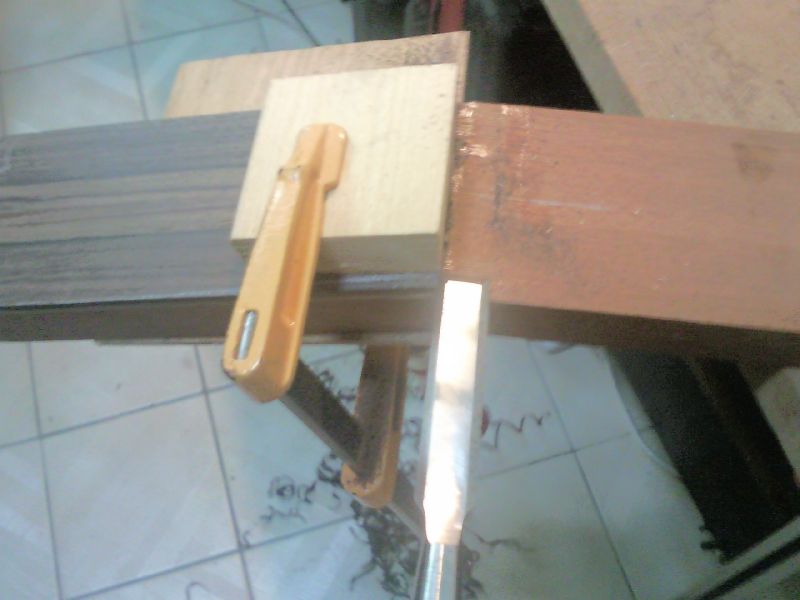
I glued the scarf joint for the #4 guitar.
Not perfect as I need to take it apart reheat the HHG and glue it back.
I think my HHG has gotten too thick I need to thin it down a little.

Heating up the surface

Glued and clamped
The neck gluing didn't turn out to be perfect, so I tore it down and redo the gluing.
That's the good thing about using hide glue.
Still it's very hard to make it come apart; I need lots of heating and inserting the spatula inside the small gap.
Some 1/2 hour or so the 2 pieces came apart without much damage.
I scrape the hide glue remnants on surface and re-plane the scarf.
This time round I check for perfect fitting include the reference edge.
Once I am satisfied the 2 parts are ready for gluing again.

The scarf came apart finally after lots of heating and spatula work.

2 necks ready for gluing
Now is the gluing time.
I prepared the HHG and then heat up the surface and started gluing.
One thing I noticed is that my HHG is slightly too thick so I added some water before I glue.
The texture is just nice.
I heat up using my hairdryer and apply hide glue to the surface.
The neck body is clamped down 1st.
After that I glued the head and clamped in 2 blocks to apply constant pressure.
Similarly I repeat for the other neck.
Now this other neck is for another project; I shall elaborate more of that later as now I have 3 guitar projects on-going at the same time.
After that I work on the headplate for my #3 neck.
I plane 1st and then scrape smooth.
The ink lines for IRW are pretty nice; just nice for the center seam.
So I don't really need any decoration for this guitar which is the main theme of the ornament for this guitar #3: natural

Prepare to glue

Apply hide glue

Clamped

Plane the headplate level

Scrape it smooth

The nice ink lines on IRW (quite rare for IRW)

All the veneers ready for gluing
Next I began to glue the veneer.
As for the head plate I wanted to wait till the veneer is trimmed so that I can drill some guide holes.
I use 2 layers of maple followed by 2 layers of walnut and finally 2 layers of maple again.
The neck wood is dark so I have dark(neck), light(maple), dark(walnut), light(maple) and dark (head plate)
Total thickness of the veneer is 1.42 mm and head plate is about 3mm.
I will trim the reverse side of the head once the tuner holes are drilled.

Thickness of the veneer 1.42 mm

Gluing the veneer with HHG

Clamping down the veneer
As for the other 2 necks they are glued pretty nice!

The other 2 necks glued.
Now the #3 neck is ready for gluing on the head plate.
I didn't glue it together with the veneer is because I need to align it centrally.
With all the protruding veneers it's pretty hard to align it.
After I trimmed the veneers, I drill 2 guide holes on the headplate on those area which will be sawn away later.
After that I prepare the HHG; and then I apply the glue; and finally clamped it.
To cater for the slight movement during clamping, I didn't clamp too hard down at first.
After tapping here and there to adjust the alignment, I apply more force on the clamp to stablise it.

Trim the veneers

For the ends I use saw instead of plane as it's easier.

Drill the guide hole

Apply HHG and heat it to prevent it from gelling too fast.

Clamp it down after adjustment.
The head plate gluing looks good.
Center almost perfectly to the eye on the center seam.
After that I saw the headplate at the nut end so that the headplate ends in perpendicular to the fingerboard.
But I can't find my old block, which was also 15 degrees head, and so I make another one by shooting a block of wood on the plane.
After sawing the excess, I clean up with chisel.
Then I started to taper the sides with plane.
This Sapele is much harder to work with compare to Spanish Cedar.

Headplate glued nicely

Plane the excess head plate at the sides.

Edge flushed

Prepared the guide block for sawing the ends

Saw the excess headplate ends at the nut area.
Clean up with chisel

... and rebate plane

Nicely done.

Tapering the sides after marking with white color pencils

The head stock look. Still need to clean up.
I began to work on the head stock shape.
Well I could have use a base shape and router with a trimming bit to follow the shape attach to the underside but I chose to do it the traditional way using chisel and rebate plane.
I draw the marking on the head and started sawing away those waste parts.
Those intricate one I use chisel to chisel away.
Finally I clean up using the rebate plane in various orientation to clean up the surface.

Before cutting the head stock, after I clean up the neck / head joint part

Saw away the waste part

Saw first and then chisel the step before the 3 Torres tomb lopes.

Saw other kerfs to reach in between the 2 lopes

Start to pare away the in between waste

Headstock almost done after cleaning up with the rebate plane.
Next I drilled the tuner holes.
With the LMI tuner jig it was quite simple.
Unfortunately I am using the 10.31 or 13/32 drill bit, and the tuner jig is meant for 10 mm.
Out of the 3 holes only 2 is large enough to drill thru'.
So I drill 2 and then turn the jig over to drill the 3rd one, making sure the center hole is correct (by inserting another drill bit within.
One fine day I should just try 10 mm instead.

Drilling the tuner holes

Done with one side.

The other side also.

The tuner fitted

Draw the lines for the front slots

Checking the amount that need to be removed from the back of the headstock
Next is to drill the slot hole and cut.
I marked out the slot hole and drill them.
Next I use the coping saw and saw out the waste material in the slot, followed by chiseling the edges to the line.

Drilling the slot holes after marking them.

Holes drilled

Sawing the slot

Slot sawn

Chiseling to the line.
I plane headstock thickness (at the back) abit to make it less bulky.
Next I saw the front slot and chisel a slope for string clearance when tying to the 1st string and 6th string tuner barrel.
The mini douzuki saw I bought recently was very useful; more handy than my usual big ryouba.

Plane the back of the headstock to reduce the thickness

The front slot done.

Saw for the slope to cater for stringing to 1st tuner barrel

Chisel the slope

Done! Neck should be done for this stage
No comments:
Post a Comment