Custom Search

2010-12-27

The top / Purfling making

Thicknessing the top

I haven't got around repairing the rosette but I started to thickness the top using my block plane.
Actually I think the only 3 planes that I use now are the 2 block plane, one for normal use and the other for end grain.
The other plane is the long 40cm MJF wooden plane for jointing tops / backs.
After adjusting the mouth and iron, The thickness is pretty easy.

Thicknessing the top.

Another view

Close up


Making the wheat pattern purfling

I decide to make the wheat pattern purfling.
So I cut 2 pieces of 1.5mm thick black fibre and 0.6mm thick white fibre board.
Then I glue them togther and clamped them using 2 90cm long pine plank.
After releasing the clamp I started to shave the sides to align the 3 layers.
I followed the instructions in the John Bogdanovich book but didnt' use as many layers as I don't have a bandsaw so will be sawing by hand.
I don't think I will make the purfling as long as the book instructed.
Shaving the purfling

Close up view

I continue the wheat purfling making by making a jig that allows me to saw at 15 degrees.
Then after making the jig I realise I can make use of it to saw the scarf joint for my neck.
What a jig! killing 2 birds with 1 stone.
Gluing up the jig

Sawing the purfling

Can be used to saw the neck blank. 
This is a just a scrap pine blank (which I use to make the jig).

The jig with a variable mouth opening. 
Currently it's secured by clamps only.

And so I began to saw the pieces.
I use the ryoba to saw but after sawing I noticed the edges are jagged...
That would mean I need to plane them smooth before gluing.
Also the next cutting, I would need to cut thicker in order to cater for the thickness to be plane away.
Cutting the pieces

The clamping set up. Well I should have use a wider base for easier clamping

Uneven surface

The other cut end

Close up view

Ready for glue up

Glue the strips using some blocks of wood.

After that I clean up the edges 

Planing the edges

The end result quite good.

Those wastes. I wonder if I have a bandsaw would there be less waste?
Sawing the individual piece with the diagonal pattern. 
The LH is to make sure the saw is following the jig.
Once the cutting groove is there I can just follow the cutting groove

A wheat pattern with a centre white strip. It's about 10mm in width right now.
I will thin it further.

Cutting a 2nd piece, notice the mirror effect in the saw blade?

The pieces ready to be glued together ends to ends.


Packing my woodstock

Well I took the opportunity to pack my zoot too.
So far I have collected several sets of Quilted Maple, Flamed Maple, Paduak, Bloodwood, IRW, MadRW, Cypress, Bubinga.
All of them are waiting for me :)
My back and sides zoot. All stickered nicely.

The neck woods are used as a weight to hold them down

Repairing the rosette
Finally I got around to repair my rosette.
What I do is to make a outside and inside mould for the rosette and sand the tiles to size.
I use the flycutter to cut the mould, but this time round I use the power hand drill instead of the battery operated drill.
It definitely has more power and cuts more cleanly but the dust flew everywhere...

The outside and inside mould for the rosette

The tiles need to fit in the channel

Maybe I could add a MOP / Abalone inlay in the rosette...

Almost done. But the inner circle is the one I did previous at a much smaller radius
This mean that I might not have enough space to put a wheat purfling at the inside edge...
Need to calculate more in detail.


My New Workbench

Well I gave up trying to make the legs of my new workbench.
Instead I just slap the piece of the heavy 1" thick MDF on my existing study table.
Voila! My new workbench.
The MDF is so heavy that even I didn't fasten / glue it to the existing top, the whole assembly is very stable.
Luckily I had this idea now I got a much bigger and stable area to work with.

My New Workbench!


I did a jig for being able to clamp things vertically.
It's basically a right angle board for me to clamp things to.
This will be useful for planing perhaps and working on the guitar's butt area.
I just simply bought to rack support and screw is to a double thickness plywood.
The jig is clamped to the table top.
The board jig

Clamped to the workbench top

Guitar #1 sound clip

My guitar #1 soundclip:
The piece played is El Testament d' Amelia by Miguel Llobet.
The mic used is MXL USB stero mic (large diaphragm condenser mic) at a distance of about 50 cm away from the guitar.
There are some background noise from the TV though please pardon that.

Some more new clips.
All pieces by Agustín Barrios Mangore
Aconquija (intro only)
Listen to the lovely harmonics of the guitar.

A 2nd version of Aconquija (played slower)
Aconquija (2nd version)

Francisco Tárrega's famous
Lágrima
(It's the default test piece for guitar in the Delcamp forum)

La Catedral I (Preludio Saudade)
La Catedral II (Andante Religioso)
La Catedral III (Allegro Solemne)

I love hear all the comments on the sound recording.
But I must say not as an exaggeration, the real thing sounds better than the recording.

2010-10-15

More Jig Making & Making the Rosette


Making the neck jig

I was concentrating in making the neck jig which I copied design from David LaPlante's neck jig.
(He is a US luthier who knows a lot about Martin guitars and other historic guitars like Torres, Hernando Y Aguado... and has attended the famous Sigüenza Romanillos Guitar Making Course)
It will help to saw the side slots at the correct angle 95 degree.
Originally I plan to use all pine material for the jig but to get the correct angle the pine isn't easy to plane.
In the end I use an extra Sapele heel block which I got from LMI.
Sapele is heavy but being quartered sawn, the planing part is easier.
Pine usually is laden with knots making the planing hard.

I use a piece of 2mm shim to change the angle of the sides (joint part) on the shootboard.
Then I measure the angle using my protractor.
When I hit the 95 degrees mark I mark the position of the shim on the shooting board.
Then I proceed to plane the angles on both pieces of the Sapele

After I got the angles correct, I proceed to cut the middle window.
The top and bottom cuts is easy, just need to use the ryoba.
But the side cuts is rather hard... I need to drill some holes and use the coping saw to cut.
The coping saw didn't fare to well with dense Sapele material.
After cutting I use my paring chisel to straight the cut.
I realised this is a good practice for cutting the tuner slots in the neck.
It's the same material and similar process.

Finally to the glue up phase.


Planing the angle into the block.


Gluing up the 2 pieces together


Chiselling the excess in the base, after cutting the slots using the ryoba.
This is to match the angle in the frame.


The assembly before the glue-up


Can see the angle here clearly


Gluing the frame to the base.


Clamping all the parts together


Cutting the heel slots


New block plane
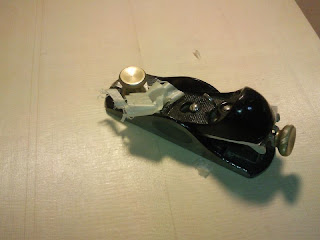
I got a new block plane, a Stanley new premium low angle block plane
I use it to cut end grain and it works like a charm
The iron is as thick as my IBC upgrade for my normal Stanley block plane.
Originally I did consider to get a normal low angle block plane and upgrade the iron.
But the difference in price is only a bit.
The new premium block plane cost me about 70+ USD sold at the Amazon and the other option cost also about 60+.
Also the design of the new block plane looks more comfortable.
The old design has a tightening lever which will make the palm uncomfortable.

Here are some pics of the 2 planes side by side.


The side view. Can see the lower angle on the premium block plane (foreground)
The cap is also smoother and more comfortable to hold.


The iron and cap lever removed.
You can see the frog of the premium plane has more contact surface.
This is to reduce the chatter during planing.
Also the adjuster mechanism is the Norris style which act both as a depth adjuster and lateral adjuster.
The old plane has separate lever for both.


IBC iron (left) and Stanley SW premium iron. Both are A2 and cryo treated.


The thickness of the iron are same also @ 1/8" thick.


Close up of the frog.

Making the Rossette
I began to do the rosette.
I was thinking of doing a segmented rosette from the cut out of the back.
So I began to design the rosette on paper.
After that I measure the size needed for each segment and cut the tiles out.
Then using a reference piece to impart the correct angle, I began to shoot the sides of the tiles into the triangular segment.
The low angle block was handy here as some of the pieces I had to go against the grain, so it's like cutting an end grain.
Only on the final stroke, I change to a pull stroke to smoothen the slanted jointing edge.
Finally I assemble enough tiles to form a full rosette.
Halfway through, I thought of adding variety to the rosette pattern and so I added bloodwood tiles too.
Bloodwood is pretty brittle to planing them isn't as easy as IRW.


Cutting the rosette tiles


Rosette design


Test fitting


Planing the angle in the segmented tiles


Another view. A reference piece will ensure the angle is consistent


IRW and blood wood tiles


The rosette


Another view

The rosette on the plan. Originally I intend just to use Bloodwood (red) and IRW (brown) but in the end I decide to insert a basswood(white) in the sequence. This makes the rosette more interesting.

Gluing the rosette on the waxed paper

Final rosette blank. Need to trim the circle next.
But to do that I will need the circular jig which is next on the making list..

Making the tuner drill jig
Then I proceed to make the drill jig for the tuner hole.
I use the cut-off from making the neck jig and use a stainless steel tubing 12mm for the drill bushing.
First I mark the 3 tuner holes and locate the center of the holes
Then I drill the holes and enlarge it progressively.
The final size I used was a 12mm drill bit; just large enough for the tubing.
Then I saw the tubing and file away the rough edges.
Finally I insert the tubing into the hole but one hole wasn't aligned properly.
Maybe I should make another drill jig or alternatively just make use of the 2 holes and turn around for the other 2 holes when I use the jig...


Drilling the holes

Sawing the tubing

The tubing ready to be inserted into the hole.

The tuner in the jig

Another view

The hole on the extreme right was out of alignment...

Making the Rosette Circular Jig
Well to cut the rosette into the appropriate circle, I need to make the jig to allow the B&D RTX (Dremel equivalent) to route away the excess parts.
So I began making the circular jig for RTX.
I make it out of MDF which I have a lot of excess cut-off from making the solera.
Well I made some mistakes along the way but none too serious.
I tried to route a channel for the tightening nut using the RTX but it didn't have the power to route thru the MDF.
So I had resort to my laminate trimmer.
But well the channel was crooked...

Anyway I discovered that MDF doesn't glue well except for large surfaces; so everything had to be reinforced with screws and nuts.
I made the screw adjustment using a long bolt and a lock-nut.
Originally I used a M10 bolt but the lock-nut was a pain to turn...
So in the end I managed to find a long M6 nut and use that instead.
The other end is a T-nut embedded in a pine cut-off.
The pine block is glued and then screwed to the MDF base.

Also after assembling the 1st cut, I discover the adjustment distance was too short starting from 40mm onwards.
So I move the channel further in and make it start from 25mm onwards.

After readjustment it was ready to be used for the rosette.
Originally I intend to try it on a scrap but in the end I was lazy to search for a scrap.
I first did it on the MDF base and was it was working fine I tape the rosette to it and started routing.

Originally I had adjusted the full depth, but the RTX wasn't powerful enough so I had to go 3 passes.
It worked out quite nicely in the end.
The rosette broke off at 2 portion but it can be easily glued back.

After successfully routing the inner circle, I clean up the frayed edges with chisel.
Then I began to route the outer edges.
But I discover it's actually pretty hard to tape it down and so I use double-side tape for that purpose.
Unfortunately, the double-sided tape didn't hold the rosette well enough...
The rosette drifted when I route and I routed the arc into the rosette at some point for the 1st pass.
Now all I can do is to replace the segment.
I decide not to route the 2nd pass and use my low angle block to remove the excess instead.
It was definitely a setback after successfully routing the inner arc.
But well I am still learning...

The rosette circular jig.

End view

The adjustment screw using locked-nut

The center pin is using a broke off Dremel grinder.

Another view

The 2 nut to lock the adjust in place. 
A channel was routed to allow the nut to move freely and w/o affecting the routing surface.

A circular piece to hold the rosette in place while I tape it down.
The circular MDF is exactly the inner size of the rosette.

Ready to be routed.

A piece to support the jig when routing the rosette.

Routing the rosette.

The adjust is too deep. The RTX can't route thru' the rosette.

So I decide to do in a few pass (3 to be exact)

The route 1st pass..

The routed channel 1st pass

Finally remove the inner excess. Next the outer excess.


Routing the rosette.

Inner ring routed but outer ring mistake!!!

The rosette drifted and I routed into the rosette.

Here the rosette moved too. The double sided tape didn't do its job well...