Custom Search

2016-01-28

Prepare for closing box


20160115
I glue some backing veneer to the sound port region.
Well although this guitar is not having any sound port, but nonetheless I better glue some veneer incase next time the owner decides to change his mind.
The backing consist of 5 layers of veneer, alternate in grain orientation for each layer.
This should give plenty of strength.

I also made a small tornavoz.
It's made of paulownia which is very light and weighs only 3 g for the ring.
The reinforcement will probably weigh another 2 g or so.


Prepare for gluing the sound port backing.


Glue the 1st layer


After all layers are glued, they are clamped


Bending the wood for the tornavoz


Clamp to shape


Weighs about 3 g (2.9g to be exact using the other scale which is more accurate)


Can the the taper at the ends so that the overall thickness is about the same.


Glued to the top


With reinforcements.


One last look before closing the box


Another look


Another view front and back


20160128
While doing the annual spring cleaning of my workshop / house, I work a bit on the neck / head.
I clean up the tuner slots; it was rough cut previously
Now it look much better


The head tuner slot cleaned up!

2016-01-19

Repair on a Thames guitar - Excellent StewMac customer service!


20151112 - 20160119
I had a customer who brought his Thames #858 guitar for repair.
Actually there was nothing wrong with the guitar.
The only part that broke is the Sloane tuning machine.
One of the button was loose from the shaft.
Thus no tuning can be done on that string. (G - treble string).


So I contacted StewMac who was the retailer for the Sloane tuner (manufactured by Waverly)
I must commend StewMac for their excellent Customer Service; the service they rendered was really top class.
They agreed to send me the replace at no charges (not even the shipping!)
Here is one company who believe in providing excellent services.

So the replacement parts arrived fast after our correspondence
Unfortunately I was charged GST (VAT) for the replacement parts which aren't supposed to be charged.
After contacting the DHL (SG) customer service still I need to pay the GST in order to receive the goods.
Without a choice I had to pay up first in order to receive the goods.
But the DHL customer service meanwhile help me to inquire from SG Govt Customs regards GST refund for this good
However, SG Customs require me to write in personally and so I did.
After showing them various evidence, they still insist that this GST is chargeable although various parts of their website implied that parts imported for replacement / repair may be exempted from GST.
Though the GST tax-free application must be filed first.
What is bad is that the SG Customs customer officer didn't even know how to reply a proper email with the correct response as to why this is chargeable.
They simply want to close the case and write stand template replies.
So much for SG50 progress... their service really suxs
Their mentality is more like "Please don't create more trouble for me" and not truly understanding the case and helping the customers / people with their enquiries Anyway enough of ranting, so I gave trying to reason with the Customs customer service officer which weren't even apt in explaining the SG GST taxation law to anyone....

FYI, the spoilt tuner was shipped back to USA, so there was no nett increase of the physical item
Why should there be any GST charge???

So I removed the original tuner and installed the new one.
I check that the holes are perfectly drilled which they are.
Also the holes are deep enough.
I thought it's the root cause of the problem but all the guitar was build correctly in this aspect.
It's just a poorly made tuner for this case.
After that the owner wanted guide dots on the guitar so I drilled and glued 3 MOP dots on the side of the fingerboard.
As I have to file level the dots I had to refinish that part of the finish.
This is really quite a saga.
I will never talk to the SG Customs again if I can; their knowledge and service really sux....

This Thames #858 2013 was a Spruce Indian Rosewood guitar fitted with a full depth Tornavoz.
The bass is very sonorous, however IMO the mids are a little shy due to the resonances being placed too far apart.
The air resonance was F2 85Hz and main top resonance 196Hz G3.
In between there wasn't any peak at all to support the mid notes.
So this explains the shy part.
Anyway it was still quite a nice guitar for Tarrega pieces!


Broken tuner - loose button


Removing the existing tuner.
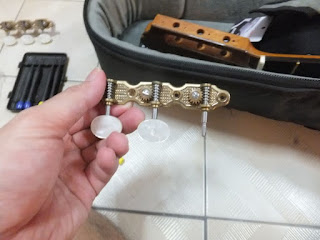

The spoilt tuner.


Both tuners removed.


Installing the replacement.


Can see the full depth tornavoz here.


Install the dots


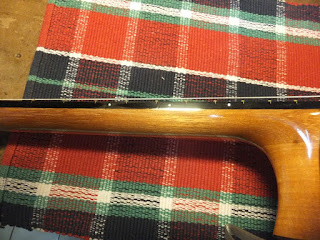
All installed and polished.

2016-01-12

Thicknessing the back


20151224
Merry X'mas to all out there!
Thicknessing used to be a chore for me, as my plane aren't design to cut too deep.
If plane too thick, the tear-out will be bad.
So I had to go thin and to plane a 5mm down to 2.x mm, it takes forever.
However, eversince I got the scrub plane thicknessing is breeze.
I plane down the 5-6mm thick back to 3mm region in about 30 mins or so, which is very fast for my standards.
(I didn't exactly time the planing just estimation)
Last time thicknessing can take several sessions.
Anyway the subsequent part is slower as I switch to my favourite wooden plane and my HA wooden MJF plane.
Both work very well.
I also use scraper to scrape smooth when it's near the final thickness of 2.3mm region.
Thickness is secondary actually more importantly is the tap tone.
Actually I tap and listen to the back it sound very nice.
Probably the best IRW I have used so far.
After that I weight the back which is about 294g


Planing the back with scrub plane.


Weighing the back using tare method


294g for the back.


Checking the fit of the back.


201601008
This is actually the 1st work done in the new year.
Anyway I have glued the braces to the back.


Scrape the back before gluing


Apply glue to the brace.


Glued the lower bout brace.


Apply glue to the centre back brace


Align the back to the brace and put weight on the centre brace region


After the glue grabs (a while later), I removed the back and apply clamp.
This way of gluing ensures more accurate position of the back braces.
I check the alignment it fits perfectly.


Gluing the 1st back brace to the body.


20160112
I glued the back seam reinforcement strips and the radial back braces for the active back.
After shaping the braces, the tap tone sounds very nice.
Still need to record and analyse the back tap tone.


Shaping the LB back brace.


Making and shaping the radial back brace.


Another view. You can see the profile of the radial back brace.


Glued and clamped


Gluing and clamping the back seam reinforcement. The backing is my radius stick, so a slight radius is imparted to the back lengthwise.


20160115

Back done


Final weight of back (w/o 1st brace) 337g


With the back label