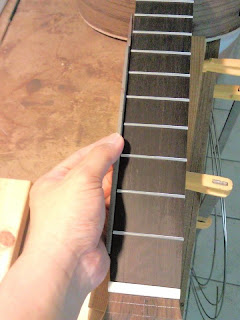
I began to hammer in the frets.
Before that I ensure that the fretboard is flat by check with my straight edge.
(My straight edge is not those expensive type but it will do for now.)
I scrape some fretboard from 2nd fret onward to create a very slight relief on the bass side.
Then I began to knock in the frets.
I didn't remove the fret tang at the ends as the fret metal is too hard and I haven't bought the fret tang remover...
If I crimp all tangs, it would take me lots of work.
The fretting process is quite straight forward, align first; hammer in; cut.
I only had time to do till 5th fret or so.
Sanding the fretboard flat
Checking for slight relief
Hammer in the frets
Up to 3rd fret done
Finally almost all the frets are done except for 19 (split) and the 20th.
For these 2 I plan to fill in those unsightly slot holes so I might remove some tang and round the crown at the inner side.
Next is leveling and round off corners.
For 15th fret onwards, I use the clamp and some knocking.
When I knock I lift up the entire guitar and support it beneath the soundboard
Clamping the frets in, at the higher inner frets.
The scraper is to prevent the clamp from denting the fingerboard
All done (well almost)
The front look.
Next is just fret dressing check: Check 3 fret at a time and make sure they do not rock at the center fret.
1st 2nd 3rd -> 2nd 3rd 4th -> 3rd 4th 5th and so on...
So far so good only once it rock a quick tap of the mallet solve it.
After that I file the edges making sure the tang doesn't protrude.
Next I plane an angle to a wooden block edge and use that wooden block to hold the file to file the angle at the fret ends.
But in the end I discover rounding it with the crowning file works better.
Next the fret ends are filed using the triangular file with safe edge.
Filing the fret ends
Check for fret seating making sure they seat properly in the slot.
The card / straight edge should touch all 3 frets at any time.
If it rocks at the center fret then the center fret is too high and need to file it down or most likely tap it. (not seating fully into the slot)
Plane a angle to the wooden block edge
Can see the angle on the wooden block edge
Use the wooden block as a guide to file the fret ends
In the end I decide to round the ends instead with the fret crowning file
The side edges is filed using the triangular file with safe edge
I know I am on the last stage of the build, just a bit more to go:
some more fretting; a proper set-up to go; thinning the neck; surface sanding.
But things will slow as my 2nd child was born recently and quite unexpectedly so now I am busy with taking care of him.
But stay tune, I will try to complete this as soon as possible.
Yeah finally the last 3 frets to do: 2x 19th and the 20th.
I file off the tang for the inner side of the fret and rounded off the ends
Then I cut off the outer ends like what I did for the other frets.
I just hammered in as per the other frets
After that I began to round the sharp edges and make sure the fret feels good.
I filled in those exposed slots too with PVA and ebony dust.
Round off the sharp edges
Using scrape to protect the top while I doing the high frets
Fret end tangs removed by filing
All the frets hammered / pressed in
Another view
Mixing PVA with ebony dust
Patch the slots
After the glue mixture dried I level them off with sand paper.
All done and next is the set-up
The patch wasn't done too good but most of the slots are filled.
May need a 2nd round though and some sanding.


No comments:
Post a Comment