Custom Search

2012-01-13

Tuning the box

I recorded some tap tone and analyse the frequency.
The top resonance is a high B3 253Hz and body resonance B2 123Hz
It's higher than I had hope for, Now I might just shoot for a heavier bridge to bring down the resonance or thin the perimeter to bring down the resonance.


Body resonance @ 123 Hz B2

Top resonance @ 253 Hz B3

I began to sand the top to bring down the resonance mainly on the lower bout perimeter.
After some vigorous sanding, I manage to bring down a few Hz; still have a long way to go.

Sanding the top.

Body resonance after sanding

Top resonance after sanding

After somemore sanding the resonance points didn't change too much and I realise I can't sand anymore.
The edges are too thin about slightly over 1 mm.
Now what I can do is to reach in and shave down the braces but before that I need to consider what other actions to take.
I could try to shave the back braces to increase the back coupling.
The body resonance should be within range but top resonance is a bit too high.
Anyway I think I just do up the binding and glue in the bridge.
If need to I adjust the back bracing to add more coupling.

Body resonance @ 106Hz G#2

Top Resonance @ 247Hz B3

Top Resonance @ 214 Hz G#3

After binding and purfling are glued and the bridge is on, the final resonance range is
Body: 104 Hz T(1,1)1 Top: 195 Hz T(1,1)2 and 227 Hz T(1,1)3
According to Trevor Gore (an Aussie Luthier who deal with tuning guitar in a more scientific method), the average values are 100, 190, 240; mine is quite close.
What Trevor aim for are 3 to 4 semitones apart for T(1,1)2 and T(1,1)3
Mine is a G and A about 2 semitones apart.
Let's see how it sound and I adjust later.
This is an active back so you can see 3 peaks very distinctly.
If non-active back, the 3rd peak will be heavily suppressed.
I think the active back does work, it makes the guitar have a fuller tone
(I only managed to hear a while the sound of the open strings before the bridge gave way)

T(1,1)1 Body resonance (or Air resonance)
104 Hz G#2

T(1,1)2 Top Resonance
195 Hz G3

T(1,1)3 Top Resonance
227 Hz A#3

2012-01-05

Closing the box

Well before I can close the box, I need to figure out how...
My solera doesn't have slots so I can't insert my F-clamp to clamp the back like what I did for the last round.
Only my big F-clamp (which I only have 4 of them) can reach in just far enough to clamp.
I will use those for the tail block and heel.
For the rest, I still are unable to figure out how to clamp.

One of the way is to use strings.
So I tried a dry run to see how long I need.
I clamp the solera to the bench top.
Note that the solera is very heavy so I clamp onto it length wise the weight of the bench top won't topple in this way.
After that I proceed to use the string to clamp.
It took about 15 mins and that's way too long.
So I think I won't be using strings...
Any good way?

I did note that once the 2 big clamps are applied to the heel and end block area, the rest of them doesn't really need much clamping down.
So the go-bars might just do the trick.
I'll try that next...

Strings to clamp the back. The wedge is to increase the string tension

Solera clamped to the bench top.

Before I close the box I tap the back and compare to the sound clips which I have tapped and recorded before I added those radial braces.
As expected the pitch is much higher than the previous tap tone where there is only the traverse brace.
So I decided to lower a bit more.
What I am looking for is a deep bass growl.
The previous tap just sound a bit too high in pitch.

Radial brace profile.
Lower towards the external edges

Overall profile

After trying various ways... the easiest is to use go-bars :)
Initially I thought go-bars doesn't have the strength to clamp down properly.
But I was wrong.
If one bar is not enough then simply add another.
The seam between the back and the rims are tight.
Think I can start closing the back all preparation are set.
Stay tune. (I took a pic but it was blurred so no pics to show the dry run process)

Well now is the real thing.
As I need to work fast I get everything prepared.
All the go-bar by the side within reach; the back marked to help with the alignment; the wooden block within reach; HHG all heat up ready to glue.
Before gluing I heat up the gluing area.
Then with quick hand I apply the HHG, and it started to gel already by the time I finished applying thru' out the rim.
I use the hairdryer to heat up further before gluing the back.
After a quick alignment, I began to put in the go-bars.
Luckily with the dry run, I realised I had to start from the inner side (though it's common sense, it's easily forgotten w/o dry run practice) to facilitate fast application of the go-bar.
After some adjustment I am all set all within 2 or 3 minutes or so.
Much faster than using strings.

Ready for closing the box.

Heat up the gluing surface

After applying the glue, heat up the HHG before closing the box.

Applying the go-bar to clamp down the back.

Can see the upper deck of the go-bar deck.
It was adjusted up to cater for the taller back.

Closeup view

Well after 1 day's of gluing, I excited removed the go-bars and examine the result.
So far ok though it's not really perfect.
There are some gaps in the closing but none too big.
I trim off the excess edges using my favourite rebate plane and chisel at the waist.
Next to come is binding and purfling but that's another big headache.

Removing the go-bar

Close up view

At the waist

Lower bout

Trim off the excess edges

Can see the doming of the back

The back

Side profile

2011-12-28

Fingerboard

Well I am supposed to close the box but it was raining very heavily these few days.
The RH shot up to 80%+
This made it very unsuitable for closing.
So what I did was to start on the fingerboard.
I just scrape the surface smooth; the fingerboard that comes from LMI was pretty well surfaced.
I just need to shoot to square the reference side.
I had some someother ebony that definitely need more work to get it smooth.
Anyway the maximum thickness of the fingerboards are about 8mm only
I remembered wrongly and thought they were at least 10 mm thick.
This threw my calculation off for the neck geometry
I had to rework the geometry readings to get the correct action at 12th fret

Shoot and straighten a reference edge.
The slots will be saw square to this edge.

I made a mistake during the sawing of the fret slots.
I used the LMI 650mm scale length template and saw using the LMI jig.
By right it's dummy proof but well I managed to goof it up...

I saw according to instructions:
Using the 650mm side of the template slots, I double tape the fret board to the template.
Then I adjust the depth of the cut using the nut slot as a reference check.
After making sure everything is OK I started sawing.

For the 1st 2 slots I can see the slot marking on the template, but after that it's all covered by the fingerboard.
I had to slide the template and feel the pin slide into the slot.
That's why I made the goof up.
During the 11th fret slot sawing, I mistakely thought the pin was inserted into the slot.
(How could I have missed that!!!)
And what's worse I made the mistake twice.
As a result I cut 2 fret slot one before one after 11th fret.
And I didn't saw the 11th fret..

I didn't realise that initially.
When I took out to check how many slot I have done, I thought the slots looked very funny.
After inserting back into the jig then I realised I missed the 11th slot and cut one before and one after...
Anyway I continue the rest of the sawing and use PVA mixed with ebony dust to fill the slot.
But I think it will still be very visible.
I have to wait till it dries and sand it smooth to find out.

Preparing to saw the slot

Sawing the slot

The goof-up... patched with white PVA mixed with ebony dust. Some update after I sanded down the excess the fill up looks quite good. Certainly not invisible but quite ok. With a black fingerboard dye I guess it would look ok afterall. Thank goodness.
The patch after some sanding.
View from far cant really tell the patch mark.
Closeup shot can see rather clearly. The center still some more filling
The treble side.
After 2nd filling looks good as new. After the patch filling, I began to cut to shape the fingerboard. I roughly draw the center line and measure 26 from the center line for the but region (52 mm for the nut width) And at the 12th fret region I measure 31mm each side (62mm at 12th fret). After marking out I saw away some of the excess and remove the rest using a shooting board and plane. Ebony is really pain to plane...
At the nut, 52 mm
At 12th fret 62 mm.
Saw away some excess
Shoot the rest to the line
Fingerboard done
The amount of waste generated
How the fingerboard look on the neck
Close up view to align the center line.
So far so good.
Then I turn over and plane the back of the fingerboard.
The bass side should be about 1mm lower than the treble side.
This is because bass string tend to vibrate more than the treble string.
Alternative I can plane the top of the fingerboard but as Ebony is prone to tear-out, there might be blemishes...
So it's better to plane the under side so that even with some blemishes it's not visible.
I smoothen it with scraper and scraper works really well with ebony but the heat build up on the scraper is really hot to the touch almost like frying pan.
Think it might be good to make a scraper holder like the LV version.

Planing the underside of the ebony fingerboard

Before I close the box, I need to cut the fingerboard and the elevated part of the neck to shape.
As the sides are attached, there is no way a coping saw can be inserted.
So I just use a junior hacksaw to saw straight lines and chisel away the excess.
I had a small chip on the front face of the neck but luckily not too deep.
After that I use my chisel and file to shape.

Saw straight cuts on the excess part

Chisel away the waste parts

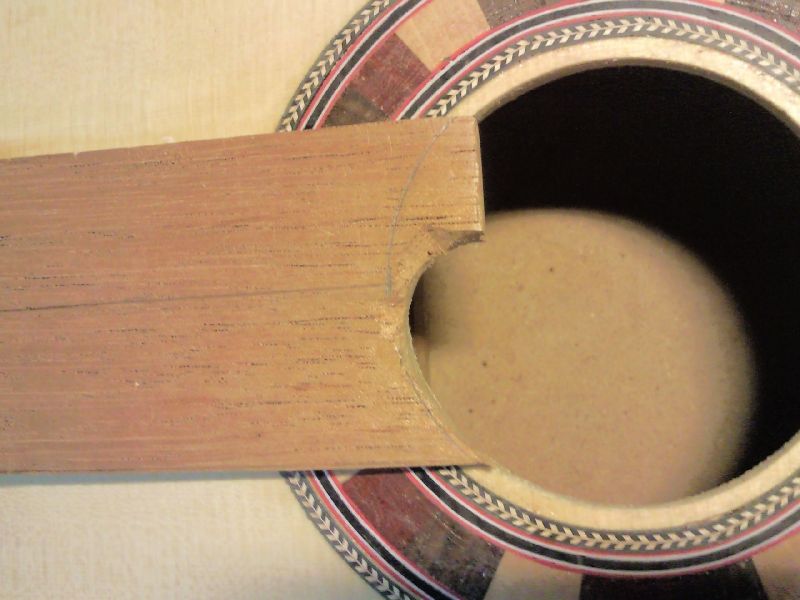
Chisel to match the sound hole

File to shape

Saw the corresponding shape on the fingerboard.

After shaping the fingerboard, I realise the neck part underneath the finger is not long enough to cover the 20th fret...
So I just saw away the neck below the 20th fret to match the sound hole.

The neck to follow the shape of the sound hole.

The fingerboard shape with the 20th fret.

The neck after smoothened with a roller sander.

From the bout looking up to the neck, looks decent even though the neck didn't extend to the 20th fret fingerboard part.

Close up frontal view.