
20211016
I began to sand the top for the finish.
Basically how good the result of the finish will be determined by the surface preparation.
Before that I also repair he rosette which had part of the tiles torn out during the planing of the rosette to level with the top.

Repairing the rosette

Repairing the rosette
20211020
Then I began to body the shellac onto the top.
After sometime in the bodying of the shellac, I started to polish.
I use some mineral (non-drying) oil for the lubricant

After sanding the top

Achieve some shine when I started polishing
20211027
As I continue the polishing I noticed some surface weren't as leveled as I had wished.
The uneven surface is quite prominent under the finish.
So I must decide to carry on or to redo the finish.
So I chose the latter and began to sand down the shellac.
Boy, the shellac sure gum up the sand paper easily.
I had a hard time sanding to bare wood.

Imperfections in the surface.

After sanding the surface

After sanding the surface
20211113
Next back to restart the bodying then polishing of the top.
I also took the opportunity to fill the rosette pores with epoxy.
This to have a better even surface on the rosette.

Achieve the shine a little by little

Lower bout

Rosette area

The medullary grains looks much better under shellac

Shine forming
2021204
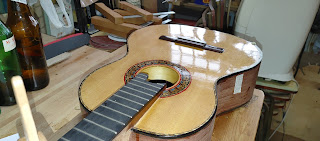
The final shine was done after a few weeks of polishing.
Not perfect but still ok.
The top was harder to polish due to the presence of the bridge
However, I chose to glue the bridge first for sound tuning purpose before finishing.
So the finish quality had to be compromised a bit for the sake of the sound quality.

Checking the reflection

Getting better

Checking the shine reflection

Acceptable shine
Final shine!
No comments:
Post a Comment