Custom Search

2012-04-27

Starting on Guitar #3 and Guitar #4

While #2 is not quite done yet, I have started on my guitar #3 and #4 sometime ago.
It was in between the process where I shoot-ed and jointed the top and backs of these next guitars
Here are some description of the next 2 guitar


Guitar #3
Top: Lutz Spruce (from Shane of High Mountain Tonewood)
Back: Indian Rosewood
Neck: Sapele
Bridge: Indian Rosewood
Fingerboard: Indian Rosewood? or Ebony (depending on the weight of the neck - Sapele is very heavy)
Plantilla: FE19 Same as #2 (perhaps add 5mm all around)
Features: Elevated neck with sound port, Active back
Bracing: Torres 7 fan with open harmonic brace


Guitar #4
Top: Lutz Spruce (from Shane of High Mountain Tonewood)
Back: Big Leaf Maple (Flamed)
Neck: Cedro
Bridge: Indian Rosewood or Madagascar Rosewood?
Fingerboard: Ebony
Plantilla: FE17
Features: Brass Tornavoz; Sound port(?)
Bracing: Torres 7 fan with open harmonic brace (maybe skip the LTB as per FE17)

Lutz Spruce is a hybrid spruce from the Rocky Mountains of North America - cross between Sitka and Englemann or Sitka and White spruce depending on the altitude of the tree.
Shane is very knowledgeable tonewood supplier and his Spruce is very well processed: quartered sawn with lots of silking.
When I tap on these 2 Lutz, they ring like forever very near that of WRC.

Shooting the jointing edge
Apply HHG to the glue edge
Jointing jig
Jointed
#3 and #4
#3 IRW with Lutz spruce
#4 Big leaf Maple (flamed) with Lutz spruce
The back inlay for both (the meander pattern tiles which I did last time)
On the maple (it looked better with a white background)
Difference in size of the plantilla
Squaring the neck blank for #4's neck (cedro)
Preparing to glue the maple back
Jointing in progress
Gluing done
Sawing the outline
Divide into sections. Straight section sawn by ryouba, curve section by fret saw with a twisted coping saw blade
Another curve section
Done!
What's next?
Well I can't really thought of anything so I just saw the outline of the 2 tops with my fret saw.
Similar method used as I saw the Maple back.
I clamp the wood and rotate the top as I saw.
Finally I managed to saw two of them.

Sawing the outline
1st top done.
Drill the center hole for the sound hole
Sawing the 2nd top
Both top done. You can compare the size of the top
FE17 top and back
Next I cut out the IRW back.
As the plantilla was slightly big, the border wasn't too much a regular coping saw would suffice.
And so I saw the outline quite easily.

Sawing the outline
Sawing done.
The #3 top and back

Applying finish to the guitar

Originally my friend who is the owner of this guitar, didn't like any finish at all for the guitar.
But I managed to convince him since the varnish I apply is a very thin layer of quick drying polyurethane varnish.
It is very water resistant (protect against the sweat) and especially useful in such a hot humid climate of Singapore.
Main thing is it can be applied very thinly using a cloth and will not affect the sound.
Some people like shiny surface but my friend prefer a matt surface.


The one on the left is with the 1 coat of varnish.
The one on the right is raw wood.
One drop of water is placed on each surface.
After the water is wiped away, the one with the varnish is very dry and the one w/o varnish can see the watermark on the wood.


So I began to sand the sides with 100 grit and then 1000 grit to smooth-en out the surface.
After that I began to apply the varnish with a piece of old cotton T-shirt cloth.
With the varnish it looks very smooth and with some more 1000 grit sanding it should feel very smooth.
It looks like raw wood as what my friend wanted.


Sanding the surface
The quick drying polyurethane varnish by Ronseal
Applying the varnish with a cotton T-shirt cloth
The varnish almost dried - some more sanding to do. Even w/o sanding it looked very smooth
Scaping the other side
The back done
Drilling guide hole for the the tuner machine screw (1mm guide hole)
Installing the machine

2012-04-23

Setup the guitar (Nut and saddle)

Next to do is actually fretting and setting up the guitar.
But I wanted to string it up before deciding what to do with the relief.
So I sand the bridge and saddle to fit the slot 1st.
Sanding is a hard job...

Then I hammer in 2 frets at 1st fret and 12th fret and mark the position of the saddle with the appropriate action at 12th fret; bass side and treble side.
Anyway this is rough set up.
I saw the saddle near to the line.

I also marked the string spacing at nut; 5mm from the edge at both sides and 8.5mm between the strings.
I file the slots and now all I need to do is to wait for putting on the string.

The setup to measure the saddle height.

Mark using a 1/2 pencil. I plane the carpenter pencil down to the lead core.

Draw the line joining the bass side and treble side

Saw near the line.

Nut end, positions marked

After all the frets are done, I go on to lower down the saddle.
If the string is not seated properly in the nut end, there will be a distinct and annoying buzz.
Once the nut slot is filed and the string seated into the slot, the buzz will disappear.

Previously I had already marked the saddle.
So I just go on and lower it.
Then I measure the action at 12th fret. THe treble is 3.5mm and bass about 4.5mm
I played it sounded quite nice.
I suppose I could lower the treble a bit more but I will leave at for the moment.

After I move back saddle front edge for the 2nd and 3rd string and 5th and 6th to compensate for the intonation.
This is done by making sure the 12th fret harmonics sounds the same as the 12th fret note.

Filing of the slant in the saddle.
Close up. It's abit hard to see the slanted that was filed into the saddle.

2012-04-02

Fretting

I began to hammer in the frets.
Before that I ensure that the fretboard is flat by check with my straight edge.
(My straight edge is not those expensive type but it will do for now.)

I scrape some fretboard from 2nd fret onward to create a very slight relief on the bass side.
Then I began to knock in the frets.
I didn't remove the fret tang at the ends as the fret metal is too hard and I haven't bought the fret tang remover...
If I crimp all tangs, it would take me lots of work.

The fretting process is quite straight forward, align first; hammer in; cut.
I only had time to do till 5th fret or so.

Sanding the fretboard flat

Checking for slight relief

Hammer in the frets

Up to 3rd fret done

Finally almost all the frets are done except for 19 (split) and the 20th.
For these 2 I plan to fill in those unsightly slot holes so I might remove some tang and round the crown at the inner side.
Next is leveling and round off corners.
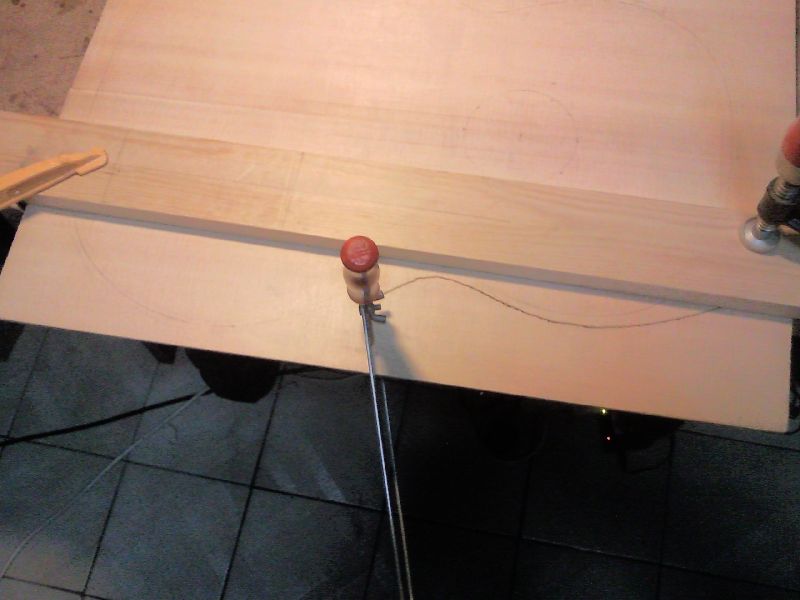
For 15th fret onwards, I use the clamp and some knocking.
When I knock I lift up the entire guitar and support it beneath the soundboard

Clamping the frets in, at the higher inner frets.
The scraper is to prevent the clamp from denting the fingerboard

All done (well almost)

The front look.

Next is just fret dressing check: Check 3 fret at a time and make sure they do not rock at the center fret.
1st 2nd 3rd -> 2nd 3rd 4th -> 3rd 4th 5th and so on...
So far so good only once it rock a quick tap of the mallet solve it.
After that I file the edges making sure the tang doesn't protrude.
Next I plane an angle to a wooden block edge and use that wooden block to hold the file to file the angle at the fret ends.
But in the end I discover rounding it with the crowning file works better.
Next the fret ends are filed using the triangular file with safe edge.

Filing the fret ends

Check for fret seating making sure they seat properly in the slot.
The card / straight edge should touch all 3 frets at any time.
If it rocks at the center fret then the center fret is too high and need to file it down or most likely tap it. (not seating fully into the slot)

Plane a angle to the wooden block edge

Can see the angle on the wooden block edge

Use the wooden block as a guide to file the fret ends

In the end I decide to round the ends instead with the fret crowning file

The side edges is filed using the triangular file with safe edge

I know I am on the last stage of the build, just a bit more to go:
some more fretting; a proper set-up to go; thinning the neck; surface sanding.
But things will slow as my 2nd child was born recently and quite unexpectedly so now I am busy with taking care of him.
But stay tune, I will try to complete this as soon as possible.

Yeah finally the last 3 frets to do: 2x 19th and the 20th.
I file off the tang for the inner side of the fret and rounded off the ends
Then I cut off the outer ends like what I did for the other frets.
I just hammered in as per the other frets
After that I began to round the sharp edges and make sure the fret feels good.
I filled in those exposed slots too with PVA and ebony dust.

Round off the sharp edges

Using scrape to protect the top while I doing the high frets

Fret end tangs removed by filing

All the frets hammered / pressed in

Another view

Mixing PVA with ebony dust

Patch the slots

After the glue mixture dried I level them off with sand paper.
All done and next is the set-up
The patch wasn't done too good but most of the slots are filled. May need a 2nd round though and some sanding.