Welcome to my guitar building blog.
This blog describes my journey into the world of guitar building.
I like to share my experience of building and hopefully it can be of some help to all the guitar making enthusiast.
Hope you enjoy my blog post!
2016-09-23
2016-09-16
Shaping the heel
20160909
I glued the heel to the neck.
Next will be rough shaping the heel.
20160916
I worked on the heel further.
Now it's shaped quite nicely but not yet sanded.
2016-09-08
Bending the sides
20160908
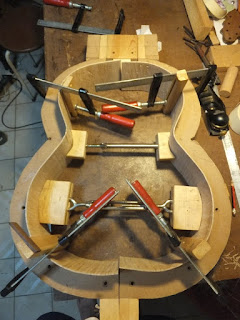
I bent the maple sides.
First time I bending maple, rosewood sides are much easier to bend.
The maple tend to want to crack alone the flame direction.
Luckily I am using hand to bent so I can stop before the crack gets too big.
I suspect the heat gun is not hot enough for maple.
Anyway I manage to complete both sides.
The fit is not perfect but I will adjust the curvature before assembly
2016-09-07
Continuing making the rosette
20160907
After seeing a reminder of my rosette on FB memories, I decide to continue the making of the elaborate rosette of my #4.
I am finished with the 2nd ring of lozengers.
Next will be the inner tiles.
Prepare for finishing
20160805
I began my preparation for finishing process which is essentially sanding.
My top was quite dirty from all the dust and so I have to sand quite a bit.
Also I need to adjust some of the mode's frequency, especially long dipole down a bit.
After sanding the top looks quite good.
20160907
I sanded the back and sides thru the various grits of sandpaper.
They emit a smooth dull sheen after the sanding.
Some parts I will need to sand more to even out the surface.
For finishing the surface preparation is the key.
2016-08-05
Shaping neck and Fretting the fingerboard
20160506
I also clean up the neck by thinning the neck profile and sawing away the 2 side excess.
As the neck blank is pretty thick I still have a long way to go.
I also need to clean up the back of the head.
20160512
I sanded straight the fingerboard and began to fret the fingerboard.
The steps are like my previous builds.
Straighten the fingerboard, Reduce the fret barb size, Cut the frets to length, trim the end fret tangs. Round the ends and install the frets.
But my progress is slow so I only manage to install 3 frets only.
20160513
I fretted until 12th fret and then string up to try the guitar.
The sound seems to get better than last time I tried (cant really be sure though mainly just a feeling.)
I did notice some buzz so I remove the fret and level that part of the fret board.
One thing I noticed is that it seems pretty easy to play the guitar.
Think this will be a winner.
20160606
Just an update, I fretted the fingerboard to 12th fret and tried the guitar.
While the guitar sounds great, the fret work isn't.
There was buzzing at 4th 5th fret for the bass strings.
Visually I check the straightness of the fingerboard; it was straight.
Not sure where the problem is.
So I ordered a straight edge for checking and now waiting for the tool to come.
20160701
The straight edge came and I check the fretboard against the straight edge.
Indeed I was quite right the fingerboard was more or less straight.
So I proceed to fret and tried the guitar.
Still it was buzzing almost every fret.
Then I noticed the action was pretty low so I remake a saddle with higher action and viola... no more buzzing.
The action was now 3.5mm (T) and 4 on (B) and I can lower them a bit more.
Previous action was more like 2.5 / 3 ... no wonder it buzz like mad...
Anyway I finished up the fret to 18th fret and now it plays nicely.
Now to finish up the instrument and get ready for finishing...
What's left is to adjust the neck thickness and heel cap.
20160705
After solving the string problem, I began to reshape the neck.
I just use the spokeshave and the sandpaper.
20160708
Before I start the finishing, I need to touch up some remaining parts.
So I glue cut the heel cap and glue it onto the heel.
The heel cap is made from the bridge cut-off and smell really nice when I sand it.
It is slightly over-sized and will trim it once I glue it on.
(On hindsight, I should make it correct size and trim the heel instead (easier to carve).
But if glued out of position, I won't have much to play around with. (So a locating pin will solve that).
20160715
I shape the heel cap and neck.
20160805
I cut the string clearance slot at the head and sanded the headplate and top.
This time round I did some design with the slot instead of a straight cut.
I also rounded the edges for the head.
I like a curve round edge look actually, though a straight cut usually will emphasize worksmanship usually...
2016-07-05
Audio clips for guitar #9
20160705
Though the guitar is not exactly completed, I managed to record some audio clips from it.
I must say I am very satisfied with the sound.
It has that deep controlled bass but not excessive like the normal fan.
The treble is very even and balanced but right now the harmonics doesn't not appear much
This could be due to the very old string which I used for testing the sound and for adjusting the saddle and nut.
When I changed to new string I will record again.
The string used are old string Aquila Nylgut treble strings with Hannabach pure gold bass.
Here are some teasers...
La Catedral by Barrios 1st Movement Preludio
La Catedral by Barrios 2nd Movement Andante Religioso
Lagrima by Tarrega
Preambulo (intro) by Ponce
2016-05-13
Shaping neck and Fretting the fingerboard
20160506
I also clean up the neck by thinning the neck profile and sawing away the 2 side excess.
As the neck blank is pretty thick I still have a long way to go.
I also need to clean up the back of the head.
20160512
I sanded straight the fingerboard and began to fret the fingerboard.
The steps are like my previous builds.
Straighten the fingerboard, Reduce the fret barb size, Cut the frets to length, trim the end fret tangs. Round the ends and install the frets.
But my progress is slow so I only manage to install 3 frets only.
20160513
I fretted until 12th fret and then string up to try the guitar.
The sound seems to get better than last time I tried (cant really be sure though mainly just a feeling.)
I did notice some buzz so I remove the fret and level that part of the fret board.
One thing I noticed is that it seems pretty easy to play the guitar.
Think this will be a winner.
20160606
Just an update, I fretted the fingerboard to 12th fret and tried the guitar.
While the guitar sounds great, the fret work isn't.
There was buzzing at 4th 5th fret for the bass strings.
Visually I check the straightness of the fingerboard; it was straight.
Not sure where the problem is.
So I ordered a straight edge for checking and now waiting for the tool to come.
20160701
The straight edge came and I check the fretboard against the straight edge.
Indeed I was quite right the fingerboard was more or less straight.
So I proceed to fret and tried the guitar.
Still it was buzzing almost every fret.
Then I noticed the action was pretty low so I remake a saddle with higher action and viola... no more buzzing.
The action was now 3.5mm (T) and 4 on (B) and I can lower them a bit more.
Previous action was more like 2.5 / 3 ... no wonder it buzz like mad...
Anyway I finished up the fret to 18th fret and now it plays nicely.
Now to finish up the instrument and get ready for finishing...
What's left is to adjust the neck thickness and heel cap.
Subscribe to:
Posts (Atom)


