Custom Search

2010-08-11

Jointing the Top

Jointing the top
Well it's been a while since my last post and I have cleaning up my work bench.
Done up a rack for storing all my tools and woods but haven't sticker the woods in place yet.

Finally I choose a day where there was no rain to do the top plate jointing.
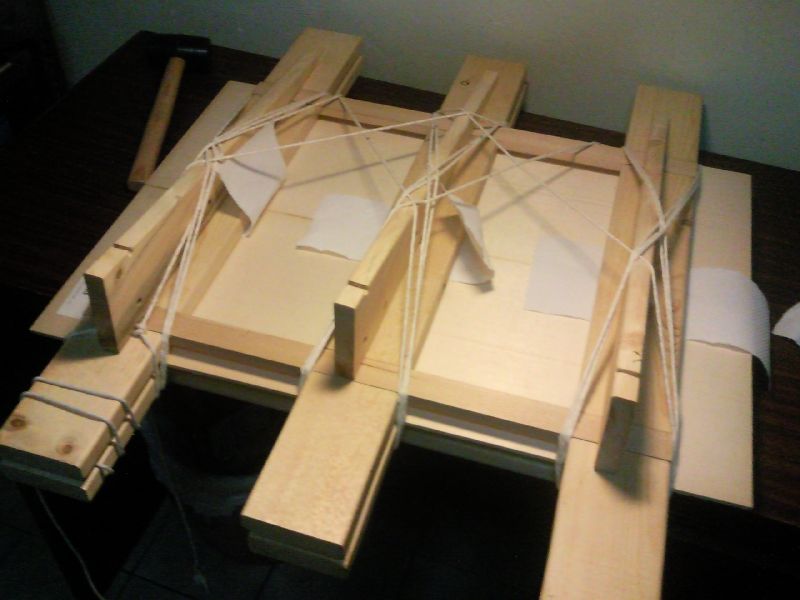
Using the same was as the back, I shoot the top and prepare to do the jointing using HHG (hot hide glue).

I prepare all the thing that I need and heat up the HHG (prepared previously)
  • Top plates
  • Jointing Jig / wedges
  • HHG with baby food warmer
  • Glue brush
  • Rope
  • Mallet for hammering in the wedges
  • Hygrometer


So I started the jointing process and with HHG I had to work fast (so no pics...)
I first laid the paper towel (to be scrapped /planed away after jointing).
Making sure the edge is the correct edge, I proceed to apply the HHG to the wood
and lay the wood on the bottom part of the jig.
Then I covered it with the top with some more paper towel and the top part of the jig
and started to tie them up.
Finally using the mallet I hammer in the wedges to tighten up the joint.
All in all it took me just less than 5 minutes to assemble the joint.
Then I proceed to clean up excess glue using some warm water.


Preparing the necessary materials / jigs / tools


HHG


Glue join and tie them up


Hammer the wedge to get a tighter joint


The joint close up view


After the next day, I remove the wedges and ropes.
When I wait for the glues to settle, I blew the dehumidifier at the top driving the RH down to 45%.


Removing the wedge and loosening the ropes


The top jointed


Looks good


The whole top

Jointing the back
I joint the back too the same way I joint the top.
But this time round I managed to find some wax paper.
It's actually the backing for stickers.
When I remove the strings, the paper didn't stick to the back at all.
The back's joint seam is not as good as the top, but luckily there will be a reinforcement strip (behind) and a backstrip inlay (front) in the middle seam.


Preparing the glue. The wax paper in place


All glued up, the dehumidifier driving the RH to about 43%


Glued back


The glued back with the plantilla drawn


Top and back

2010-07-05

Neck Making

#3 Neck Making: V-joint
I was busy making lots of jigs and mould recently so haven't really got time to post any pictures.

Anyway I started on another neck for my #3 guitar though I haven't decide on the back and sides material.
I am thinking of a cypress with an Torres FE17 plantilla.

After seeing many people making a neck with a Romanillos V-joint (mortise and tenon), I decide to attempt it.
There are lots of valuable resource on the forum which I participated

  • Covered/Fussen V-joint (Hauser) by David Schramm (A luthier who build great Smallman style guitars and did his research on Hauser guitars) on the Delcamp forum

  • V-joint tutorial by Waddy Thomson (An amateur luthier who build in the Romanillos style) on the OLF

  • V-joint tutorial by Joshua French (A Houston-based luthier who builds in the Romanillos / Torres style with Tornavoz) on the OLF

These great resources helped me a lot on how to build a V-joint.
So I did just that.

The scribing and sawing part was easy but the fitting part was tedious.
In the end I had to saw away the 1st V tenon i did and redo it again.

Here are my steps:

Marking the head angle 9 degrees (as per David Schramm). I choose a lesser head angle than my scarf joint is because my neck black was just about 1" thick.
If I choose a steeper angle I would need a thicke neck blank.


Making the triangle 1st with pencil.
After that I went through the making with a scribing knife.


The side view. You can see the 9 degree angle on the V.

Then I use my 1" paring chisel to chisel the marking to make it more prominent and easier to saw.


Using the chisel to make the marking more prominent


Fully scribed, ready to saw.

Then I proceed to saw away the wasted area.
I use a douzuki saw (Japanased backed pull saw) to do the job as it has very thin kerf and is able to saw in a straight line.


Sawing the wasted area


From the top end


Sawn V tenon


Another view


Side view

Then I proceed to clean the sawn area.
This is where I failed, in the end the V tenon's angle all got messed up.
I reviewed David Schramm's video on how he did the clean up and follow his method.
I planed the angle into the front face of the tenon and put a 90 degree wood to serve as an reference to clean up the V tenon.


Checking the head angle


Then I use the same face to draw the mortise part and saw the mortise on the head blank.

Saw away the mortise part. Note my sharpened chisel, the mirror surface.

After than I proceed to fit the V-joint this is the most taxing part.
I am using hide glue and to glue well the joint must not have any gaps.
Hide glues doesn't glue well when there are gaps.


The mortise and the tenon


The fitted V-joint (still need to plane the head part to correct thickness)


From behind view


I use the shooting board (one of few jigs that I am making) to remove the end grain during the fitting process


Jig makinng: plate jointing jig
I spend my time making some jigs.
Here's the story.
When I want to glue the head plate for my #2 neck, I found that I need to join the back first and use the cutoff for the head plate.
So before I can join up the backs, I need a shooting board and a plate jointing jig.
So I made this plate jointing jig based on the LMI jig.


The plate jointing jig


The top on the bottom part of the jig.
A top plate would cover the 2 plates and a rope is use to pull the 2 plates together.
Then the wedge would be inserted to exert more pressure on the 2 plates.

Shooting Board and Preparing the back for Jointing

Well I made a shooting board for shooting and jointing.
And then I began to prepare the backs for jointing.
Using my 16" MuJingFang wooden plane with a sharpened blade I began to even out the edges.
At first I apply the clamp the the 2 boards but in the end I discover as I need to take out often to do a light thru' check, I just simply hold it in place using hand.
There is a stopper block at the end of the shooting board.

When I do a light thru' check, I hold the pieces up against my table lamp and check which part of the 2 boards emits the light.
Then I shoot more of the touching areas (no light area) and even out the gaps.
I stop when I don't see any light thru'
It's really a great learning experience.
Next to come will be joining the 2 backs together but due to the weather (raining)
I decide to leave it for next time. (When it's raining the RH will be too high)


The shooting board and the 16" MuJingFang plane and the IRW backs


The shooting board and the 16" MuJingFang plane


Shooting


Holding with the left hand


Holding up the piece against the light to check for joint closeness


The 2 back pieces ready for jointing

2010-04-19

Neck making

Neck making
I started making the neck for my Guitar #2.
I was deciding between a V-joint or normal scarf joint for the neck but in the end opt for a simpler scarf joint.
After all Torres also did a normal scarf joint.

The main reason was that my neck blank wasn't thick enough so for a V-joint I would need too attached a piece of wood to thicken that part.
Also V-joint needs more precision cut.

Anyway I got my new tool: a Ryoba saw (double edge Japanese pull saw - 両刃鋸).
First I marked out the angle of the head stock, 15 degree and enough wood for doing the headstock shape (probably a Torres 3 bun head stock).
Then I proceed to clamp a guide block and started sawing.

The saw did drift and my cut wasn't perfect.
I stopped and cut from the other side.
The rest was corrected by using the plane.
My new sets of long wooden plane does help but the greatest help was my wooden MuJingFang block plane especially in leveling the scarf joint surface keeping it square and flat.
Constantly I will check for squareness and flatness of the joint.

Once I can see no light at the area I proceed to glue up the scarf joint.
I used the hide glue which I had kept refrigerated for the past month.
It didn't smell bad so I proceed to use it.

Here are the pictures:


Guide block


Sawing with my ryouba nokogiri


Top view - can see the scarf joint angle.


Jaggered edge - due to my lousy sawing no fault of the tool just my skill.


Another view


Planing the scarf joint flat


The MuJingFang block plane really works wonderfully.


Checking the squareness and flatness


Checking the flatness


Preparing the hide glue


The scarf joint snug fit


Clamping the joint after applying the glue


Top view


Another view

After I removed the clamps and examined the joint, the joint looks pretty well done.
Hide glue really holds the 2 pieces together pretty strong, well at least it feels so.
Then I proceed to remove the woods in the head but it was sure hard work to remove so much wood by a block plane.
How nice if I had an CNC router machine programmed to make a neck...


The joint after gluing looks pretty good.


I don't have any wax paper so I just use a paper towel.
Those area will be removed by planing anyway.
I think I should get some wax paper... for top plate jointing.


Preparing to thickness the head


Thicknessing the head


After rough thicknessing the head, there is some tapering.
But I haven't exactly measured the exact thickness including the headplate and veneer


Sawing the neck using a ryoba