20150924
The haze is getting bad these few days hitting 300+ regions hazardous..
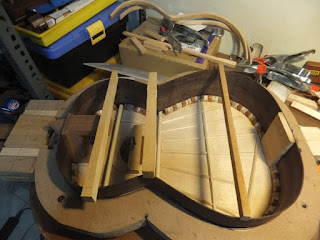
Assembling the guitar is one of the most satisfying stage of the build.
Maybe it's because the guitar will take shape.
Anyway for this #9 I began to assemble the guitar.
To ensure the fitting of the various part I spend quite sometime aligning the various parts in the pre-assembly stage.
With the use of the side mould the assembly process is much easier and more accurate.
Previously for normal guitar (non-elevated) I was using the movable stops, but they weren't too accurate in ensuring the plantilla shape of the guitar.
The side mould work much better.
The assembly process is quite simple; glue in the end block, glue the peones or dentelleones, glue in the neck side wedges.
So I began by dry fitting the end block which was sanded smooth and the surface aptly prepared.
I check to see how many clamps were needed and where to clamp to ensure maximum fit.
After that I began to heat the parts and began the gluing process.
The clamps were applied swiftly as I have done the dry fitting process.
Next I began to glue in the peones.
I tried 2 white blocks (same material as the back lining) and 1 cedar block.
This will make the looks more interesting.
As the glue I use is hide glue, I just need to hold the block for a while before continuing to the next.
The hide will pull the 2 surface together as it dries.
Next I glue in the wedges.
The wedges were pre-fitted before so it's just a matter of applying the glue and hammer in the wedges.
20150927
After the clamps are removed, I saw away the excess end block and wedges.
After that I began to profile the sides and the foot.
The profile is based on the curve block which I made sometime ago.
Normally it requires sanding but I just profile with the block plane which is faster.
20151011
I worked on the back lining, to profile it with a nice smooth profile.
Originally I use a dremel-typed rotary tool (RTX) to profile it but the result wasn't too good.
In the end I just use a chisel / marking knife to shape it manually and then sand it smooth.
I also consider to option of using ABW (African Blackwood) for the side braces.
Amongst rosewood they are one of the more stable rosewood available and more importantly they are heavy.
It will add about 400g of side mass to the sides.
This will help to lower the top resonance which is beneficial for Bouchet-braced tops as they tend to have high resonances.
Furthermore the lowering of the top resonances does not require the addition of mass on the bridge which is good.

Thinking of using these for the side braces. They are heavy and stiff and stable.
It will add about 400g of mass to the sides which helps to lower the top resonances by 6 Hz or so.
This is beneficial for top with Bouchet brace design without adding mass to the top.
20151015
I made some side bracings from African Blackwood.
Ooo they are sure heavy and hard(which is good).
It's damn difficult to saw by hand.
I had to sharpen the saw now and then after a few cuts.
For the 2 main side brace to support the main traverse brace, I use some spruce.
However due to continuous lining, I haven't figure out how to exactly to mount the side braces.
They have to be inlet-ed in to the lining for sure but how exactly to accomplish that is still a mystery as of right now.
I also cut up some back braces too.
20151022
I worked on the back braces.
The 1st back braces was fitted to the foot.
The Spanish foot will support it from below thus making a very rigid part at the neck / heel area.
This region is prone to lots of tension from the string pull.
Thus by strengthening this part the deformation will be reduced.
I use the Aluminium rule to check the back curvature.

Cut the notch in the back brace. There is still a lot of meat left in the brace so this does not compromise it's strength


No comments:
Post a Comment