
Well it's been a while since my last post and I have cleaning up my work bench.
Done up a rack for storing all my tools and woods but haven't sticker the woods in place yet.
Finally I choose a day where there was no rain to do the top plate jointing.
Using the same was as the back, I shoot the top and prepare to do the jointing using HHG (hot hide glue).
I prepare all the thing that I need and heat up the HHG (prepared previously)
- Top plates
- Jointing Jig / wedges
- HHG with baby food warmer
- Glue brush
- Rope
- Mallet for hammering in the wedges
- Hygrometer
So I started the jointing process and with HHG I had to work fast (so no pics...)
I first laid the paper towel (to be scrapped /planed away after jointing).
Making sure the edge is the correct edge, I proceed to apply the HHG to the wood
and lay the wood on the bottom part of the jig.
Then I covered it with the top with some more paper towel and the top part of the jig
and started to tie them up.
Finally using the mallet I hammer in the wedges to tighten up the joint.
All in all it took me just less than 5 minutes to assemble the joint.
Then I proceed to clean up excess glue using some warm water.

Preparing the necessary materials / jigs / tools

HHG
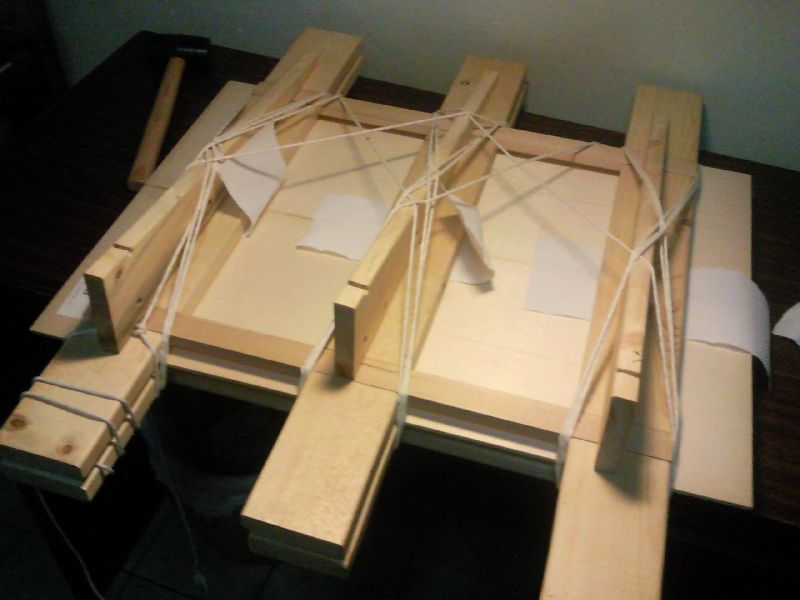
Glue join and tie them up

Hammer the wedge to get a tighter joint

The joint close up view
After the next day, I remove the wedges and ropes.
When I wait for the glues to settle, I blew the dehumidifier at the top driving the RH down to 45%.

Removing the wedge and loosening the ropes

The top jointed

Looks good

The whole top
Jointing the back
I joint the back too the same way I joint the top.
But this time round I managed to find some wax paper.
It's actually the backing for stickers.
When I remove the strings, the paper didn't stick to the back at all.
The back's joint seam is not as good as the top, but luckily there will be a reinforcement strip (behind) and a backstrip inlay (front) in the middle seam.

Preparing the glue. The wax paper in place

All glued up, the dehumidifier driving the RH to about 43%

Glued back

The glued back with the plantilla drawn

Top and back
No comments:
Post a Comment