I bought the new Sloane tuning machine when I saw the Stewmac advertise on their home page.
Now it comes with bearing; in fact 2 of them.
The worm and worm gear fits precisely, there are no backlash.
As I turn it, I feel that it is tight but smooth.
Overall I rate it a well-worth tuner at this price range.
Welcome to my guitar building blog.
This blog describes my journey into the world of guitar building.
I like to share my experience of building and hopefully it can be of some help to all the guitar making enthusiast.
Hope you enjoy my blog post!
2013-01-14
2013-01-07
Assemble the Guitar
20121128
It's ... assembly time.
Now that all the dentellones are prepared I can start to assemble the guitar.
But first of all I need to glue the heel block to the top.
Previously I had drilled 2 guiding holes so after applying the hide glue, I inserted the drill bit into the holes for alignment.
It's a lot easier to pull metal out than to use wood.
After it dried I check the alignment with the neck perfect fit.
20121130
After that accident on the top I am ready to proceed.
Cracked Top
I tested the repaired top and it is sturdy as a rock.
The cracks aren't that visible.
Anyway I have learnt my lesson (hopefully) and place the top safely back into the solera.
No more hanging of tops anymore.
I put in back the side molds and align all the pieces carefully.
Luckily I had pencil markings previously it wasn't hard to align them.
I place in the sides and cut the wedges to a smaller length and check the fitting at the heel.
One side fits well and the other side I probably need to adjust the wedge angle to close a small gap.
I check the repair patch and 2 of them sits in the path of the dentellones and so I repmove those parts.
Finally the assmebly stage is set and ready for gluing.
Oh I just remember I need to put in the 3 big side brace for the 2 UTB LTB and the lower bout portion
They will serve to hold the back braces too.
I will make from end block with the grains parallel to the sides.
The rest of the side braces will be cross gain to the sides.
Not much update actually, I was waiting for a good weather to continue the assembly but it seems now is the rainy season and it rains everyday.
Looks like I wont be able to continue until next year when the weather clears up.
But meanwhile I will be concentrating on the guitar 4.5 10 string guitar.
Post coming up shortly!
20121231
I prepare the side bracing for the lower bout, LTB and UTB.
I cut the blocks from a end block blank; they have parallel grains as the sides so as to prevent stressed.
The rest of the side struts will be perpendicularly grained.
These 3 blocks (each side) will also be supporting the 3 back braces
One of the special feature is the lower bout side brace block; it has embedded nut to allow fixing of weights to the lower bout sides.
This feature will load the side to create more impedance on the sides so that the top vibration will be harder to transmit to the sides.
The end result will be a more vibrant top.
The result was discovered and experimented by Trevor Gore, I read it from his 2 volume of book on guitar making and tuning.
If you are serious about guitar making >this 2 volume are the book that you should get. After cutting to size and fitting the curvature to the sides, I drilled a hole and embed the nut inside.
After that I close the hole with a piece of spruce to prevent glue from entering the hole when I glue the block to the sides.
The fitting of the waist block was the hardest due to skew curvature at that part.
Also because of the elevated fretboard, the top itself was curve up so the base of the side block need to be fitted to the top.
Finally it's the block need to be fitted to the UTB and LTB.
20130105
Finally the day has come for the actual assembly.
It has been raining for the past 1 or 2 months.
After waiting for a good weather, I finally got it.
The weather was fine and the forecast was good too!
It did rain in the evening though but it's OK
I heat up the hide glue and started to glue each dentellones or peones to the sides and top.
For the upper bout I need to correct for the tilt
But it's not too difficult.
I use chisel instead of a plane.

Correct the skew for the dentellones. The bottom piece is the cut off from the neck. It has the same angle as the sound board tilt.
20130107
After the glue dried, I began to trim the overhang.
Well I could have use a trimming bit but was lazy to set it up
Anyway the rebate place and chisel was pretty fast too and not to mention safer.
After that I tap the top it remind me of my #1's tap tone at this open back stage.
The treble side sound tighter and more focus and bass side looser and more bassy.
I think this build has good potential.
2013-01-06
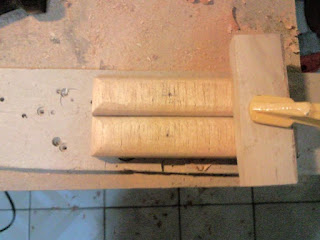
Making the radius stick (sanding block)
I made a radius stick sanding block for the back.
Nothing special here draw the arc, spokeshave it and ensure squareness.
Finally glue some ply wood to join the 2 sticks to have enough area for sandpaper.
Nothing special here draw the arc, spokeshave it and ensure squareness.
Finally glue some ply wood to join the 2 sticks to have enough area for sandpaper.
Subscribe to:
Comments (Atom)


