Thicknessing the top
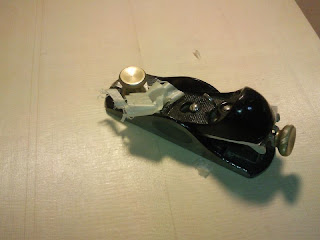
I haven't got around repairing the rosette but I started to thickness the top using my block plane.
Actually I think the only 3 planes that I use now are the 2 block plane, one for normal use and the other for end grain.
The other plane is the long 40cm MJF wooden plane for jointing tops / backs.
After adjusting the mouth and iron, The thickness is pretty easy.
Thicknessing the top.
Another view
Close up
Making the wheat pattern purfling
I decide to make the wheat pattern purfling.
So I cut 2 pieces of 1.5mm thick black fibre and 0.6mm thick white fibre board.
Then I glue them togther and clamped them using 2 90cm long pine plank.
After releasing the clamp I started to shave the sides to align the 3 layers.
I followed the instructions in the John Bogdanovich book but didnt' use as many layers as I don't have a bandsaw so will be sawing by hand.
I don't think I will make the purfling as long as the book instructed.
Shaving the purfling
Close up view
I continue the wheat purfling making by making a jig that allows me to saw at 15 degrees.
Then after making the jig I realise I can make use of it to saw the scarf joint for my neck.
What a jig! killing 2 birds with 1 stone.
Gluing up the jig
Sawing the purfling
Can be used to saw the neck blank.
This is a just a scrap pine blank (which I use to make the jig).
The jig with a variable mouth opening.
Currently it's secured by clamps only.
And so I began to saw the pieces.
I use the ryoba to saw but after sawing I noticed the edges are jagged...
That would mean I need to plane them smooth before gluing.
Also the next cutting, I would need to cut thicker in order to cater for the thickness to be plane away.
Cutting the pieces
The clamping set up. Well I should have use a wider base for easier clamping
Uneven surface
The other cut end
Close up view
Ready for glue up
Glue the strips using some blocks of wood.
After that I clean up the edges
Planing the edges
The end result quite good.
Those wastes. I wonder if I have a bandsaw would there be less waste?
Sawing the individual piece with the diagonal pattern.
The LH is to make sure the saw is following the jig.
Once the cutting groove is there I can just follow the cutting groove
A wheat pattern with a centre white strip. It's about 10mm in width right now.
I will thin it further.
Cutting a 2nd piece, notice the mirror effect in the saw blade?
The pieces ready to be glued together ends to ends.
Packing my woodstock
Well I took the opportunity to pack my zoot too.
So far I have collected several sets of Quilted Maple, Flamed Maple, Paduak, Bloodwood, IRW, MadRW, Cypress, Bubinga.
All of them are waiting for me :)
My back and sides zoot. All stickered nicely.
The neck woods are used as a weight to hold them down
Repairing the rosette
Finally I got around to repair my rosette.What I do is to make a outside and inside mould for the rosette and sand the tiles to size.
I use the flycutter to cut the mould, but this time round I use the power hand drill instead of the battery operated drill.
It definitely has more power and cuts more cleanly but the dust flew everywhere...
The outside and inside mould for the rosette
The tiles need to fit in the channel
Maybe I could add a MOP / Abalone inlay in the rosette...
Almost done. But the inner circle is the one I did previous at a much smaller radius
This mean that I might not have enough space to put a wheat purfling at the inside edge...
Need to calculate more in detail.
My New Workbench
Well I gave up trying to make the legs of my new workbench.
Instead I just slap the piece of the heavy 1" thick MDF on my existing study table.
Voila! My new workbench.
The MDF is so heavy that even I didn't fasten / glue it to the existing top, the whole assembly is very stable.
Luckily I had this idea now I got a much bigger and stable area to work with.
My New Workbench!
I did a jig for being able to clamp things vertically.
It's basically a right angle board for me to clamp things to.
This will be useful for planing perhaps and working on the guitar's butt area.
I just simply bought to rack support and screw is to a double thickness plywood.
The jig is clamped to the table top.
The board jig
Clamped to the workbench top
Guitar #1 sound clip
My guitar #1 soundclip:
The piece played is El Testament d' Amelia by Miguel Llobet.
The mic used is MXL USB stero mic (large diaphragm condenser mic) at a distance of about 50 cm away from the guitar.
There are some background noise from the TV though please pardon that.
Some more new clips.
All pieces by Agustín Barrios Mangore
Aconquija (intro only)
Listen to the lovely harmonics of the guitar.
A 2nd version of Aconquija (played slower)
Aconquija (2nd version)
Francisco Tárrega's famous
Lágrima
(It's the default test piece for guitar in the Delcamp forum)
La Catedral I (Preludio Saudade)
La Catedral II (Andante Religioso)
La Catedral III (Allegro Solemne)
I love hear all the comments on the sound recording.
But I must say not as an exaggeration, the real thing sounds better than the recording.


