I had just changed a new job recently so not much leave to take to make the guitar.
Anyway I managed to do some more things:
- Bend the side back to shape to eliminate any spring back
- Shaving of braces to 7mm wide and 3mm tall (Torres fan)
- Plane the topboard to between 2 to 3 mm thick
Side Bending
I use the Aluminium pipe coupled with the heat gun to bend the sides.
To bend the side the heat gun have to set to about 75% full power which is quite hot.
Without a thermometer I can't really tell how hot it is, but I guess its quite hot but not as hot as stove. (Because I bend w/o wearing any glove)
Now as a safety precaution, you should always use a glove to bend.
The hardest part of the bend, was the waist.
I let the gun blow hot air onto the waist to heat it up.
Then I slowly press onto the heat pipe and rock the sides around the heat pipe.
No spraying of water was used as I found it to be unnecessary.
Well I nearly crack the piece, but luckily stop in time to prevent the cracking.
After a few rounds, the waist conforms to the acrylic template which I take as reference.
Then I bend the lower bout to reduce the spring back and then the upper bout.
It was fun; I have never felt more satisfied with myself.
Here is the side after the bend.
There is virtually no spring back, only slightly open at the both ends.
Compare with the previous picture, the spring back was pretty bad.
Bracing
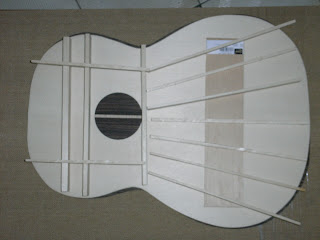
For the bracing, after so many rounds of consideration, I decided on the Torres fan bracing pattern.
The braces are 7mm wide by 3mm and so I began to shave down the braces to size.
I never regretted acquiring the Stanley block planes.
It really makes the whole planing process a joy.
Top
Finally, I manage to thin down the top.
When it came it was abt 3.x mm thick.
I dont have a thickness dial gauge so I cant tell you the exact thickness.
The only measurement was at the edge using a veneer caliper.
After planing I measured the edge was about 2mm. The center which I leave it slight thicker should be between 2 to 3 mm.
Adjusting the stanley block plane was fairly easy.
Using the block plane, I managed to thin out the top board and smoothen it using a scraper.
Here is the braces and the top after the work.
What's next
I think the whole thing is ready for some bracing action.
All I need next, is either one of the 3:
- Get some weights
- Building cam clamp
- Building a screw system
- Building a go-bar deck
Weights
The easiest of them all and requires no building.
However to get dense weight w/o occupying a large area is quite hard to find.
I tried several stationary shops around they don't seem to carry any paper weights...
Cam Clamp
Previously, I had bought some Aluminium bar from the Kelantan Lane.
They were meant for building cam clamps.
However, building cam clamps is a tedious process and I need to source for the wood.
I think I will leave at it for the moment.
Screw System
I was thinking of getting a metal bar across the top board and use a screw and bolt to press down on the brace while gluing.
This is a pretty fast method of building but involves some careful design consideration
I need to acquire alot of screws which may add up quite a bit of cost.
Also it need some making for the screw to attach to the bar and press against the braces.
Go-bar Deck
Finally, the proven go-bar deck system.
I will be acquiring some plywood from a local supplier Chiang Leng Hup Plywood
for about SGD20 a piece for a 2m x 1m x 1cm plywood.
If you are interested you can contact them for the quotes.
The staff are very friendly to deal with.
For the go-bar deck, I just need to do the following:
- Saw the plywood into 2 2 foot square (60cm).
- For the rest of the wood, it will be used as "braces" to support the plywood.
The stress on the plywood is quite great, enough to bend the whole board.
- Drill 4 holes at the edge for the metal support.
- Saw 2 screw rods into halves (which I have acquired previously) (1m each)
I need four of them; 1 for each corner
- Reinforce the board with the struts (glue or nail or screw)
- Assemble the deck accordingly.
For the go-bar itself, I will be sawing some bamboo pole in length excess of the deck height.
Once the deck is up it's easy to add new go-bars, which is the main reason why I will opting for this method of clamping.
Now to acquire the plywood 1st.
Bridge blank
I bought some padauk bridge turning wood for making the bridge, which is an African hardwood.
The turning square is enough to make 3 bridges.
(See the LMI bridge blank compare to the turning square)
According to many makers, paduak is a lighter material compare to rosewood.
The famous Australian maker Greg Smallman is also using paduak bridges to reduce the weight on the top.
Welcome to my guitar building blog.
This blog describes my journey into the world of guitar building.
I like to share my experience of building and hopefully it can be of some help to all the guitar making enthusiast.
Hope you enjoy my blog post!
2007-12-03
2007-10-10
The solera
I managed to make quite a bit of time to do the guitar.
Since I am working on the guitar I thought I might as well make the solera instead of assembling free form.
So I embark on the solera making.
Before I started work on the solera making, I managed to persuade my mum to let up room for my guitar making.
So we clear the room and manage to source an old table for the work.
No more backaches for me (so I have hoped till today still suffering from backache)
Here's the full arsenal I have acquired (minus the power tools)
I drew a 15' arc using 15' string and a pencil.
What best to get a 15' arc.
I wanted a 25' arc but 15' is near the limit of my mum's living room diagonal.
In the end only manage to get a 15' arc.
I will be using this arc to plane the back braces.
With the table I managed to free up 2 hand to use the Stanley #4 smooth plane.
Well planing was a breeze except that when I overexert strength the plane will knock into the wall.
Think I need to get some plaster for the wall...
Well I try to saw a side mold using the coping saw but gave up because the side mold wood plate was too soft.
It wouldn't stand against the spring back of the sides.
While making the solera (work board) I manage to pick up my chiseling skills abit.
I did not have an entire piece of wood so my solera had to be joined.
One of the half's slots was drilled and chiselled while the other half I discovered a way to do it better and faster too: that is using Tenon saw.
The tenon saw (saw with back rib reinforcement) was plain easy to use.
The saw line was straight too.
Sorry no pictures for this part, as I was too engrossed in the work.
In the end here's the solera layout.
Dust was a problem especially since I got a bad cough now.
Got a baby to take care and so I got myself a 3M mask.
It is very effective no wonder people use it during SARS period.
Strangely it's rather comfortable to wear.
So I wanted to finished up the side support stopper.
But the stupid B&D RTX rotary tool heated up too hot (until I smell the burning plastic)
So I could not continue.
The end product - the Solera (minus some side stoppers)
I made a trip down to Kelantan Lane once again wanting to get some screws for making brace clamps.
However as I explored the place I manage to find some Aluminium bars, which is essential in my cam clamp making.
So I purchase enough Al bars to make about 30 cam clamps.
Now just need to source for the wood and time to make the cam clamps.
I also bought a Al pipe and make a heat pipe bender.
For the heat source I use the heat blower; I can also use a propane torch also.
Although my side comes pre-bent, the spring back is pretty bad.
So I need to touch up on the curves before I assemble the guitar.
I tried my hands in the heat pipe bending method.
It wasn't easy though I read quite a bit about heat pipe bending on the OLF and other forums, the experience wasn't really descripable...
I nearly crack one of the waist...
Actually my next immediate task should be bracing the top board.
But before that I need 2 things:
- Clamps: either the cam clamps or the go-bar
- Dehumidifier
I went surfing the internet for local suppliers of dehumidifier.
It seems that this machine wasn't readily available.
Nonetheless I manage to secure a purchase at SGD 500; heavy investment on my part...
Here's the Amcor dehumidifier which I bought: it is able to remove about 15 litres or moisture each day, enough for the room which I am currently making in.
Solera Dome and Struts Glueing
For a acoustic guitar (folk guitar) top, the entire top is domed to some radius 15' or 20'.
For that purpose the x-brace is often shaped to that particular radius and the whole top is glued using a MDF radius dish.
For a classical guitar, only the lower bout is radiused.
The struts of the classical guitar does not required to be shaped to the same radius of the lower bout.
Instead they are pressed into the dome and the shaped is held by the glue.
This technique is often used by the great luthier Antonio de Torres.
Doming allows a thin top (1mm thickness) to acquire sufficient strength to support the tension forces acting on the top
I worked on the solera trying to create the dome in the lower bout but unfortunately the pine solera wasnt really flat.
In order to repair the solera an create a consistent dome I added another layer of MDF on top of the pine solera.
I work on the previous dome i created with the MDF, trying to smoothen the curvature to a 15' radius.
Also I create a 15' radius template using acrylic sheet, using for reference on the dome curvature.
The 15' curvature smoothened.
The new workboard with the MDF layer.
2007-09-26
Soundhole Ring, End Block
I manage to pull out some time to work on the guitar.
So far quite good in progress.
- Did a simple joint on the bridge plate for the soundhole reinforcement
- Finished an end block
- Shaped the back braces for a free form radius
- Braced the back with the reinforcement
- Saw the template out of acrylic
- Smoothen the solera dome (Still not quite done though)
Joining the soundhole reinforcement
I use 3 end blocks to do the joining.
2 for stabling the sides.
1 to compress down on the center joint.
Before I join, i put a metal rules underneath the 2 pieces of wood.
Clamp the 2 side end block to place and remove the metal rule.
Finally clamp tight the center end block.
This way there will be slight pressure on the joint exerted by the 2 side end block.
One thing I forget is to put a piece of wax paper in between the end block and joined spruce.
When I removed the assembly, it got stuck to the end block.
Joining set up
Joined product
End block
For the end block I did not use any saw to thin the thick piece of end block.
Instead I use a chisel and spilt the end block at the 1/2 thickness point.
The runout was pretty bad.
The pieces produced was very uneven...
I had thought of discarding the spilt piece and go for another piece.
Here is where the good old Stanley block plane comes into play.
I plane the splitted block until it was smooth and voila!
The result is pretty good.
The end block
Run out in the end block
Shaping the back braces
I did have any radius dish and so I decide to shape the braces free hand.
Here is where I appreciates my Stanley block plane even more.
The shaping was quite a breeze.
The curve did look presentable
Shaping the brace end
Checking the curvature of the brace
The braces laid in position before gluing
Bracing the back
After the brace are shaping I finally had the chance to braced the back.
I used the Elmer's Probond glue for gluing the braces.
Because of the lack of Cam Clamps I had to use some innovative way to clamp the braces.
The planes are used as weight to press down the center part of the brace
Gluing the back braces
Unforunately after the back is braced I noticed a crack at the top of the back where the Spanish heel is located.
The crack isn't very big.
After consulting the the OLF forum, this could be due to changes in relative humidity.
I did not do any RH control.
Also I suspect it could be due to the curvature being too curved.
According to a respected luthier in the Delcamp forum, the curvature should be about 4mm depression in the center for a 20' radius
I think mine exceeds that...
How to remedy?
I decide to chisel away the 1st brace and redo that brace with a slighter curve.
Also will build some sort of RH control fixture.
Maybe a plastic bag with silicon gel.
Cracked back
While I decide what to do with the braced I did brace carving of the back braces
Shaping it into a curve.
The thumb plane came in quite handy in this case.
Shaping the back brace
Final brace profile
Gluing the back reinforcement strip
Although there is a crack I decide to carry on with the back reinforcement.
Using again some innvovative ways and the weight of the Stanley planes.
Gluing the back reinforcement strip
2007-08-08
Solera 2
Finally I managed to squeeze some time to work on the guitar after several trips of tools and material acquisition
Initially I had planned to make the 1/2 plantila template out of the acrylic sheet that I have bought.
However, as soon as I had wanted to start work, I discovered that the acrylic sheet that I had bought was too short... OMG...
So the next best thing was to make the template out of vanguard sheet.
Well I postponed the template making to the next session after I acquired the correct sized acrylic.
I saw some more struts for the back bracing and the Bouchet style bracing for the top.
Finally I get to use the Stanley block plane.
The quality of the plane really impressed me.
Here is some picture of the block plane in action:
I also worked on solera for the topboard.
Initially I had wanted to use the pine board I got from IKEA for the solera.
However, I think pine wood are abit hard for gouge the centre depression for the top dome.
So I manage to get a piece of MDF just fitting the size of the topboard from Art Friend.
(It is expensive thought cost about SGD 8 per piece)
With the gouge, which I bought from Daiso (SGD 2), I discovered it is very easy to work upon the MDF; almost effortless.
After an hour's work or so the depression is done.
Only thing left is to smoothen the depression so that I can glue some sandpaper to it for sanding the struts to fit in the shape of the depression.
The gouge is a sort of U-shape "chisel".
You can hollowed out the wood.
How much you remove the wood depends on the angle attack.
You can see the top dome depression here:
Finally I use a straight edge wood carver as a scraper to smoothen the depression.
If I had bought the curved shaped scraper from LMI, it would be a better fit tool.
The final step of smoothen the depression was not yet done.
I will need a curved surface block with some sand paper to do the job.
Initially I had planned to make the 1/2 plantila template out of the acrylic sheet that I have bought.
However, as soon as I had wanted to start work, I discovered that the acrylic sheet that I had bought was too short... OMG...
So the next best thing was to make the template out of vanguard sheet.
Well I postponed the template making to the next session after I acquired the correct sized acrylic.
I saw some more struts for the back bracing and the Bouchet style bracing for the top.
Finally I get to use the Stanley block plane.
The quality of the plane really impressed me.
Here is some picture of the block plane in action:
I also worked on solera for the topboard.
Initially I had wanted to use the pine board I got from IKEA for the solera.
However, I think pine wood are abit hard for gouge the centre depression for the top dome.
So I manage to get a piece of MDF just fitting the size of the topboard from Art Friend.
(It is expensive thought cost about SGD 8 per piece)
With the gouge, which I bought from Daiso (SGD 2), I discovered it is very easy to work upon the MDF; almost effortless.
After an hour's work or so the depression is done.
Only thing left is to smoothen the depression so that I can glue some sandpaper to it for sanding the struts to fit in the shape of the depression.
The gouge is a sort of U-shape "chisel".
You can hollowed out the wood.
How much you remove the wood depends on the angle attack.
You can see the top dome depression here:
Finally I use a straight edge wood carver as a scraper to smoothen the depression.
If I had bought the curved shaped scraper from LMI, it would be a better fit tool.
The final step of smoothen the depression was not yet done.
I will need a curved surface block with some sand paper to do the job.
2007-07-12
Solera
Together with my knowledgeable luthier friend EJ, I source for some wood to make the solera at IKEA.
Originally I had called IKEA to find if they sell MDF board.
The sales person replied that they do when actually they were referring to particle board or chip board.
MDF or Medium Density Fibreboard is a made from a uniform medium density substrate.
which is quite different from a chip board (in terms of uniformity) which is made from compressed saw dust with glue.
In the end afer some walk around sourcing, we mananged to find a solid (actually not really solid - joint planks) pine cabinent at an affordable price of SGD18.
The 2 pieces after joining will fit in the guitar body quite nicely.
The additional pieces will cut up into the side reinforcement.
For the bottom piece I will route / gouge some depresssion into the solera.
This is because the lower bout of the guitar is radiused and not really flat.
Bracing
I had some changes in the original bracing idea.
I wanted to add a treble reinforcement bar to the left (treble) side of the top board.
This will make a asymetrical bracing pattern.
The bass part will have 3 struts (including the centre strut) and the treble side will have 4 (including the center strut) making a total of 6 struts fan.
Instead of bridge plate, I will be using a horizontal strut (aka Bouchet)
Tools Addition
I ordered the Stanley planes #4 Bench Smoothing Plane and Block Plane from Amazon.
They are real heavy compare to the China made block plane which I am using now.
So far I have not gotten around to calibrate the planes to the cutting precision required but I have utmost confidence in it look at how well it's made.
No wonder Stanley planes have so good comments.
I tried to adjust and tune the block plane.
The plane allows fine adjustment by turning the adjustment screw adjustment to remove very fine shavings.
Now I know why Stanley planes are so well-acclaimed.
2007-06-25
Some building consideration details
I have not been working on the guitar for a month or so.
Recently I have been thinking about the spanish heel construction; something which I did not particularly favour.
I was thinking more in terms of a mortise and tenon joint fasten on by bolt and nut.
The particular advantage of this method of construction:
1) It allows the neck and body to be work on separately.
Particularly when it comes to installing the fret wire or french polishing the body
2) It allows to adjust the neck angle after assembly. Spanish heel construction there is no way to adjust the neck angle.
That's why a solera is essential in spanish heel construction; it is to built the neck angle into the solera so that the correct neck angle is maintained during assembly.
Romanillos advocate a different method of construction for the Spanish heel.
The neck angle is only fixed at the time when the back is closed.
Instead of 2 narrows slots to grip the sides at the traditional Spanish heel, the slot is widen into a ramp slot.
At the time of the back closing, a wedge is driven into the ramped slot to hold the correct neck angle in place.
This method allows the final neck angle to be adjusted.
Here is a picture of the Romanillos method of construction.
This particular pic is a construction by an amateur luthier RCoates
Neck Angle
Neck angle is the angle where the neck of the guitar makes with the plane of the top board of the guitar.
With forward angle, the neck plane is above the top of the top board of the guitar.
This will cause the saddle to be low, which is essential in flamenco guitars.
However, take note the too much forward angle will cause in determining the saddle height.
The saddle need a certain minimum height and the neck angle cannot be below this minimum height or else the the action at 12 fret would be too high for comfort.
Backward angle will cause the saddle to be high.
An example of extreme backward angle is violin family of instruments.
You can see that the cello's bridge/saddle is a few inches tall.
Zero Neck angle:
Forward neck angle: You can see that the saddle height is reduced.
Backward neck angle: You can see that the saddle height is increased.
NB: the effect of neck angle has been exaggerated to illustrate the difference better. Typical neck angle is very minute in terms of 1 or 2 mm differences at the nut.
See the picture of a Andrea Amati cello from Cremona, it clearly shows the effect of an extreme negative neck angle on the bridge.
Neck Relief
Neck relief is the amount of curvature built into the fingerboard to allow the string to vibrate without hitting the fingerboard.
...
2007-05-17
Some Readup
I did not continue with the project due to some family commitment.
However I have been exploring the OLF forum for some information gathering.
One thing I find that I am not too good is that I like to plan/think too much.
The moment I read about adjustable neck, I began to plan it into my project...
However judging the progress, I doubt it is very feasible.
In order to complete the project I would better off concentrating on the traditional Spanish heel assembly instead.
I order some more stuff from LMII:
- Hide glue
- Shellac
- Bridge clamp
- Bridge blank
I plan to use the hide glue for those removable part like the finger board and the bridge.
This will facilitate guitar repair when I need to remove the fingerboard to repair the topboard.
Also I can use the hide glue to repair my Alhambra which the bridge is detaching.
After I finished my business at TMC, I visited Balestier road's hardware shop.
Somewhere near the end of the Balestier Road just before the road entrance to Whampoa estate I found a hardware shop selling quite extensive tools.
They carry all sorts of tools ranging from China-made planes and power tools like router and router bits.
I bought a thumb plane for SGD15, which the base is made of rosewood, to help in shaping the struts bracing.
Here is the picture:
Also bought another steel box metre rule (90cm actually).
Because of its rigidity I can use it to
1) locate the bridge
2) check for straight edges
3) check for frets height even-ness
I was thinking of getting a manual drill for drilling the headstock holes for the tuner machines.
Till now still havent locate a shop selling that...
However I have been exploring the OLF forum for some information gathering.
One thing I find that I am not too good is that I like to plan/think too much.
The moment I read about adjustable neck, I began to plan it into my project...
However judging the progress, I doubt it is very feasible.
In order to complete the project I would better off concentrating on the traditional Spanish heel assembly instead.
I order some more stuff from LMII:
- Hide glue
- Shellac
- Bridge clamp
- Bridge blank
I plan to use the hide glue for those removable part like the finger board and the bridge.
This will facilitate guitar repair when I need to remove the fingerboard to repair the topboard.
Also I can use the hide glue to repair my Alhambra which the bridge is detaching.
After I finished my business at TMC, I visited Balestier road's hardware shop.
Somewhere near the end of the Balestier Road just before the road entrance to Whampoa estate I found a hardware shop selling quite extensive tools.
They carry all sorts of tools ranging from China-made planes and power tools like router and router bits.
I bought a thumb plane for SGD15, which the base is made of rosewood, to help in shaping the struts bracing.
Here is the picture:
Also bought another steel box metre rule (90cm actually).
Because of its rigidity I can use it to
1) locate the bridge
2) check for straight edges
3) check for frets height even-ness
I was thinking of getting a manual drill for drilling the headstock holes for the tuner machines.
Till now still havent locate a shop selling that...
2007-04-27
Sawing the struts
Til date, I have just started the guitar making process for 3 session.
Here are the details:
Session 1
I bought some tools from Daiso at $2 each.
It is really a good place to get cheap and good tools.
(They do sell alot of other good stuff but that's another story...)
- F-clamps
- Chisels
- Scrap woods (bass wood)
I started the guitar making process by sawing the struts from the block of spruce.
Using coping saw to saw the spruce block is not an easy task; it is very easy to deviate from straight line.
So to cope with that, I deliberately increase the thickness of the marking for at least another 50% or so.
(It is bound to happen actually, so got to think of ways to recover from the mistake.)
This is to leave enough margin for mistakes.
E.g. I need 6 mm thickness I would marked the line at 1.5 cm or so.
The difference would be removed by planing.
At the end of the session I have sawn quite number of struts, but still a long way to go...
One of the important points to take note is that, after sawing the brace, ensure that the surface is flattened by planing it.
This has to be done before you start to saw the next brace from the spruce block.
If this is not done properly, you could end up with a crooked struts.
Unfortuately, some of the struts which I have sawn, exhibit this mistake...
Session 2
In order to alleviate some of the hand and back pains I experience while sawing the struts, I bought a electric Jig Saw.
I bought it at AMK NTUC Extra which cost about SGD40.
Unfortunately after trying to use it for sawing the struts, the result was not what I had expected and very unsatisfactory.
If you think using the coping saw was hard, using Jig Saw was even harder,
especially in controlling it to saw in a straight line.
As a result, regretably, I wasted quite a bit of the spruce block :(
(Luckily I ordered 2 more spruce block, knowing that I would make stupid mistake here and there.)
According to my more experienced friend EJ, who has dabbled quite a fair bit in this art of luthiery, in order to make the Jig Saw cut in a straight line properly, you need a fence guide.
I was thinking of making a mold or something to achieve that.
One of the way is to fix the Jig Saw on a mounting block and use it like a Band Saw.
If that is the case, the the fence guide would simply be another removeable plank hold in place using the F-clamps.
However, making the mount could take some time and effort and my little work bench wouldn't have enough space to hold the mount either.
You need a proper size workbench instead.
Session 3
I have just bought a new digital camera (Ricoh R6) to take some pictures of the guitar making process.
All the pictures shown was actually taken during this session.
I merely backdate it.
I bought some more new tools from Daiso:
- Japanese carpenter saw
- Mallet (for hammering in the frets)
- Clips for clipping the kerfing
- Some screws and nuts (for making the mounts)
- Cork sheets for protecting the wood surface during clamping.
I also bought some tools at Art Friend:
- Adjustable carpenter square (for ensuring perfect straight and perpendicular edges)
- 1 metre rule (for measuring the string course length 650 mm)
- Some more bass wood for scraps
Here is a picture of my mini work bench and tools.
Top to bottom:
- Coping saw
- Adjustable Carpenter Square
- Japanese Carpenter saw
- Plane
- F-clamp
Sawing the brace:
Planing the block before sawing the next brace (Note the F-Clamp at the end to faciliate planing)
After sawing all the braces for the tops, I laid them out on the spruce top board.
Finally I can see the light after labouring for so long...
Here's another view
Bracing design
Explanation about the struts
The topboard is the most important part of the guitar
To support the string tension the topboard would have to be very thick.
However a thick top would not make a good sound and probably hardly any volume at all.
So in order to support a thin top (typically 2-3mm thick), struts of bracing have to be added to the top board to support the pull of the string.
The struts are laid in a pattern known as the fan struts; they fan out towards the lower part of the guitar.
It was developed by the Spanish Luthier Antonio de Torres.
Newer patterns include the modern lattice patterns which has a grid of cris cross struts
What I have in mind for bracing the topboard is something like the Romanillos's bracing pattern.
The upper and lower harmonic brace surrounding the sound hole, would be both open harmonic brace.
(I.e. the struts from the lower bout of the top board can / will extend all the way into the upper bout of the guitar.)
There is open slot for the struts to go through.
You can see some examples of open harmonic bracing at the following site:
- Romanillos Guitar Making Course
- Luthier Jeffrey Elliot's open harmonic bracing
My luthier friend EJ commented that the brace was too thick, so I am going to trim them down further.
Probably I will let the height of the bracing remain at 5 - 6mm, higher than normal height (3 - 4 mm).
After I have strung the guitar up during the final phrase, then I will fine tune the brace height either through the sound hole or an access hole at the end block.
Guitar Making
After playing guitar for 10 over years, I began to inquire into the making of guitars.
After reading about guitar making from several websites and bought a few books about guitar making, I have decide to try it out myself.
The books which I bought include:
- William Cumpiano - Guitarmaking: Tradition And Technology
- John S. Bogdanovich - Classical Guitar Making: A Modern Approach to Traditional Design
They can be found from Amazon
There is a good forum on Delcamp, where the luthiers shares their valuable experience.
I have learned alot from that forum and found another friend EJ in Singapore also interested in guitar building.
He is way more advanced than me in guitar making; on his way to finish his first master piece.
His guitar making process can be found at the following website:
Photo album 1
Photo album 2
Some of the good guitar making site include:
-William Cumpiano's informative newsletters
-David Schramm's online apprentice
By chance, I found the luthier supply website Luthiers Mercentile International (LMII).
I browsed through their catalogues of material and the good thing about them is that they have a kit set for guitar making at a discounted rate
What is even better is that, the kit set can be customised.
Finally after some customisation, I ordered the kit set from them.
Not only do they supply the raw materials, they also do some processing.
I also ordered some of the wood processing service offered by LMII, partly because I don't have the right equipment / tool to do the job (e.g. side bending) and I don't have the necessary experience.
These includes the more tedious processes like bending the side wood, inlaying the rosette and carving the neck etc...
Now all that is left to do, is to assemble the parts of the guitar.
(Shipping was about USD 80 to Singapore, which was affordable.
However do note that any Internet purchase above SGD200 is subjected to GST.
So if you want to get any kit set better get it before the GST hike in July.)
The package arrived in January.
Mine took slightly longer than usual because it was Christmas period when I confirmed the order for the package.
LMII's packaging is very meticulus; every thing is well-bubbled wrapped to protect the materials.
I must say their service is 1st class: polite and efficient; salute to them for their service
Here is some pictures of the packaging:
The complete materials. (Note that I have started to saw some struts)
The materials include:
- Top board: AAA grade Englemann Spruce
- Back and Side: 1st grade East Indian Rosewood.
- Neck: Pre-carved Spanish Cedar with Indian Rosewood veneer
- Bridge: Pre-made Indian Rosewood bridge with compensation
- Binding: Maple binding (pre bent)
- Fingerboard: Pre-slotted Ebony
- Rosette: Pre made rosette
- Tuner: Schaller tuner machine with ebony buttons
- Kerfing: Standard Cedar kerfing
- Brace wood: Englemann Spruce.
Here is the close up of the Schaller tuner machine:
This is a lyre type of tuner machine.
I had originally wanted a Hauser type of tuner machine, but they were out of stock.
Not wanting to wait for the back order I chose this instead.
The main feature about this tuner, which I like, is the black ebony buttons.
They look nice eh?
Subscribe to:
Posts (Atom)