Custom Search

2012-05-24

Making the rosette

Well for the guitar #3 I wanted to keep the ornaments simple, so I decided to do a simple wood rosette.
I had some nice burl wood from RC Tonewoods for the rosette.
At first I tried to use the manual cutter to cut it, but at some portion the wood is brittle and for that part it literally crumbles to pieces when I cut it.
So I resort to my circular routing method and it works fine.


Cutting using the circular cutter.
The rosette.
Routing the rosette
Outer circles routed
Inner circle routed.
The rosette.
The rosette with surrounding purfling. I bought the purfling off eBay.


Then I began to scribe the circle for the rosette.
At first I use my manual cutter to scribe and concentric circle then chisel it.
I discover I was too slow... (I didn't have much time to do it)
So I resort to my B&D RTX (dremel equivalent) with the circle jig.
Thing got fast and because the outer and inner rims were scribed, the circle didn't appear too bad.
The inner was remove using chisel but much less materials to removed.
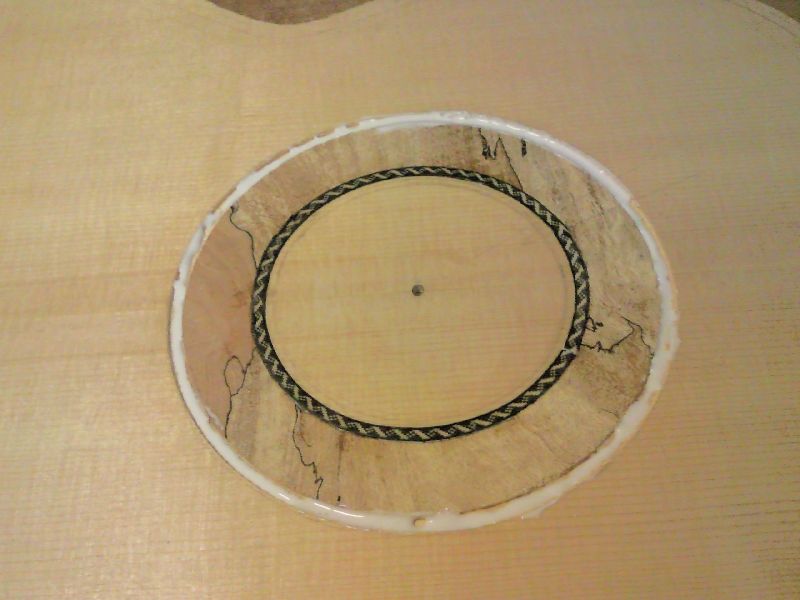
Then I threw in some PVA glue (dries transparent) and glue and clamp the rosette.
The fit wasn't too great but since there will be a purfling border I guess it should not matter too much.
The purfling channel however must be perfect, as there will not be any more room for error.


Scribe the circle
Rings of concentric circle
Chiseling time
Cutting the channel with RTX (dremel). Still have some more waste to remove with chisel.
Testing fitting the rosette in the channel
Base of the channel almost flat by using the chisel.
White PVA Glue in the channel
On the rosette too.
Glue in the rosette with squeeze out cleaned.
Rosette clamped
After I removed the clamps, I check that the burl rosette was inlaid quite nicely.
I shave it down using my Stanley new sweetheart low angle block.
After that I began to scribe and inlay the inner channels.
After scribing the outline of the channel, I use the RTX to remove the materials.
I test fit the purfling and it went it snugly.


Leveling the rosette with a LA block plane (new Stanley Sweet heart low angle block plane)
Almost leveled
Looks rather nice.
Scribing the channel
Test fitting the purfling
Inner ring test fitting done. Looks OK.
Now when I was doing the outer ring I made a terrible mistake...
I switch to a 3mm router bit I thought it was a good fit for the purfling.
What a mistake I made.
First I route too deep and 2nd I routed into the rosette.
What is worse is that I have already scribed the channel...
Now the channel is too wide at some parts.
What can I do at this point? nothing.
I just glue in the purfling and indeed the outer channel is too deep and it can't stay there.
Start to glue in the purfling
Inner ring done nice and tight.
Start gluing the outer ring
The purfling doesnt want to stick insider the channel....
I have to resort to tape to stick it back into the channel.
From far the rosette looks quite nice.
Front view
Near view.. you can start to see all the mistake. Inner ring is nice but not the outer ring. Lesson learnt never change method 1/2 way... Argh...

2012-05-21

Making marquetry

Well I thought of doing some marquetry tiles for the rosette.
I have always wanted to try to make some.
The first I have in mind is a diamond surrounded by a rectangle border.
This kind of pattern was used by Torres, Romanillos and other luthiers.
The steps on one to make the pattern was described in Romanillos' book on Torres; making the lozenges pattern purfling.
However, I am not going to make the small sized fine pattern as it requires the use of table saw or band saw to saw thru' a continuous long wood block.
Instead I am going make the size of the diamond about 3mm big as dictated by the thickness of my headplate :)
My steps are as follows:
1) Sandwich the central diamond piece by 2 surrounding piece. Make sure they are all of the same thickness.
2) Plane away the protruding part from the assembly when the glue has dried
3) Glue 2 more piece substantially wider than the central diamond above and below it.
4) Plane the overall assembly in an diagonal way such that the central square is now orientated in a diamond
5) Slice the assembly in to tiles the cross-section shape should show the diamond

Sandwich the central piece with 2 sides.
After the protruding central piece is planed flushed with the 2 sides, glue 2 pieces 1 on top and 1 below.
Shows the x-section of the assembly
Start planing the border
The final diamond or lozenges tile.
The white diamond too :)

2012-05-05

Guitar #1 vs Guitar #2

Well Guitar #2 is done.
I brought #1 over and compared with #2

Here are the clips
Projection test @ 5m away from the mic. Now which is which make a guess?
Answer at the end of the post

Lagrima
Guitar 1
Guitar 2

La Catedral 1st movement
Guitar 1
Guitar 2

IMO #2 treble is better, has better sustain and the harmonics are richer.
#1's treble has more fundamental and the harmonics seemed to be a further distance away.
Bass wide #1 bass is more even and #2 need more effort to bring out the bass.
The volume wise, #1 just a little louder than #2.
Overall they are similar but yet different.
I used both Aquila Albastro strings on them.
The Aquila nylgut string always works well for Torres fan bracing guitar. (exclude Hauser bracing)

When we compare to the redgate, both of them are louder than the redgate...
Redgate's note are very even much like a piano.
Bach pieces sounded nice on the redgate but not Spanish pieces where the notes need more character.


Guitar #1 on the left and Guitar #2 on the right

Guitar #1 on the left and Guitar #2 on the right

Towards the end of the session, the #2 did open up and seemed louder.
The bass became more prominent.


Ans: 1st guitar is #2 and 2nd guitar is #1, now which one do you like?