Custom Search

2011-05-11

New Wood Stock Collection

I have ordered some new woods from Prosono International.
2 sets of Pink Ivory
1 set of Mopane
1 set of African Blackwood
What can I say, they are beautiful

I also order a Black Limba set from a fellow luthier @ the OLF


Update: I probably can resume work next month.
The house upgrade / renovation is done.
But I still need to paint the walls and ceiling, the walls are done and now left with the ceiling. Yeah!


Here are the pics:

The package arrived


The four set of woods, stickered nicely

Pink Ivory (3 piece back)

Pink Ivory (using 2 large piece of the 2 sets)

Pink ivory set 2

Mopane (master grade)

African blackwood, 4 piece back but I only use 3 of the 4 piece piece with a Torres FE19 plantilla

They actually use ABW cut-offs to sticker the wood!


Close up of the sticker woods


Black Limba


My Lutz spruce (Picea Lutzii) from Shane of High Mountain Tonewoods also arrived in this month.
Well they aren't the best grade, like my previous batch of Lutz spruce (AA) but the quality is equivalent.
Tonewood grading are actually is misnomer; it is graded from it's appearance rather than it's quality.
So a master grade tonewood just simply means it looks great; it has no direct bearing on whether it's a great / excellent / lousy tonewood.
However usually those graded in AA and above are quartered-sawn as opposed to those in the A grade and below.

Anyway this batch of spruce is graded A, it's well quartered and supposedly to be in the AAA grade or AA grade but it was downgraded due to it's cosmetic flaws.
There are knots and sometimes in the center of the tonewood.
Most of the sets (13 tops) I can do a 2 piece tops with the knots moved to the outer sides.
But some of them the knots are right in the middle.
So I can do a 4-piece tops or maybe mixed it with WRC?

Here are some pics of the spruce.


2011-02-23

Making the Meander Tiles

Some updates: My workshop apartment is undergoing some major upgrade, (changing of all the sewage pipes, water pipes etc...
So unfortunately, I won't be able to work on my guitar for a few months :(
Hope to work my guitar soon.

I wanted to have a thick back strip for the guitar, and also possibly decorate the head-plate too.
So I thought of making a meander tile for it.
I originally thinking of a more complicated 2 fold meander pattern but settled for just one fold.

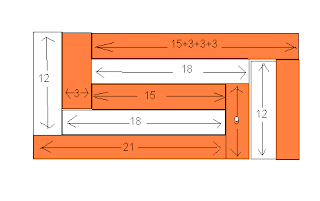
I started with the paper and calculated the width of each of the piece on the paper.
The centre strip was 15mm wide, and each piece thickness was 3mm.
So I add according and came out with a list of the width to cut.

I use Basswood for the white part and Indian Rosewood (double length head-plate) for the dark part.
To cut the strips from the head-plate I use my purfling cutter tool and it works like a charm.
I measure the width from the caliper (with some allowance) and set the tool width according.

Then when I cut the strips I just need to make sure the IRW / basswood edge is straight (by shooting on the shooting board) and then exert a constant pressure on the edge while i glide the purfling cutter on the head-plate.
I score on one side first and then flip on the reverse side and continue until it cuts completely.
Then I shoot both pieces to get a straight edge.
The main piece has to be shot to be straightened too, for the next cut.

Here are the pics:

Planning for the Meander pattern.
Nearly did a width calculation mistake for one of the piece (less 3mm)


A clearer picture of the design.
All dimensions in mm.

Measure the width setting on my purfling cutter.

Shooting to straighten the edge.

Cut the strips from the head-plate.

Dry assembly looks good.


The gluing part needs lots of clamp and clips.
Luckily I have lots of clamps around.
I use normal PVA white glue for the job because of the open time.
Anyway it dries clear and it's not structurally crucial, so PVA glue will suffice.

Gluing the 1st strip

Simple just use the clips

After some pieces. The meander is taking shape

More clamps are employed as the meander tiles gets thicker

S-shape formed

More clamping

Amost done.

Tada... Completed


Next to come is to cut up the tiles.
So in order to cut properly I made a miter box to be used with my douzuki saw.

Miter box for cutting up the tiles

Another view

Using the miter box.
The right block is thicker than the left.
It's meant as a stop to control the thickness of the tile slice.

Sawing the tile

The full view of the set-up.

The 1st tile sawn. So far so far

The pattern forming up.

My meander back strip (dry assembly).
The 2 white lines are for the look and feel.
The actual one will be thinner.

After a number of tiles sawn.
You can see the dust piling up.


My collection of tiles ready for installation. 
Should be able to inlay on 2 or 3 backs.

2011-02-02

New Plane Iron Upgrade from Lee Valley

I bought new a A2 plane iron / chipbreaker set from Lee Valley for my #4 Stanley smoother.
The chip breaker is about .125" thick made of O1 iron and the plane iron is about .1" thick
I didn't sharpen or hone it; it looks and feels sharp out of the box.
I had a test run on some pine (softwood) and it shaves like butter, thin slice some more.
Anyway I need to re tune the frog to adjust for the new iron / chipbreaker set.
I have to try it on IRW 1st will report back the finding on the performance of the new iron.

Here are the pics:

My new plane iron  / chipbreaker

The Lee Valley A2 plane iron

The Veritas chipbreaker
(Veritas is same as LV)

The plane and iron

L (the stock blade and chipbreaker)
R (the upgraded LV set)
It is noticeably thicker and feels good also

2011-01-25

Go-bars

I saw up some go-bars from a kite making fibreglass rods which I got from GoodWinds.
I also got some carbon fibre rods from them for reinforcing the neck.
The rods came in a 4' length and so I saw them up into 2' length and install the caps.
But the caps were abit loose so I attach some tape to the ends to make it more fitting.
Now I just need to find a container to hold them...

2011-01-18

Tuning up my handplane.

I took some time to tune my #4.
I took out my #4 and flatten the base with a 100 grit sandpaper.
Took my 3 pieces of sandpaper a few hours of sanding and it's still not quite flat...
But after that I smoothen it using 1000 grit.

I also adjusted the frog, making the alignment more perpendicular.
The mouth was made closer too.

Think I need to get more rougher grit to level that animal.
Anyway it did manage to shave thin slices of pine wood.
I am thinking of an plane iron upgrade, probably aiming for LV plane iron or IBC plane iron

After the #4 I proceed to flatten the base of my Stanley block plane 9 1/2 normal angle.
This time round the base was flatter, but still not as flat as I like it to be.

Here is the pictures
My entire plane collection.
Last Row: Anant #8 Jointer (the screw is screwed...)
2nd Last: On the left 3 MuJingFang 3 planes, MJF high angle block plane, MJF bullnose rabbet plane MJF (copy) smoother plane, Stanley #4
2nd row (middle): MJF compass plane convex, MJF concave compass plane, MJF mini straight plane, MJF mini block plane.
1st row: Stanley spokeshave, Stanley premium low angle block plane, Stanley 9 1/2 block plane, original block plane iron, Seagull block plane (My 1st plane).

The #4's base you can see it's starting to shine. But it can certainly shave.

The Stanley #4 smoothing plane


After the tune-up I tried the plane on the neck.
Viola it work like a charm.
The Spanish Cedar was a soft wood so the it wasn't a real test on the iron.
But still it can cut very thinly.

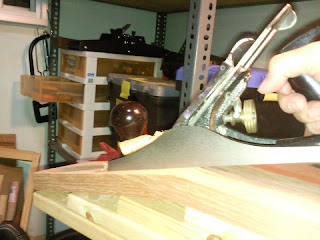
Planing the neck head surface flat.

The set-up

Light can pass thru'

2011-01-12

Thickness Measurement Tool

Thickness Measurement Tool
I started to make a frame for the electronic thickness dial gauge which I bought from Rockler.
At first I was thinking of sawing a U-frame out of a plywood but I noticed I had quite a lot of excess pine blank which I can use.
So I decide to make a frame out of the scrap pieces of pine that I had.
But after gluing up I noticed it wasn't as rigid as it should, so I added an aluminium piece to strengthen the structure.
Well the Al piece did work.
After adding the Al piece, the throat is about 30 cm.

Next I managed to scoop a depression to fit the dial gauge's fixture.
Finally I would need to glue a extension to touch the bottom of the dial gauge's needle.

The bottom nut is done.
I simply mark where the dial gauge needle would be and drill a 6mm hole.
Enlarge the bottom side to accommodate the T-nut.
But I didn't manage to knock the T-nut all the way in.
After screwing in the bolt, I also file the top of the bolt flat and rounded at the edges and smoothen with sandpaper.

Clamping the fixture

The dial gauge almost done.

Gluing the end piece for the extension to touch the needle

Aluminium piece to strengthen the rigidity of the frame.
The thickness measuring tool done.

Close up shot

Added the bottom adjustable screw.

Beneath is a T-nut. On top is a normal nut to lock the height.

The side view


Readjusting the neck angle and relief of Guitar #1
My guitar #1's geometry wasn't good at all.
Due to the too forward neck angle, the action at the treble side becomes too high.
Also the relief at the bass side is too straight for at the 2nd fret region.
So I decide to remove the frets and plane away some finger board at the head end to correct the angle.

At first removing the fret seems really daunting.
But I muster the courage and try on the 1st fret.
Surprisingly the fret comes off pretty easily.
Unfortunately it also chips at the tang area.
But luckily I am going to remove some fingerboard so the chip part will be removed.
After planing, scraping sanding, I visually check the curve and adjusting until I think it looks right.

Then I also plane more curvature at the 2nd fret region to correct the relief for the bass side.
After that I knock back the frets and try. Voila!
The bass finally doesn't buzz.
But I did create some buzz at the 5th string around the 4th fret region.
Then I think it due to the nut should be easily fixed.
Overall now I am more confident to doing a re-fret job.
Removing the frets

Scraping to smoothen the surface after planing

I also did something to the solera please read the solera post.