Custom Search
Showing posts with label Guitar #8. Show all posts

2018-06-22

Installing the binding and purfling


20180622
Next I cut the binding channel on the back of the guitar.
Normally I will cut the top binding channels first for but this time round I cut the back bindings
Also I bent the bindings.
I thought ebony was hard to bend but they came out pretty good.
Think overall my method had improved as I use another iron to heat the other side of the wood.
That really helps in the bending.

I describe a bit about my new method of bending.
Actually there isn't much difference from my previous method.
Previously I will use 2 blocks to support the back of the curve portion during the bend.
However the heat is only coming from the hot pipe side.
So this might result in some breakage for some woods that don't want to be bent.
With this method, the concept is very similar.
The bend at the curve part is now supported by the iron; but I can only support one side instead of two.
I need the other hand to hold the bindings.
The good part is the iron will also apply the heat to the back of the wood which greatly reduce the breakage.
Also by pulling the wood thru the compressing heat mold formed by the pipe and the iron, the wood acquires a gradual bend shape.
This will also reduce the amount of sanding required for the woods after bending.

After cutting the channel, I fit the binding and they fit perfectly.
I did some adjustment to the trimmer to cater for the arch back surface.
Thus the channel came out referenced the sides instead of the top.


Bending the bindings using a hot pipe and an iron. Works great!


After cutting the binding channel. Chips everywhere.


Test fitting the binding.


2018-05-07

Closing the box


20180430
Finally the box is closed.
Before that I remembered to weigh the back.
However, I forgot to record the tap tone of the box and the back...

I did not do a dry run for the clamping but it was mistake.
As I glue the back, I could not insert the clamp on the heel area as the solera was blocked from below.
I had forgotten to allow some space for the clamps to go in.
Anyway I just clamp the rest first then proceed to shift the woods below to allow the clamp to go in.
So rule of thumb, always do a dry run if you have not been doing the process for a long time.


One last look before closing the box.


Ensure there is enough block to spread the clamping pressure


Apply the glue and heat them up so that they will not gel so fast


Glued and clamped.


20180507
I removed the clamps and check the fit.
No problem with the fit.
After that I proceed to trim the overhangs.
During clamping it helps to have about 5mm or so of overhang.


Trimming the overhang - assortment of tools used: Rebate plane, chisel, LA block plane, scraper etc...


Trimming the overhang


Overhangs trimmed


The back view

2018-04-24

Prepare to close box


20180208
I glued the reinforce veneer to the sound port side.
I haven't decided whether to include a sound port for this build or not.
But I can glue-in the backing first.

Next I also glued in the middle back brace.
I just need to glue in the tornavoz and I am all set to close the box.


Glue the veneer backing for the sound port


Apply the clamps


20180302
I also make the tornavoz for the top.
Previously I have already thin the tornavoz wood, so for this session I just heat and bend it.
After that I just use the clamp to hold it in shape.
I have not decide the exact radius yet.


The bent toranvoz


The bending equipment. I use an additional iron to apply heat to both sides of the wood.


20180424
I drilled the sound port and glue on the tornavoz to the top.
The tornavoz was previously bent, I just glue up the tornavoz and glue the tornavoz to the top.
I decided to fit the tornavoz to the size of the soundhole instead of bigger and glued behind the sound hole.
So I trim off the excess tornavoz and glue the tornavoz ends together using the soundhole as clamp.


Glue the tornavoz ends together.


Next I glue the tornavoz to the top.
Surprisingly the tornavoz fitted the sound hole very well with no gaps.
After that I glued some peones lining block to support the tornavoz.


Glued the tornavoz to the top


Glue the lining blocks to support the tornavoz

Next I also drilled the sound port on the sides.
I did not follow my usual design as I wanted a smaller sound port so as not to affect the air mode too much.


Marking the location where to drill the sound port.


Clamp a backing to avoid blowout


Sound port done. Not very nice though...


20180430
I glue the first part of back seam support.
After that I paste my label on the back and signed the label.
To protect it I also coat the reinforcement and label with a thin coat of shellac.


Gluing the back seam reinforcement


Paste the label

2018-02-08

Preparing the back


20171226
After the box is almost done, I began to prepare the back by thicknessing the back with planes.
I tried to use the scrub plane but it is causing heavy tear outs in the back.
So I had to use smoothing plane and cut at a thin shavings setting.
Man, it's really a workout...
After sometime the back sure looks great; with a golden flame.


Thicknessing the back


Maple back with a golden flame. Beautiful.


20180208
I began to brace up the lower bout of the back after the thicknessing.
finding the right location is always a challenge when gluing the back.
Some makers notched the back after gluing on all the 3 braces but for me, as I did not use the radius dish, my back doming was done with the brace in brace in the rim.
Thus, that method did not work too well for me.

This round I had to glue 2 brace onto the rim itself and glue the lower bout brace on the back instead.
This is to enable me to tune the active back with the lower bout back brace on.
The mid and upper bout are mainly for structural support.
Anyway that was done and I also glued in the angle braces
After that I shape those braces and glued in the seam support.
I choose IRW cut off as Maple is a light wood so it looks nice and in terms of weight it has some leeway to go.
I still need to cut some more seam support for the back but now it kind of look pretty nice.


Gluing the back brace


Gluing the angle braces


Gluing the seam support


All carved nicely

2017-12-22

Assemble the guitar


20170224

It's really been a quite a while since I last posted.
I have been busy with my day job.
There has been a major reorg in my company and I am tasked a lot more things to do.
So end up I didn't have much time for building guitars.
Nonetheless I managed to do a couple of repairs and some guitar building.


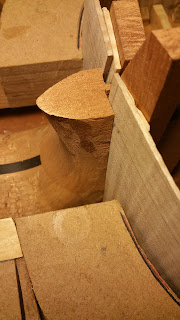
Here I prepared for the assembly by cutting the rebate on the guitar heel block.
The easiest way is probably to use a router, but for me I use hand tools mainly and for this job I use the router plane and block plane.
I measure the thickness of the top at that point and cut the rebate.
Usually I cut a little deeper, and patch up the upper bout with a piece of horizontal grain spruce to protect it against cracks cause by the fingerboard.
This portion is very prone to cracks due to the expansion of the ebony fingerboard.
With dual protection from the extended heel block and spruce patch, this part is secured.
Of course it has the additional advantage of lending weight to the top notes


Cutting the rebate


Check with the top


Preparing the spruce patch


20170721
After preparing the patch, I finally glue the patch to the the top.


Gluing the patch to the top.


20170728
I aligned the top to the neck.
Then I drill some pilot hole thru' the top and the neck.
Then I shave some 3mm dowels for alignment.
Finally I glued the top to the neck, ensuring the centre line is aligned.


Aligning the top to the neck and drill the pilot holes for a 3mm dowel.


Glue the top to the neck.


Glued, and start of assembly

After the glue dried substantially, I release the clamp and put the entire assembly into the solera.
This is the start of the assembly.
I has to aligned the top and neck carefully in the solera to ensure the fitting is good.
Next I glued in the end block.
The end block has be pre-shaped to fit the end part of the guitar previously.


Put the top neck and sides into the solera


Gluing the end block.


20170804
Next I started to glue in the peones or the lining block.
I was thinking to use ABW for the lining blocks but thought against it.
I was pondering to make this guitar a ultralight guitar of one with a heavy sides.
Meanwhile I can use my normal peones first and decide later.


Clamp the sides to the side mould and clamp it down to the top.


Start gluing the peones


The entire rim done (in 2 sessions)


After the glued dried. Now for the wedges and side struts.


20170816
I shape the wedges for fitting neck with the sides in place.
As the wedge is not thick enough, I added a piece of maple to the sides in the same grain direction as the sides.
After that I glued in the wedges.

Next I began to shape the rim of the sides.
I use my radius stick as reference and use the block plane (normal block since my LA block is out of action...) to shape the rim accordingly.

Finally I began to glue the back lining.
I leave a little protruding to allow for the sanding / planing of the lining to the radius.


Checking the wedge fitting.


Wedges glued.


Shaping the rim according to the radius stick.


Gluing the back linings


Preparing the side braces


Doing the side support struts for the LTB and UTB.
The support struts is a bit complicated due to the slanted angles by the curving sides in the LTB.


20171101

I finally finished shaping the 2 back brace after taking some time to decide how to go about doing it.
I did a joint on the 1st back brace and foot.
The foot will extend 1/2 into the width of the brace thus supporting one another.
The problem arose because the foot wasn't thick enough to accommodate the brace entirely and I don't wish to shave off too much of the back brace.
Thus by doing this way I can retain the strength and still support one another.


Two back brace done.


The 1st back brace forms a joint with the foot.


20171114
Next I began to work on the side braces.
I have to notch the lining in order to fit the side braces.
This is to prevent stress risers on the sides if they are butted against the lining.
After which I began to glue the side braces, starting with the side braces supporting the traverse braces.


Notching the side brace inlet in the lining and test fitting.


Gluing the side braces


Gluing the side braces at the lower bout


20171214
Finally I managed to glued all the side braces for the lower bout.
I weigh the braces it ends up about 450g.
Think I wont be adding more braces.


Clamping the other side


Gluing the end block area side braces


Lower bout's side struts all done.


20171222
I patched up the lining to close the gaps between the back braces and the back lining.
After which I began to glue the decoration piece for the LTB and UTB side supports.
It's has the same grain direction as the sides and hence it doesn't offer any much support; it's really for decoration.
Also I glue in the 1st back brace to the heel and rims.
Before that I weigh the back brace to see it's weight.


Gluing up the lining to close the gap between the braces


Weighing the back brace 20g


Gluing the 1st back brace to the heel and rims


Without the LTB.


Internal view


Another view