Custom Search
Showing posts with label Fretting. Show all posts

2014-10-01

Fretting and Set-up


20140910
I also managed to start the fretting work.
Before that I strung up the guitar to have a listen to the sound.
It definitely sounded great much like my #1 with more and deeper bass.
Before I did the fret work I check the neck angle and notice the angle was off.
I had to remove more material near the 12th fret region to correct the angle.
After that I use my new tools to help with the fret work and they definitely help alot.
The tools I recently acquire are:
1) Fret barber from Stewmac
2) Fret tang remover from LMI

All I can say is they both work great!
I use the evo wire which is harder than normal fret.
The barb were reduce in size in minutes
And the tang was removed in minutes.
The fret went into the slot in a few quick taps.
I deepened the fret slot more after sanding down the fretboard.


Sanding smooth and flatten the fingerboard


Taper the fret slot to allow easier removal of frets for future re-fret work. To prevent chipout too.


The fret barber at work. The fret are pull across it reducing the size of the barbs


The bard size reduced


Thickness gauge to set how much to remove.


Fret tang remove from LMI.


The end tangs are remove. How much to remove doesnt matter to me much as I am not using fret board binding. Rather I just want to remove abit of the end tangs to prevent them from sticking out later.


Fretting. A quick few taps does the job. Much easier!


3 completed. A few dozen more to go.


20140918
I finished up the fret work and cut the nut and saddle.
Unfortunately the string height is still too high (wrong neck angle).
I need to reduce more of the 12th fret region.
The relief was just nice though.
I tried out the guitar and it sounded very balanced with more powerful bass than my previous guitars.
The harmonics isn't as strong and my other guitars but I think it will improve with time as they did with my other guitars


Frets all installed


Another view


Sawing the nut


Filing the nut slots


20140922
I have been trying to set up the nut and saddle for the compensation but I encounter a big problem.
When I tuned up the open string and check the 12th fret note it's flat.
Normally it will be sharped and when I file back the saddle it will be normal pitch again.
But if it's flat I cannot file back anymore else it will become flatter.
So I tried to bring forward the nut instead.
After moving forward by 1 mm the effect is still the same.
If I tune the string according to the 12th fret not, the fret below the 5th fret or so will get sharper.
So in simple words I can't get it in tune.

I think I have over-compensated the bridge. However my previous guitars #3 was compensated in the same way too and that intonation is perfect.
I had several options:
1) Glue piece of bone in front of nut to bring it more forward.
2) Glue a piece of bone in front of saddle to bring it back.
3) Remove teh bridge and reglue it.
4) Remove the fingerboard and shift it toward the saddle.

So after I made a block of ebony and place it in front of the nut the effect is still the same.
So that just eliminated my 1st option.
Out of curiosity I check the bridge location and guess what! I found out where is the problem: I had misplace the bridge. It is set-up more by 10mm.

Normally I use a meter rule to locate the bridge, I will place the 325 mark on the 12th fret
And from there I check the 652 mark for the bridge.
But this time round i place the 315 mm on the 12th fret.
This ultimately adds another 10 mm back for the saddle.
No wonder it's out of tune.

Now I have to remove the bridge and re-glue it.
After checking online on how to remove one, I began the process.
I just use a pallet knife one for spreading paint I think.
It's quite thin and flexible without any sharp edges.
So I apply heat to the frosting spatula and slowly work beneath into the bottom edge of the bridge.spatula.
Finally after 1/2 hour I remove the bridge.
There were some tear-out in the top but not much.
After sanding the top all is good.
Just to be safe I scrape off all the hide in the bridge too.
I relocated the bridge and drill the 2 pilot holes again.
This time round I double and triple check the position.

Funny thing is when I apply the hide glue and re-clamp the bridge.
I actually glue it back into the original wrong position.
Luckily I took of the central clamp and check the position once more.
I discover the same mistake and quickly remedy it.
And so I remove the bridge while the glue is still have not set and glue it back to the correct position.
Then after I double and triple confirm the position before applying the clamp.
Now hopefull all will be well; finger's crossed.


Wrong position of the bridge. It's off by 10mm!


Slowly removing the bridge. Apply heat only to the spaltula / pallet knife. This won't affect the brace glue below the top.


Bridge removed!


This time round ensure the 325mm mark is correct


The final length is 652mm


Prepare to glue


Apply hide glue


Glue and clamp


20140925
I set up the guitar and now the intonation is spot on.
I didn't need to adjust anything.
I tried the guitar and the bass is indeed powerful as previously mentioned.
The treble seem to lack the brighness of my #1 but have that lovely mellow tone.

After trying out the guitar I glued on the heel cap.


Prepare to glue the heel cap


Glue and apply the clamps


20141001
I rework on some of the frets as they are buzzing.
I remove the frets and sand and scrape the fingerboard to adjust the frets
After that I hammer in the frets and try again.
The buzzing improved a little but I think there are still some to adjust more
After that I sand the neck and shaped the heel cap and heel.
Now its considered almost done.


Adjusting the frets to reduce buzzing


Shaping the heel cap


Planing the heel cap


Sanding the neck


Shaping and sanding the neck profile.

2013-07-11

Fretting the fingerboard


20130702
I began to fret the guitar.
At first I wanted to listen to the open strings, but I can't seem to find my box of strings.
Now to recall I might have threw the box away by mistake. Argh!!!!!
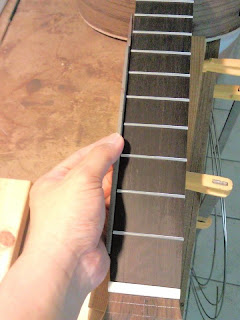
For fretting, I first level the fretboard making sure it's flat.
Then I check the slot making sure it's deep enough for the tangs.
I did this by filing away the protruding studs on the fret tang and use that to check each slot.
Finally I began to fret.

I don't have a nipper so I had to file the tang away at the ends.
It's a hard job but I am going slowly.
(I ordered some new strings so the pace is just nice for the strings to arrive)
I also file a bit of the fret tang studs away to make it easier to hammer the fret in.
Before hammering, I file the slot with a triangular file to make it less prone to chipping in case a fret jumps out during hammering.
And it did, one fret jumped when I was hammering it in and no chips at all :)
So far I only covered 5 frets and a lot more to go.


Checking whether the fret slot depth is deep enough


Filing away the fret tangs at the end


The result is quite nice but lots of hard work


Filing the slot with a triangular file to prevent chipping


And the fretting begins


20130711
I have finished fretting all the frets but I have yet to find my box of strings.
I filed the fret ends and rounded the ends like what I did for the other 2 guitar. I think I have thrown it away... Sigh.
Anyway I bought some unknown brand of strings to string it up while my shipment of new strings is still in transit.
The guitar didn't really sound as what I expected.
My #1 sounded more refined.
Think I'll for the strings to come before I make any conclusion.
Anway I have yet to adjust for the intonation until the new set of strings arrives.


Round the ends of the fret


Clamp in the last few frets. For those in the body I use clamp instead of hammering


When it's in the body, I use 2 scraper to protect the top


Check for fret levelness; 3 fret at a time.

2012-04-02

Fretting

I began to hammer in the frets.
Before that I ensure that the fretboard is flat by check with my straight edge.
(My straight edge is not those expensive type but it will do for now.)

I scrape some fretboard from 2nd fret onward to create a very slight relief on the bass side.
Then I began to knock in the frets.
I didn't remove the fret tang at the ends as the fret metal is too hard and I haven't bought the fret tang remover...
If I crimp all tangs, it would take me lots of work.

The fretting process is quite straight forward, align first; hammer in; cut.
I only had time to do till 5th fret or so.

Sanding the fretboard flat

Checking for slight relief

Hammer in the frets

Up to 3rd fret done

Finally almost all the frets are done except for 19 (split) and the 20th.
For these 2 I plan to fill in those unsightly slot holes so I might remove some tang and round the crown at the inner side.
Next is leveling and round off corners.
For 15th fret onwards, I use the clamp and some knocking.
When I knock I lift up the entire guitar and support it beneath the soundboard

Clamping the frets in, at the higher inner frets.
The scraper is to prevent the clamp from denting the fingerboard

All done (well almost)

The front look.

Next is just fret dressing check: Check 3 fret at a time and make sure they do not rock at the center fret.
1st 2nd 3rd -> 2nd 3rd 4th -> 3rd 4th 5th and so on...
So far so good only once it rock a quick tap of the mallet solve it.
After that I file the edges making sure the tang doesn't protrude.
Next I plane an angle to a wooden block edge and use that wooden block to hold the file to file the angle at the fret ends.
But in the end I discover rounding it with the crowning file works better.
Next the fret ends are filed using the triangular file with safe edge.

Filing the fret ends

Check for fret seating making sure they seat properly in the slot.
The card / straight edge should touch all 3 frets at any time.
If it rocks at the center fret then the center fret is too high and need to file it down or most likely tap it. (not seating fully into the slot)

Plane a angle to the wooden block edge

Can see the angle on the wooden block edge

Use the wooden block as a guide to file the fret ends

In the end I decide to round the ends instead with the fret crowning file

The side edges is filed using the triangular file with safe edge

I know I am on the last stage of the build, just a bit more to go:
some more fretting; a proper set-up to go; thinning the neck; surface sanding.
But things will slow as my 2nd child was born recently and quite unexpectedly so now I am busy with taking care of him.
But stay tune, I will try to complete this as soon as possible.

Yeah finally the last 3 frets to do: 2x 19th and the 20th.
I file off the tang for the inner side of the fret and rounded off the ends
Then I cut off the outer ends like what I did for the other frets.
I just hammered in as per the other frets
After that I began to round the sharp edges and make sure the fret feels good.
I filled in those exposed slots too with PVA and ebony dust.

Round off the sharp edges

Using scrape to protect the top while I doing the high frets

Fret end tangs removed by filing

All the frets hammered / pressed in

Another view

Mixing PVA with ebony dust

Patch the slots

After the glue mixture dried I level them off with sand paper.
All done and next is the set-up
The patch wasn't done too good but most of the slots are filled. May need a 2nd round though and some sanding.