Custom Search
Showing posts with label Thicknessing. Show all posts

2020-09-12

Making the back


20200606
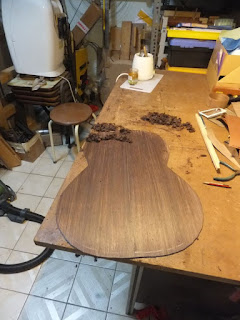
I started to thickness the back while waiting gluing other parts.
The back is a damn dense wood which is very hard to plane.
I think this process will take some time.


Closer view of the dense wood


Full view of the back


Thicknessing starts


20200724
Now more planing and scraping time.
Thicknessing this wood is a pain in the ass.
It is very taxing on the tools too.


Planing the back, you see my dog hole clamp in action here


Back is 465g now


20200815
More planing and scraping in progress


Scraping


Planing with scrub plane


Scraping in action


20200822
Finally all thicknessing is done.
The weight is reduced to 353g


All tear out removed


353g


20200830
Next I close up the box with clamps to mark the position of the back braces.
I insert my arm into the box with a pencil to mark the position of the back braces.


Mark position of back braces.


20200902
Next the 3rd back brace is glued onto the back.


Heat up the back surface


Heat up the glue


Glue and clamped


20200903
The brace is shaped accordingly


Almost ready to close the box


Shaping the back brace


20200908
Glue the back seam reinforcement made from spruce off cut.
The pieces are glued using the radius jig to give it a pre-curved shape
The other 2 back brace are also glued to the body rim.


Back seam reinforcement glued from spruce off cuts


Back braces glue to rim.


20200912
Next I shaped the back seam reinforcement to a nice curve profile.
Also I check that the reinforcement is at the right place not interfering with the back brace and end block when the box is closed.


Shaping the back seam reinforcement


After using chisel and plane I also sand the back seam reinforcement


All done.


Checking the fit with the back braces and end block.


Glued the back radial braces


Carving the back radial braces


Back all done.

2020-02-19

Making the sides


Making the sides

20191128
While waiting for some of the glues to dry, I began to thickness the sides.
At first I scraped one side smooth first.
This will be the outside sides with no knots visible
The other side with some some knots will be in the interior of the guitar.

Damn this wood is damn hard to plane, causing some tear out but luckily the stock is pretty thick so by the time I scrape them out the tear-out becomes level.
I switched to my high angle plane to prevent the tear-out and the HSS iron works wonder; remaining sharp after numerous planing.


Scraping the sides


Outer side of the sides scraped


Thicknessing the sides with HA plane


20200207
More thicknessing done on the 2 sides pieces.
Other than measuring the thickness by the thickness gauge, I also flex the piece.
When flexed the side piece has to be pretty flexible.


Both sides thicknessed


All the shavings...


20200219

Bending the Sides
After thicknessing, the next step will be to bend the sides.
Before bending I need to mark out roughly where the curvature points are.
i.e. which part is the waist which part is the upper bout etc...
Once marked I can start bending.

Recently I bought a properly bending iron.
The main difference is that it has a flatter curve portion on the iron as well as a tight curve portion.
This allows me to heat up more sides before attempting to bend.
This makes the bending job a lot easier and the bent sides are smoother in curvature.


Bending the sides


One side done


Both sides done


The bending set up - new side bending iron.

2019-09-05

Thicknessing the top


20190905
I began to thickness the top as the tedious rosette process was done.
With my large kanna plane, I thicknessed the top and it leave a gleam on the top when seen under light.
As the top was being thicknessed, I also take note of the mass and the frequency response as well as the flex on the top.
When the readings reach my desired range, I stop the thicknessing and it was ready for the next stage.


Thicknessing the top with my kanna


Another view


Look at the shavings


Tapping the top


Analyse the frequency


Final mass of the top is 133g in line with my other tops of similar density


2016-01-12

Thicknessing the back


20151224
Merry X'mas to all out there!
Thicknessing used to be a chore for me, as my plane aren't design to cut too deep.
If plane too thick, the tear-out will be bad.
So I had to go thin and to plane a 5mm down to 2.x mm, it takes forever.
However, eversince I got the scrub plane thicknessing is breeze.
I plane down the 5-6mm thick back to 3mm region in about 30 mins or so, which is very fast for my standards.
(I didn't exactly time the planing just estimation)
Last time thicknessing can take several sessions.
Anyway the subsequent part is slower as I switch to my favourite wooden plane and my HA wooden MJF plane.
Both work very well.
I also use scraper to scrape smooth when it's near the final thickness of 2.3mm region.
Thickness is secondary actually more importantly is the tap tone.
Actually I tap and listen to the back it sound very nice.
Probably the best IRW I have used so far.
After that I weight the back which is about 294g


Planing the back with scrub plane.


Weighing the back using tare method


294g for the back.


Checking the fit of the back.


201601008
This is actually the 1st work done in the new year.
Anyway I have glued the braces to the back.


Scrape the back before gluing


Apply glue to the brace.


Glued the lower bout brace.


Apply glue to the centre back brace


Align the back to the brace and put weight on the centre brace region


After the glue grabs (a while later), I removed the back and apply clamp.
This way of gluing ensures more accurate position of the back braces.
I check the alignment it fits perfectly.


Gluing the 1st back brace to the body.


20160112
I glued the back seam reinforcement strips and the radial back braces for the active back.
After shaping the braces, the tap tone sounds very nice.
Still need to record and analyse the back tap tone.


Shaping the LB back brace.


Making and shaping the radial back brace.


Another view. You can see the profile of the radial back brace.


Glued and clamped


Gluing and clamping the back seam reinforcement. The backing is my radius stick, so a slight radius is imparted to the back lengthwise.


20160115

Back done


Final weight of back (w/o 1st brace) 337g


With the back label