Welcome to my guitar building blog.
This blog describes my journey into the world of guitar building.
I like to share my experience of building and hopefully it can be of some help to all the guitar making enthusiast.
Hope you enjoy my blog post!
Showing posts with label Bracing. Show all posts
Showing posts with label Bracing. Show all posts
2022-03-07
Bracing the top
20210403
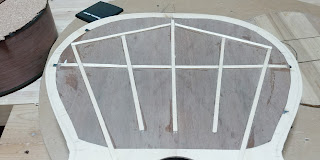
Next step will be bracing the top.
One of the major consideration when bracing for this top is stiffness.
The top itself will be stiffer than most tops so I will be going lighter on the bracing.
For that reason, I am opting for a 5 fan bracing with cross bracing.
20210408
So I began to brace the top using the go-bar.
I started with the cross brace first as this will be below the fan braces (different from my usual bracing).
As the brace is about 3mm high (or lower) it can easily conform to the doming.
Following that the glue down the central brace.
For this bracing scheme I need to notch the bottom of the brace for the cross brace.
After that it is clamped similarly with go-bar
20210410
Then I continue with the rest of the fan braces.
I also glued the donut for the soundhole reinforcement
20210411
Next the braces are carved roughly to the approximate height
Once that is done, the closing braces are glued.
Further carving will be done to tune the sound and stiffness
20210421
Next step is to carve the donut to shape, it will taper from the centre to the outer rim.
The donut is wider than normal to support the wide rosette in the top.
The weight of the donut was reduce from >20g to <10g.
It include a protruded lip for the tornavoz.
I also prepare the side braces and glued them.
The side braces extend into the top to transfer the vibration unto the top part.
This will enhance the trebles especially for notes in the 12th frets vicinity.
20210501
Next the UTB and LTB are prepared, weighed and glued.
As usual, my TB are always opened
This gives a more open sound.
2020-01-16
Bracing the top
20191010
The required braces were prepared before hand by splitting and ripping from the stock and then planed to size.
Usually splitting produce more waste but it can ensure that there is no run out on the brace stock
If the supplies were obtained from a good supplier, you can afford to rip it instead of split it.
Of course that depends on your guitar building principles.
When the braces are prepared, I lay them out on the top.
Also I draw the bracing on the top and cut the braces to length.
For this build, I will also be using carbon fibre in addition, in order to reinforce the top more.
I had some wonderful experience in terms of using CF on wood and would like to try out on guitar.
The first step using CF is to glue the tow onto the top first using epoxy diluted with alcohol.
Then the brace will glue on top of the CF tow.
Finally the brace is capped with the CF
This will produce a very stiff braces in general.
However a good tuned top is neither overly stiff nor loose, so the balance must be there.
When optimally tuned, the final mass will be lesser than the normal braced top.
For this build I also modified my go-bar deck.
I make it stiffer and cleaner easier to use.
20191022
The bracing stage is always done in stages, as we need to carve the braces.
If not sometimes the other braces are in the way of the carving.
For my case, I carved the centre 3 braces and next will be gluing the Bouchet brace.
The Bouchet brace need to fit over the centre 3 braces.
But for the outer brace the outer fan brace will fit over the Bouchet brace instead as it decrease i
n height at the ends

Gluing the lower bout traverse brace after fitting the centre fan braces. This brace also commonly known as the Bouchet brace.
20191031
20191107
The braces were carved to shape and tapping measurements were taken and compared to ensure of the optimal stiffness.
20191113
Next the sound-hole reinforcement donut is glued.
There is some difficulty here as the bracing extends into the reinforcement.
Also there donut need to cater for the gluing of the tornavoz.
20191128
Next the tornavoz is made and glued into a ring.
And some reinforcement veneer is glued to the top which also beautify the top.
20191219
The 2 side braces are glued next.
20191224
Silent night! Next the 2 main traverse brace is made.
I use a lighter material to make the traverse and intend to wrap it with CF to increase the strength.
20200103
Next the 2 traverse brace is wrapped in CF cloth.
20200116
The traverse braces is glued to the top and the entire top weight is measured.
Subscribe to:
Posts (Atom)


