Custom Search

2008-01-24

Gluing the struts

Preparing the struts
During the last 2 or 3 weeks, there happened to be pockets of free time available and so I worked on the guitar.

First of all, I resaw some of the struts to make more square especially the gluing surface.
Subsequently, I draw the struts layout on the top board itself basing the on the Torres fan design.
The fan struts had a focal point some where in the 15th fret region.
Most design of fan struts are in the 12th fret region but Torres' fan focal point is 52mm into the body and the outer fan will make a right angle (90 degress) with the enclosing struts.
All the information is from the Romanillos's book on the life the of Torres.

Then I saw the the struts to size according to the layout.

Here is the final layout


Another view.


Gluing of struts
Then comes the problem of how to clamp the struts while gluing down.
What to use to hold the struts in place while gluing?
As discussed previously I decide to go for the bamboo go bar method.

However, the bamboo gobar is not usable.
As the bamboo's thickness is not uniform, the go bar produced had varying strength.
So I gave up that method.
I contrived several other methods but to none seem to satisfy the need to press the struts into the depression.
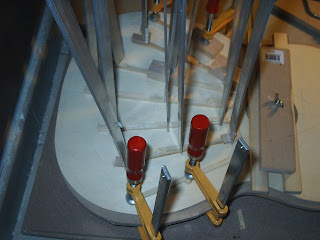
In the end I discover that the set of Aluminium bars which I purchased for making the Cam clamps, had a potential to become a go-bar instead.
When I tried it, it was very successful.
So I decided to go with this method.

Due to time constraint I did not build the go-bar deck but use the underside of the table top instead.
However I soon to discover that the I need heavy weights to hold the whole thing in place as the go-bar was pushing the table up.
So building a go-bar will be next on my to-do list.

Here is the top board with the markings and ready for gluing


Gluing of struts


Another view: Note the doming especially for the centre struts
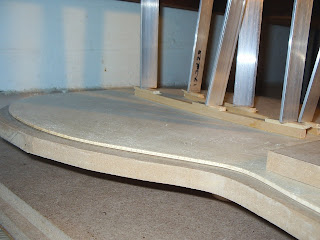

Close up view


All the struts in place.
The outer struts was using F-clamp due to lack of Aluminium bars and also the upward force exerted on the table top was too great.
Now I know why they use go bar deck instead of a simple table top.


Front view


Weights to keep the table down (mainly books)


Here is the topboard after the main fan struts are glued


The doming effect in the topboard


Carving the struts
The next day, I removed the struts from the go-bars.
I am pleased with the results considering its my first attempt in gluing using the go-bar.
Some struts slided on the surface thus dirtying the topboard.

Next I proceed to carving the struts.
At first I was using the finger plane but the length of the small plane was slightly too long considering that the struts was domed.
So I end up using the broad chisel I got from Daisol instead.
The chisel wasn't really that sharp and so I had quite a bit of hard time trying to carve the struts.
Due to some carelessness I accidently scratched the topboard with the edge of the chisel while carving the struts.
I was deciding between shaping the struts round or triangular.
At first I went for triangular but in the end I end up with round as round is the easier of the 2 to make it look nice.
The final shaping was using sandpaper to smooth the roundness.

Factors to consider when carving a struts
- Sharpness of chisel
- Protecting the top board while carving.

Luckily I did not glue the enclosing the struts because when I taper the ends I always over shoot the chisel.
If the enclosing struts were there, they'd sure be damaged...

Carving the struts


Tapering the end of the struts


The struts after carving


Another view


The full fan struts with the traverse bars (not glued yet) and the enclosing struts


Gluing the soundhole reinforcement and the enclosing fan struts

Next I proceed to glue the enclosing fan struts and the sound hole reinforcement
The sound hole is a weakness in the topboard and thus requiring the strengthening strip.
Some design like Hauser just simply have 2 vertical strips around the both sides and the top and bottom is strengthened by the traverse bars.
But I preferred a ring design and so used a ring instead.
For clamping down the reiniforcement I simply used the screw (which was used to secure the whole top board in place)
As for the enclosing struts, I used F-clamps and the Ibex bridge clamp (longer reach).
The planes are simply there to counter balance the lopsided weights at the enclosing struts end with all the F-clamp in place.
If not the whole board will toppled off the table top...

The process of gluing


Another view


Close up

2007-12-03

Side Bending and Preparation for Top Bracing

I had just changed a new job recently so not much leave to take to make the guitar.
Anyway I managed to do some more things:
- Bend the side back to shape to eliminate any spring back
- Shaving of braces to 7mm wide and 3mm tall (Torres fan)
- Plane the topboard to between 2 to 3 mm thick

Side Bending
I use the Aluminium pipe coupled with the heat gun to bend the sides.
To bend the side the heat gun have to set to about 75% full power which is quite hot.
Without a thermometer I can't really tell how hot it is, but I guess its quite hot but not as hot as stove. (Because I bend w/o wearing any glove)
Now as a safety precaution, you should always use a glove to bend.

The hardest part of the bend, was the waist.
I let the gun blow hot air onto the waist to heat it up.
Then I slowly press onto the heat pipe and rock the sides around the heat pipe.
No spraying of water was used as I found it to be unnecessary.

Well I nearly crack the piece, but luckily stop in time to prevent the cracking.
After a few rounds, the waist conforms to the acrylic template which I take as reference.
Then I bend the lower bout to reduce the spring back and then the upper bout.
It was fun; I have never felt more satisfied with myself.

Here is the side after the bend.
There is virtually no spring back, only slightly open at the both ends.


Compare with the previous picture, the spring back was pretty bad.


Bracing
For the bracing, after so many rounds of consideration, I decided on the Torres fan bracing pattern.
The braces are 7mm wide by 3mm and so I began to shave down the braces to size.
I never regretted acquiring the Stanley block planes.
It really makes the whole planing process a joy.

Top
Finally, I manage to thin down the top.
When it came it was abt 3.x mm thick.
I dont have a thickness dial gauge so I cant tell you the exact thickness.
The only measurement was at the edge using a veneer caliper.
After planing I measured the edge was about 2mm. The center which I leave it slight thicker should be between 2 to 3 mm.

Adjusting the stanley block plane was fairly easy.
Using the block plane, I managed to thin out the top board and smoothen it using a scraper.

Here is the braces and the top after the work.


What's next
I think the whole thing is ready for some bracing action.
All I need next, is either one of the 3:
- Get some weights
- Building cam clamp
- Building a screw system
- Building a go-bar deck

Weights
The easiest of them all and requires no building.
However to get dense weight w/o occupying a large area is quite hard to find.
I tried several stationary shops around they don't seem to carry any paper weights...

Cam Clamp
Previously, I had bought some Aluminium bar from the Kelantan Lane.
They were meant for building cam clamps.
However, building cam clamps is a tedious process and I need to source for the wood.
I think I will leave at it for the moment.

Screw System
I was thinking of getting a metal bar across the top board and use a screw and bolt to press down on the brace while gluing.
This is a pretty fast method of building but involves some careful design consideration
I need to acquire alot of screws which may add up quite a bit of cost.
Also it need some making for the screw to attach to the bar and press against the braces.

Go-bar Deck
Finally, the proven go-bar deck system.
I will be acquiring some plywood from a local supplier Chiang Leng Hup Plywood
for about SGD20 a piece for a 2m x 1m x 1cm plywood.
If you are interested you can contact them for the quotes.
The staff are very friendly to deal with.

For the go-bar deck, I just need to do the following:
- Saw the plywood into 2 2 foot square (60cm).
- For the rest of the wood, it will be used as "braces" to support the plywood.
The stress on the plywood is quite great, enough to bend the whole board.
- Drill 4 holes at the edge for the metal support.
- Saw 2 screw rods into halves (which I have acquired previously) (1m each)
I need four of them; 1 for each corner
- Reinforce the board with the struts (glue or nail or screw)
- Assemble the deck accordingly.

For the go-bar itself, I will be sawing some bamboo pole in length excess of the deck height.
Once the deck is up it's easy to add new go-bars, which is the main reason why I will opting for this method of clamping.

Now to acquire the plywood 1st.


Bridge blank
I bought some padauk bridge turning wood for making the bridge, which is an African hardwood.
The turning square is enough to make 3 bridges.
(See the LMI bridge blank compare to the turning square)
According to many makers, paduak is a lighter material compare to rosewood.
The famous Australian maker Greg Smallman is also using paduak bridges to reduce the weight on the top.

2007-10-10

The solera

I managed to make quite a bit of time to do the guitar.
Since I am working on the guitar I thought I might as well make the solera instead of assembling free form.
So I embark on the solera making.

Before I started work on the solera making, I managed to persuade my mum to let up room for my guitar making.
So we clear the room and manage to source an old table for the work.
No more backaches for me (so I have hoped till today still suffering from backache)

Here's the full arsenal I have acquired (minus the power tools)


I drew a 15' arc using 15' string and a pencil.
What best to get a 15' arc.
I wanted a 25' arc but 15' is near the limit of my mum's living room diagonal.
In the end only manage to get a 15' arc.
I will be using this arc to plane the back braces.

With the table I managed to free up 2 hand to use the Stanley #4 smooth plane.
Well planing was a breeze except that when I overexert strength the plane will knock into the wall.
Think I need to get some plaster for the wall...


Well I try to saw a side mold using the coping saw but gave up because the side mold wood plate was too soft.
It wouldn't stand against the spring back of the sides.

While making the solera (work board) I manage to pick up my chiseling skills abit.
I did not have an entire piece of wood so my solera had to be joined.
One of the half's slots was drilled and chiselled while the other half I discovered a way to do it better and faster too: that is using Tenon saw.
The tenon saw (saw with back rib reinforcement) was plain easy to use.
The saw line was straight too.
Sorry no pictures for this part, as I was too engrossed in the work.

In the end here's the solera layout.


Dust was a problem especially since I got a bad cough now.
Got a baby to take care and so I got myself a 3M mask.
It is very effective no wonder people use it during SARS period.
Strangely it's rather comfortable to wear.


So I wanted to finished up the side support stopper.
But the stupid B&D RTX rotary tool heated up too hot (until I smell the burning plastic)
So I could not continue.

The end product - the Solera (minus some side stoppers)


I made a trip down to Kelantan Lane once again wanting to get some screws for making brace clamps.
However as I explored the place I manage to find some Aluminium bars, which is essential in my cam clamp making.
So I purchase enough Al bars to make about 30 cam clamps.
Now just need to source for the wood and time to make the cam clamps.

I also bought a Al pipe and make a heat pipe bender.
For the heat source I use the heat blower; I can also use a propane torch also.


Although my side comes pre-bent, the spring back is pretty bad.
So I need to touch up on the curves before I assemble the guitar.
I tried my hands in the heat pipe bending method.
It wasn't easy though I read quite a bit about heat pipe bending on the OLF and other forums, the experience wasn't really descripable...
I nearly crack one of the waist...

Actually my next immediate task should be bracing the top board.
But before that I need 2 things:
- Clamps: either the cam clamps or the go-bar
- Dehumidifier

I went surfing the internet for local suppliers of dehumidifier.
It seems that this machine wasn't readily available.
Nonetheless I manage to secure a purchase at SGD 500; heavy investment on my part...
Here's the Amcor dehumidifier which I bought: it is able to remove about 15 litres or moisture each day, enough for the room which I am currently making in.


Solera Dome and Struts Glueing
For a acoustic guitar (folk guitar) top, the entire top is domed to some radius 15' or 20'.
For that purpose the x-brace is often shaped to that particular radius and the whole top is glued using a MDF radius dish.
For a classical guitar, only the lower bout is radiused.
The struts of the classical guitar does not required to be shaped to the same radius of the lower bout.
Instead they are pressed into the dome and the shaped is held by the glue.
This technique is often used by the great luthier Antonio de Torres.
Doming allows a thin top (1mm thickness) to acquire sufficient strength to support the tension forces acting on the top

I worked on the solera trying to create the dome in the lower bout but unfortunately the pine solera wasnt really flat.
In order to repair the solera an create a consistent dome I added another layer of MDF on top of the pine solera.
I work on the previous dome i created with the MDF, trying to smoothen the curvature to a 15' radius.
Also I create a 15' radius template using acrylic sheet, using for reference on the dome curvature.


The 15' curvature smoothened.


The new workboard with the MDF layer.

2007-09-26

Soundhole Ring, End Block

I manage to pull out some time to work on the guitar.
So far quite good in progress.
- Did a simple joint on the bridge plate for the soundhole reinforcement
- Finished an end block
- Shaped the back braces for a free form radius
- Braced the back with the reinforcement
- Saw the template out of acrylic
- Smoothen the solera dome (Still not quite done though)

Joining the soundhole reinforcement
I use 3 end blocks to do the joining.
2 for stabling the sides.
1 to compress down on the center joint.
Before I join, i put a metal rules underneath the 2 pieces of wood.
Clamp the 2 side end block to place and remove the metal rule.
Finally clamp tight the center end block.
This way there will be slight pressure on the joint exerted by the 2 side end block.
One thing I forget is to put a piece of wax paper in between the end block and joined spruce.
When I removed the assembly, it got stuck to the end block.
Joining set up


Joined product


End block
For the end block I did not use any saw to thin the thick piece of end block.
Instead I use a chisel and spilt the end block at the 1/2 thickness point.
The runout was pretty bad.
The pieces produced was very uneven...
I had thought of discarding the spilt piece and go for another piece.
Here is where the good old Stanley block plane comes into play.
I plane the splitted block until it was smooth and voila!
The result is pretty good.

The end block


Run out in the end block


Shaping the back braces
I did have any radius dish and so I decide to shape the braces free hand.
Here is where I appreciates my Stanley block plane even more.
The shaping was quite a breeze.
The curve did look presentable

Shaping the brace end


Checking the curvature of the brace


The braces laid in position before gluing


Bracing the back
After the brace are shaping I finally had the chance to braced the back.
I used the Elmer's Probond glue for gluing the braces.
Because of the lack of Cam Clamps I had to use some innovative way to clamp the braces.
The planes are used as weight to press down the center part of the brace

Gluing the back braces


Unforunately after the back is braced I noticed a crack at the top of the back where the Spanish heel is located.
The crack isn't very big.
After consulting the the OLF forum, this could be due to changes in relative humidity.
I did not do any RH control.
Also I suspect it could be due to the curvature being too curved.
According to a respected luthier in the Delcamp forum, the curvature should be about 4mm depression in the center for a 20' radius
I think mine exceeds that...
How to remedy?
I decide to chisel away the 1st brace and redo that brace with a slighter curve.
Also will build some sort of RH control fixture.
Maybe a plastic bag with silicon gel.

Cracked back


While I decide what to do with the braced I did brace carving of the back braces
Shaping it into a curve.
The thumb plane came in quite handy in this case.

Shaping the back brace


Final brace profile


Gluing the back reinforcement strip
Although there is a crack I decide to carry on with the back reinforcement.
Using again some innvovative ways and the weight of the Stanley planes.

Gluing the back reinforcement strip

2007-08-08

Solera 2

Finally I managed to squeeze some time to work on the guitar after several trips of tools and material acquisition
Initially I had planned to make the 1/2 plantila template out of the acrylic sheet that I have bought.
However, as soon as I had wanted to start work, I discovered that the acrylic sheet that I had bought was too short... OMG...
So the next best thing was to make the template out of vanguard sheet.
Well I postponed the template making to the next session after I acquired the correct sized acrylic.

I saw some more struts for the back bracing and the Bouchet style bracing for the top.
Finally I get to use the Stanley block plane.
The quality of the plane really impressed me.

Here is some picture of the block plane in action:


I also worked on solera for the topboard.
Initially I had wanted to use the pine board I got from IKEA for the solera.
However, I think pine wood are abit hard for gouge the centre depression for the top dome.
So I manage to get a piece of MDF just fitting the size of the topboard from Art Friend.
(It is expensive thought cost about SGD 8 per piece)
With the gouge, which I bought from Daiso (SGD 2), I discovered it is very easy to work upon the MDF; almost effortless.

After an hour's work or so the depression is done.
Only thing left is to smoothen the depression so that I can glue some sandpaper to it for sanding the struts to fit in the shape of the depression.


The gouge is a sort of U-shape "chisel".
You can hollowed out the wood.
How much you remove the wood depends on the angle attack.


You can see the top dome depression here:


Finally I use a straight edge wood carver as a scraper to smoothen the depression.
If I had bought the curved shaped scraper from LMI, it would be a better fit tool.


The final step of smoothen the depression was not yet done.
I will need a curved surface block with some sand paper to do the job.