So far quite good in progress.
- Did a simple joint on the bridge plate for the soundhole reinforcement
- Finished an end block
- Shaped the back braces for a free form radius
- Braced the back with the reinforcement
- Saw the template out of acrylic
- Smoothen the solera dome (Still not quite done though)
Joining the soundhole reinforcement
I use 3 end blocks to do the joining.
2 for stabling the sides.
1 to compress down on the center joint.
Before I join, i put a metal rules underneath the 2 pieces of wood.
Clamp the 2 side end block to place and remove the metal rule.
Finally clamp tight the center end block.
This way there will be slight pressure on the joint exerted by the 2 side end block.
One thing I forget is to put a piece of wax paper in between the end block and joined spruce.
When I removed the assembly, it got stuck to the end block.
Joining set up

Joined product

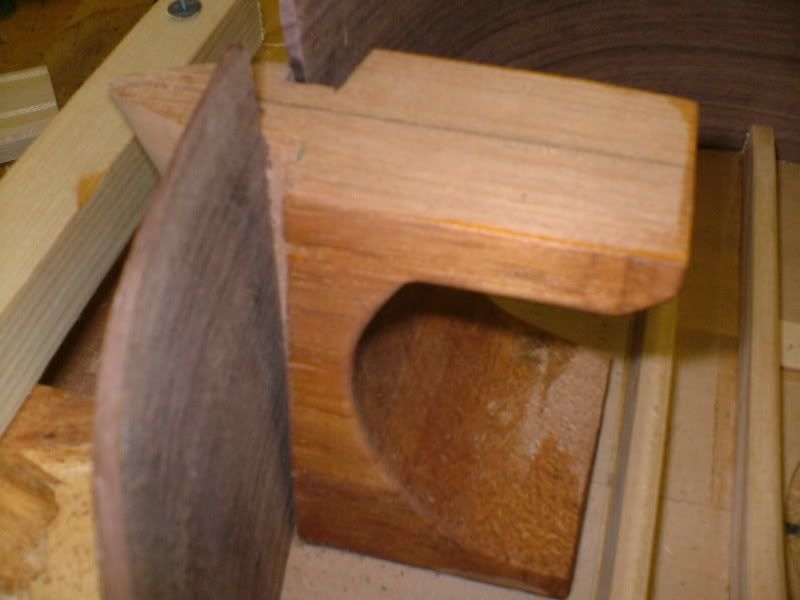
End block
For the end block I did not use any saw to thin the thick piece of end block.
Instead I use a chisel and spilt the end block at the 1/2 thickness point.
The runout was pretty bad.
The pieces produced was very uneven...
I had thought of discarding the spilt piece and go for another piece.
Here is where the good old Stanley block plane comes into play.
I plane the splitted block until it was smooth and voila!
The result is pretty good.
The end block

Run out in the end block

Shaping the back braces
I did have any radius dish and so I decide to shape the braces free hand.
Here is where I appreciates my Stanley block plane even more.
The shaping was quite a breeze.
The curve did look presentable
Shaping the brace end

Checking the curvature of the brace

The braces laid in position before gluing

Bracing the back
After the brace are shaping I finally had the chance to braced the back.
I used the Elmer's Probond glue for gluing the braces.
Because of the lack of Cam Clamps I had to use some innovative way to clamp the braces.
The planes are used as weight to press down the center part of the brace
Gluing the back braces


Unforunately after the back is braced I noticed a crack at the top of the back where the Spanish heel is located.
The crack isn't very big.
After consulting the the OLF forum, this could be due to changes in relative humidity.
I did not do any RH control.
Also I suspect it could be due to the curvature being too curved.
According to a respected luthier in the Delcamp forum, the curvature should be about 4mm depression in the center for a 20' radius
I think mine exceeds that...
How to remedy?
I decide to chisel away the 1st brace and redo that brace with a slighter curve.
Also will build some sort of RH control fixture.
Maybe a plastic bag with silicon gel.
Cracked back

While I decide what to do with the braced I did brace carving of the back braces
Shaping it into a curve.
The thumb plane came in quite handy in this case.
Shaping the back brace

Final brace profile

Gluing the back reinforcement strip
Although there is a crack I decide to carry on with the back reinforcement.
Using again some innvovative ways and the weight of the Stanley planes.
Gluing the back reinforcement strip