
Well I have to start on the binding and purfling.
I am doing a miter on the back and sides, so I need to glue a red and white strip to the bottom of the binding.
I choose the binding out of my stock of maple binding.
The 4 strips had about the same colour and had moderately curls
Then I use the rule and purfling cutter method to cut the strips.


After cutting all the pieces needed I began to glue the red and white purfling to the binding.
This will be for the side miter.

After the glue dried I scrape and plane the excess.
Looks good. Next step is to bend it accordingly


Well I didn't manage to do much just shave the excess off the other 2.
My MJF rebate plane worked the best: light and handy compared to the Stanley block.

Finally I get to continue the binding.
After all the bindings are prepared, with the red white purfling glued and trimmed,
I began to bend the bindings.
I marked the position of the waist using the same vanguard template and tape them all together.
This is to prevent breakage.
On the hot pipe this is pretty easy and fast operation.
I had used some water at the waist but I discover they aren't really necessary.
The trick is to use 2 wooden block to support the bend.
The wooden block apply pressure at the point just outside of the curve, so that the part bends and is supported by the block and thus won't break.
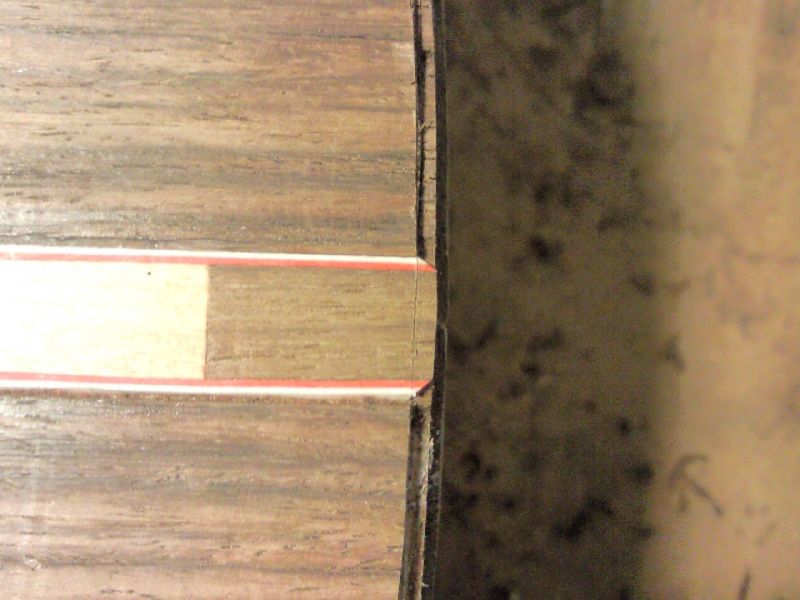
After the bending, I routed the rebate channel.
As the back is quite curvy, the channel route will not be really vertical but perpendicular from the curved top.
I had thought of making a jig for it but was too lazy...
I just correct the skew from vertical using my chisel and rebate plane.
The channel was route quite good except for the lower bout where I over routed 2 parts.
But luckily they will be covered by the purfling channel.
For the purfling channel I choose to go by hand.
I scribed the channel and then chisel off.
It wasn't really easy some of the alignment were off.
At the tail part, I accidentally pop off the back.
But since it's glue using hide glue, it was easily glued back and clamped.
Next to come is how to glue the binding... but before that I need to route the top channel and end graft.


But I forgot to cater for the miter of the purfling...


After the back rebate is done, I did the same for the front rebate.
Similarly I routed the binding rebate and hand chisel the purfling rebate.
Since the top is curved, the routed binding rebate is perpendicular to the top and thus it's not parallel to the side.
So I need to correct it using my rebate plane.
Before cutting the purfling rebate, I measured the thickness of the purfling to know how much to chisel.
The step is similar, scribe the purfling rebate and then hand chisel.
I use a new set of chisel the old one is dulled from chiseling the rosewood.
The only tricky part is the part near the neck.
Chiseling the rebate really takes lots of time...


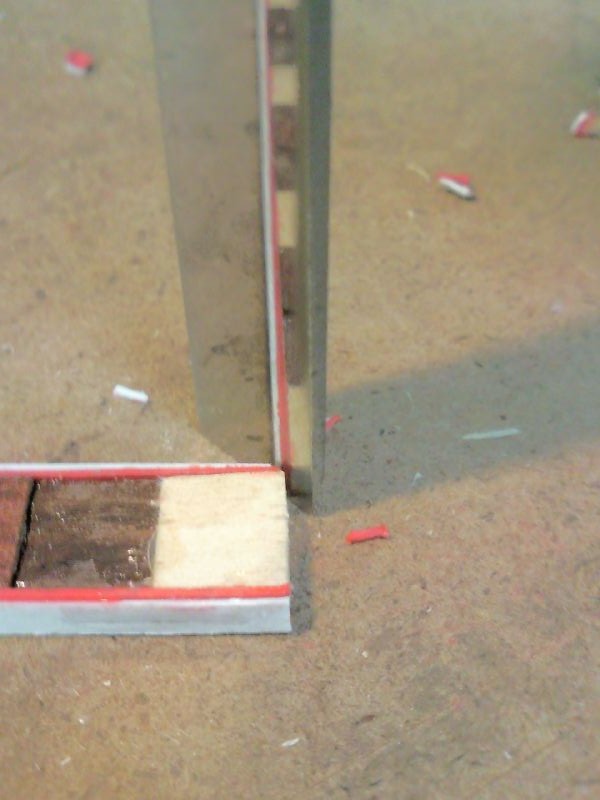
Well next is to route the channel for the end graft but before I need to make it.
I was deciding between a maple end graft same as the binding or a tiled version same as the back strip.
In the end I chose to match the back strip.
So I began to saw the tiles and glue them up.

During sawing the thumb MUST NOT be there unless you want your thumb sawn away...


The end graft looks quite nice.
And because I use the PVA glue, (lazy to bring out my HHG since I only have 1hr or so)
I had to sand the sides to expose the wood before I glue the purfling.
Next is to route the end graft channel on my guitar.
I had a clamp jig which I use for planing etc to clamp the guitar to the table.
The only problem is clamping the guide for the router.
In the end I found a right jig for the job the right angle bracket for shelf which I got from Ikea. :)
But to use it as router guide, I had to screw a horizontal piece to stabilize the structure while I clamp to the guitar.
After that it was matter of alignment and clamping.
Then I set the depth which I had routed previously for the back strip and route the end graft.
There are some frays in the channel but I clean it up easily with a chisel.
Then I proceed to glue the purfling to the end graft.
Same thing I use the aluminium bar as the clamp.


The structure is a wall bracket which I got from Ikea.


The gluing of the purfling strip to the end graft was without hitches.
Err... well except that I forgot and glue with the leveled side of the tiles on top.
But no matter I just use the plane to level the protruding purfling.
After that I test fit the channel and end graft, the fit was perfect.
One of the end graft end was mitered and I use a cut off from the binding / purfling to see where the end graft should sit at.
Then I mark the other end and saw to size.
Again I nearly make a mistake for not catering for the miter.
The end should protrude from the binding channel by just a bit so that the purfling can be mitered.
But I forgot about that.
Luckily I am use to saw a bit proud and then chisel to size.
That little extra was just nice for the miter... luckily... whew...
Anyway without much to remove I simply miter all the ends using the chisel
The mirror surface of the chisel will tell me exactly 45 degrees by looking at the reflection and see a right angle miter reflection.
After that I applied the PVA and glue the end graft.
I did a final check with the binding cut-off and clamp it down
The clamping was a bit tricky: I clamp 2 pieces to the top and back and once piece across the end graft and clamp to that 2 pieces of wood.


After the clamp was removed, I began to level the end graft with the side using my plane and scraper.
I also did a dry run of gluing the purfling strip and binding strip.


I started the actual gluing.
Before that I make sure the purlfing isn't protruding by a lot if not during the gluing, the tape wont be able to hold it down.
I was pondering to use PVA or HHG.
For the last guitar I did both purfling and binding at the same time.
So any glue will be fine, but this time round I did the purfling first and binding later.
So it make sense to use HHG as the clean up will be simpler, for HHG there is no really need to clean up the binding groove / rebate as the new HHG will fuse with the old glue just fine.
For PVA, I need to chisel clean the rebate before doing the binding.
So I just set everything up and proceed as planned.
After all the tape, I use rope to secure in case the tape doesn't hold.


When I removed the tape, I thought all is fine.
But when I put in the binding to check, well... there was lots of gap.
This is due o the purfling channel wasn't straight vertical.
So I had to adjust the channel with chisel and rebate plane.
Also I marked and saw the binding to size and now it's ready to be glue.


After all the preparation I am good to glue it up.
This time round I use the broader tape to have more holding power as there are some spring back in the binding.
For the heel end I clamp a piece of wood to hold the 2 bindings together.
After the tape I string it up and insert some wood pieces to increase the tension.
When I 'play' those strings I can hear a high pitch. (The tension is tight enough)


The binding process wasn't that good.
On one side the binding is slightly too long and it produce a gap at the upper bout curve.
While I trim the other side to level with the back and sides, I began to think how to remedy the situation
The most obvious is to remove and trim to size and re-glue which is what I did.
And I am glad I chose HHG over PVA for the binding.
The re-glue process was very smooth.
I use the heat gun to heat it up.
The binding came off pretty easily (partly because it wasn't glued properly in the 1st place)
I clean up the joint a bit though it's not really necessary for HHG; the old glue will adhere to the glue.
But I need to clean it up because I need to trim the ends of the binding and see if it fits properly.
With the glue remnants in place I can't be sure of getting a proper fit.
I trim the ends using the chisel and start the glue process.
This time round I use string directly so that I can see the fit better.
This is possible as I don't need to do the entire perimeter; just a section.


I use it at a distance and move the air stream around; this is also to prevent the heat gun from overheating the back lining joint.

The rebate is cleaned up for checking the fit.


After I release the rope, the repair was perfect (well nearly)
Well at least I achieved what I wanted.


Well I was busy with office shifting recently.
My current office was due for renovation and we have relocated to another place.
That place was really bad... in terms of filthy air.
That aside, I finally found some time to continue with the binding.
I tried to bend the purfling using the heat pipe but at certain place there is still some creases.
I stripped them apart and glue back using hide glue to conform to the shape of the guitar.
After that I check the purfling channel, some of them wasn't a good fit.
I recut the channel.
Anyway I found the gramil blade which is a V-bevel blade meaning it can go either way.
After all the fitting I began to glue the channel.
I use tape and then some strings.
After an hour or so I removed them to check.
The right side lower bout wasn't done properly so I redo that part.
Following that I check the binding and the miter at the butt.


So I trim the ends and glue again.


I did the binding but I wasn't really satisfied with the top binding.
It didn't sit in the rebate properly I might have to redo the purfling and binding...
I measured the air and top resonance after the binding was done, there are 108Hz 252Hz
It went back up?
I tap with the bridge on the top (not glued) and it shows 104Hz (G#) and 220Hz (A) not too far from my 1st guitar. (104Hz G# and 202Hz G#)
Hopefully this will come up well too.


I use the same old way of removing the binding.
Surprisingly it's not that simple - meaning the binding was quite well glued.
I use the heat gun to heat and a knife to remove the binding.
After some work the binding was off.
The I proceed to clean up the channel.
At one part the channel was badly cut and after checking, I realised it was due to the side wasn't vertical...
Now I know why.
But then after cleaning up the HHG in the channel with chisel I check the binding fit.
It was all good except for a part where the purfling I probably need to remove and cut inner a bit.


I have clean up the binding channel and next is the purfling issue.
The purfling channel at the waist wasn't deep into the body enough which makes the binding not sitting well at that portion.
So I need to cut further into the body at that portion
But before that I need to remove the purfling.
Again same method.
After removing the purfling might not be reuseable.
Also I was thinking of using the herringbone to replace the entire purfling.
This makes the outline more obvious.
My purfling wasn't the bold herring bone like the one I used on the rosette but a finer one.
I tested on the left side and it looks pretty good.


I am thinking of re-doing the outer 2 colors (red / white)


I think I lost count removing and redo-ing the binding and purfling.
After much consideration, I removed the binding and purfling clean up the rebate and redo it with the herringbone purfling.
For the left side I did both purfling and binding together.
Seems to be OK.
For the right side somehow I went slow and the binding wasn't sitting correct.
What did I do? I remove them and clean up the binding rebate and redo it.
Then I look at the left side.
Not too good and I remove the binding and clean up the rebate and glue it back.
Finally all is well :)
Next to come leveling the binding and purfling.
Well there one portion not too good that is the butt joint on the purfling I cut one too short... argh...
That's life...


Next I began to level the binding and purfling using the scraper and the rebate plane.
Nothing special just plain leveling off.


Well I had to level the sides and top and the back.
Just scrape and scrape and finally they will be sanded smooth.
Looks ok except that the part near the heel is is pretty hard to scrape.
I also remedied the purfling where I cut the purfling short; I clean up the hole using my 2mm chisel and then cut a portion from the excess purfling trying very hard to match the pattern
finally I applied some white glue and glue it in.


I did patch at a section where the side purfling was removed during chiseling
No tricks just cut to length and glue and then leveled


