
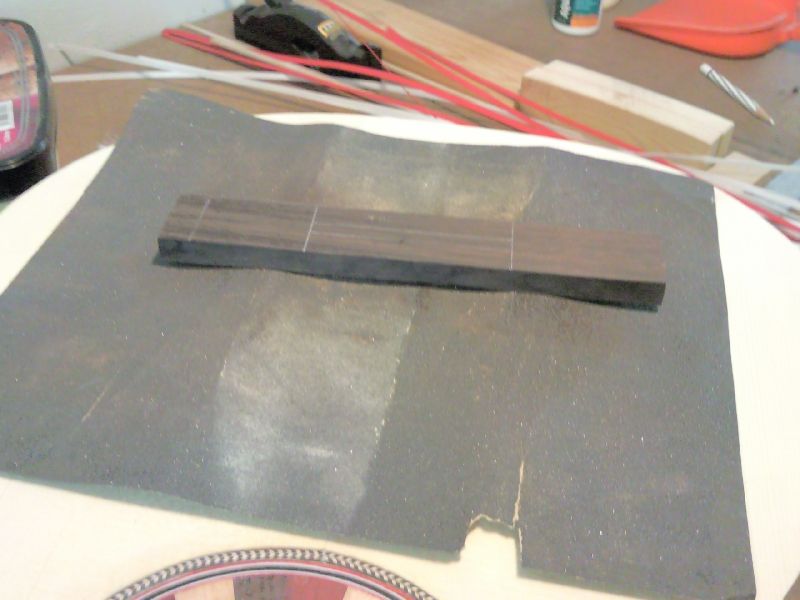
After assembling my assort of bridge blank, I discover all my IRW bridge blank are purplish in color.
The back is more brownish in color.
But in the end I chose a slight purplish blank, but taps well and the grain line matches the back


I saw the blank to size and shoot the edges square.
I also measured the amount of curvature require on the underside (about 2mm) to fit the top.


First I marked out the 650mm position on the top.
Then I put in the fingerboard and place a 3mm action on 12th fret (my Aluminium bar is just nice 3mm)
Placing a straight edge from nut to 650 and then measure the displacement from the top.
It's about 10.4mm for the string height.
This is a nice height: If I include 1mm for the fret crown height, it's about 11.4mm
When I lower the treble to 2.5mm the final height will be about 10.4mm
And take away 1mm taper for the bass and keeping the action at 3mm, the final height will also be 10.4mm.
It worked out just nice.
Neck Geometry
I believe not a lot of guitar making books cover this aspect of guitar making.
Basically is the dimensions of the components that will affect the geometry of the action (@ 12th fret)
There is a great discussion over at the Declamp forum on this.
The components that affect the action includes:
@ nut position
- fingerboard thickness
- nut excess height: assume same as fret crown height.
- neck angle elevation - height extra from parallel plane of reference
@ 12th fret
- action
- fingerboard thickness
- fret crown height
@ bridge
- top doming
- bridge height
- saddle excess height (protruding from bridge)
The relation of the 12 th fret is 1/2 difference between the bridge and nut height
The diagram below should help for a better picture of the geometry

action + neck angle = 0.5 [ (string height + doming) - (fingerboard thickness - fret crown height) ]
action = 0.5 [ (string height + doming) - (fingerboard thickness + fret crown height) ] - neck angle
Some mistake in the formula above, correct version is as show below:
The derivation
Nut:
Fingerboard thickness + Fret crown + Neck angle
Bridge:
String height + doming
12th fret:
Action + Fingerboard thickness + Fret crown height
If we take away the FB + FCH from all, we have
Nut:
Neck angle
Bridge:
(String height + doming) - (Fingerboard thickness + Fret crown height)
12th fret:
Action
If we remove neck angle from all again, we have
Nut:
0
Bridge:
(String height + doming) - (Fingerboard thickness + Fret crown height) - Neck angle
12th fret:
Action - neck angle
The relation of 12th fret is 1/2 of that the bridge, we have
Action - NeckAngle = 0.5 [(String height + doming) - (Fingerboard thickness + Fret crown height) - Neck angle]
Action = 0.5 x [(String height + doming) - (Fingerboard thickness + Fret crown height) - Neck angle] + Neck angle |
And when we analyse often we need to analyse the bass side and the treble side.
The bass fret board is usually 1mm lower than the treble side so the equation will shift.
This equation will help to determine the doming in the solera how much to dig into the lower bout depression. :)
My doming used is about 5mm.
Of course all these are in theory, in practical, the doming on the top may not exactly follow the depression on the solera, so the most practical is to measure like what I did, the exact string height above the doming.


I also prepared the caul for gluing the bridge.


Well since while waiting for the glue to dry on the binding, I continue with the bridge making.
I chose another blank one that is more brownish instead of purplish.
After weighing the same blank I discovered that it was heavier than the previous blank.
In this case I think it is helpful to have a slightly heavier blank.
The new blank of the same size as the previous one weight about 51g the older one is about 46g.
For a start I measure the doming of the top which is about 2mm
I scrape the center part of the blank and push outwards to the wings.
Finally I sanded it on the top with a sandpaper underneath to get an exact fit.
After the doming are fitted, I routed the slot with my B&D RTX and the Stewmac precision router attachment.
The 2 Aluminium bars are clamp to act as a guide.
Then I started to shape the wings with chisels.
I saw multiple slots in the wings and remove the waste by chisel.
This is a woodworking technique I learn when making dados and will prevent big chunk of wood from chipping out.
Finally I started to shape using the rebate plane that I had :)


More of shaping the wings and thin it to about 4mm.
Now one side is about 5.x mm the other side 4.x mm
Care must be taken to ensure the wings aren't dished the profile should smooth.
I use the following tools:
scraper, rebate plane, rasp, file.
Finally once the thickness is achieved, sandpaper.
I make sure I leave an edge of about 1mm and not over thin the edges.
For the ends, I will make a slight curve to ensure that the bridge does not stress on one particular grain line on the top.


I had some time and use the rebate plane and scraper to correct the profile shape of the wings.
Now it looked much better
But again the weight is still about 36g still a bit of weight to shave off.


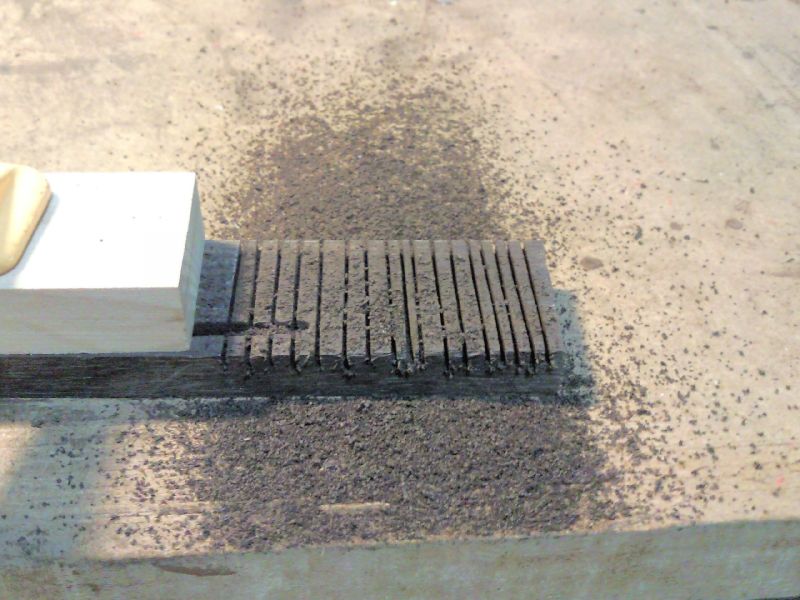
After the wing profile looks correct, I began to cut the central groove.
Originally I had plan to use the RTX to route the central groove but I didn't had time to set it up.
So I just use a guiding block and saw the tie block edge and chisel the rest.
So far no mistake as yet.
I weight the bridge it was 32 g abit over my expectation.
I had anticipated it to drop by a bit after I remove wood from the central tie block region.
But the weight didn't drop too much.
I might have to thin another 1 mm from the tie block and the saddle slot block.


More of trying means to reduce the weight and finally I manage to get it near 25.7g
Not bad.
1) Reduce the tie block weight
2) Ridge the saddle block and tie block region
3) Reduce the entire width of the bridge but more of the tie block side.
We need the saddle front block to be thick (at least 4mm thick) to withstand the forces of the string pull on saddle.
4) Reduce thickness of the wing to 4mm and possibly 3mm thick (Now is about 4mm)
I will make the saddle groove deeper (now is about 3mm) and the ridge between tie block and saddle block deeper too.
This will probably bring it down to below 25g


I would probably increase the depth the ridge between them.

Yeah after doing several things the weight of the bridge is reduce to 23.6g.
It's within target but of course it can be reduced further.
My last bridge was about 21g
What I did was:
1) Increase the groove between the tie block and saddle block by chiseling.
2) Route deeper the saddle slot.
3) Thin the wing
4) Reduce the length of the bridge to 52mm per side from tie block. It was about 57 - 58 mm or so.
5) Curved the ends so that the end doesn't sit on one grain line and cause stress to the spruce top.
Now it look good.


OK the final saga of the bridge making; err... almost final saga.
I managed to reduce the weight to 21.3g which is about right.
My previous bridge was about 21g.
I thinned the wings, taper the ends, reshaped the back saddle block.
After checking the actual saddle allowance on the guitar, I reduced both tie and saddle block to about 8.5mm.
This will protrude a correct saddle height of about 2mm or so.


While waiting for the binding to dry, I work on the bridge tie-block inlay.
Hehe no surprise just a series of square blocks with the signature color: brown red white.
But for the white color I am using MOP instead.
I use wooden blocks and clamped it to the workbench and make into a shooting board.
But with the same width as the MOP pieces 5mm.
By using this setup the 3 pieces IRW, Bloodwood can be shoot to the same width.
Then I saw the pieces into roughly a square.
No miter box just use eye to judge.
After that I lay out on the tie-block to see if it fits.
Now to consider what glue to use.
I roughly weigh the bridge it's about 24g!!!
Hmm.. after shaving the excess it should be around 23g?
Well maybe I should reconsider putting the inlay on the bridge.


