There is a Singapore Guitar Show 2011 (2nd) at the Suntec Exhibition Center this weekend, 3rd Dec to 4th Dec.
Do drop by if you are free.
More info at this site.
Singapore Guitar Show 2011
 Custom Search
2011-11-29
2011-11-25
Back struts
I saw started preparing the back struts.
Till now I am still thinking to make a live back or inactive back.
Check out Trevor Gore's book it says a lot about live back (active back).
It's said to give a better tone but at a certain expense of the volume.
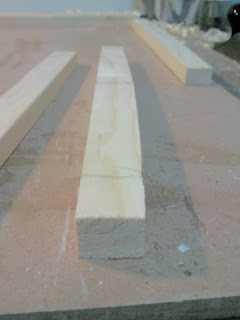
Anyway I cut the brace blank from spruce and profile it accordingly
 All 3 struts ready for shaping
 Shooting the curve into the 1st brace.
 The curve is nicely fitted with the foot.
 Shooting the curve into the back struts (Lower Bout strut)
 Same (Waist strut)
When I tried to shoot the struts I slipped and my thumb go crashing into the struts end...
Of course I bled but at least not on the struts....
Well that's the minor accident that always happened.
Anyway I finished shaping the curve of the back struts I tried fitting to the back and check all the fitting.
I think the foot area will need some adjustment
The rest of the struts and curvature are alright.
 Some gaps in the foot region.
 The curves looks OK now.
After fitting the curves, I began to work on the struts.
I saw them to size and chisel the ends to 5mm.
The ends will fit in the notches in the reverse kerfed lining.
The height of the lining is about 10mm so I chose 1/2 of it 5mm to be the final height of the brace ends.
 Chiseling the curve at the ends.
 Marking the position of the 1st struts
 Sawing the notch pocket
 Chisel away the waste
 1st back brace fitted.
Then I worked on the other 2 back strut as per 1st one.
For the position of the 1st 2 back string (UB and W) I make them follow the position of the
UTB and LTB.
They are almost on top of them.
For the 3rd back strut, I just place in the center between the end block and the waist back strut.
This 3rd one is special as I will relief the center portion too.
This will make an active back which would give the guitar a bigger sound.
In addition some more struts will radiate from the center of the 3rd LB strut.
 2nd back braces fitted.
 I relieved the centre portion of the LB back strut for an active back.
 3rd back brace fitted
 Done.
Done.
 Another view
Till now I am still thinking to make a live back or inactive back.
Check out Trevor Gore's book it says a lot about live back (active back).
It's said to give a better tone but at a certain expense of the volume.
Anyway I cut the brace blank from spruce and profile it accordingly


When I tried to shoot the struts I slipped and my thumb go crashing into the struts end...
Of course I bled but at least not on the struts....
Well that's the minor accident that always happened.
Anyway I finished shaping the curve of the back struts I tried fitting to the back and check all the fitting.
I think the foot area will need some adjustment
The rest of the struts and curvature are alright.


After fitting the curves, I began to work on the struts.
I saw them to size and chisel the ends to 5mm.
The ends will fit in the notches in the reverse kerfed lining.
The height of the lining is about 10mm so I chose 1/2 of it 5mm to be the final height of the brace ends.


Then I worked on the other 2 back strut as per 1st one.
For the position of the 1st 2 back string (UB and W) I make them follow the position of the
UTB and LTB.
They are almost on top of them.
For the 3rd back strut, I just place in the center between the end block and the waist back strut.
This 3rd one is special as I will relief the center portion too.
This will make an active back which would give the guitar a bigger sound.
In addition some more struts will radiate from the center of the 3rd LB strut.


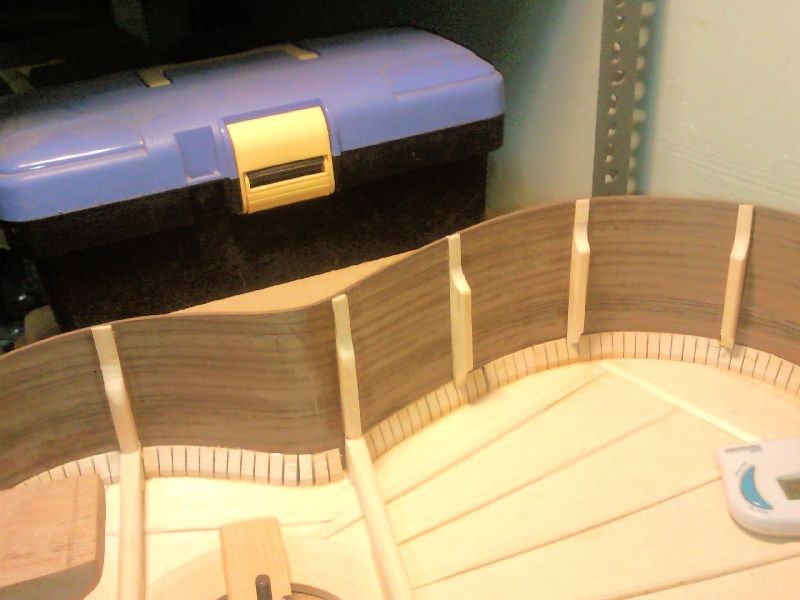
Side struts
I also glue the side struts to enhances the rigidity of the sides.
I have 5 on each side, 2 of them is there to support the UTB and LTB, and 3 more for the lower bout.
Well it's a bit overkill but after gluing the sides feels rigid.
 Gluing the UTB and LTB support
 HHG dried pretty fast so after sometime I didn't have to clamp the main body of the strut
 Notching the kerfed lining of the top.
 The side struts will sit into the notched lining.
 Chamfer the ends of the struts
 Rounding off with 1/2 round file.
 All glued, looking good.
 All the side struts done
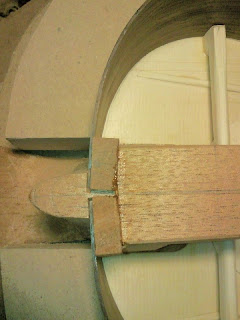
When I was doing the notches in the reversed kerfed lining for the back, I made a terrible mistake.
I use the vanguard sheet to mark the position of the side struts
But I made a mistake the vanguard is outside the sides..
Due to the side curvature when transfer the markings to the linear lining, there is a position misplacement.
The notches are further apart...
Argh.. when fitted the lining only then I realise it... now I have wasted a good piece of lining material...
 Marking the position of the side struts. This is a mistake, the vanguard sheet should be inside not outside of the sides.
The curvature will cause enough discrepancy when notching..
 Chiseling the notches
 Test fitting... the notches doesn't fit....
Now gotta think what to do...
I discard that lining as there were too many notches in there.
But it didn't go wasted, I use is as reference for the notching correctly the next lining.
I used it for both sides and managed to get it done accurately.
The vanguard sheet on the inner circle also didn't work properly as there as some thickness in the side struts (2.5mm) which is enough to make the discrepancy.
This was why I used the 1st trial lining for reference.
It is able to go over the side struts and thus be able to mark the position accurately.
 I use the vanguard sheet to mark the position but this wasn't accurate either due to the thickness of the side struts.
 Lining notched correctly and made wet and clamped to place.
 The shape is form ready gluing.
 Lining glued.
Have to worked fast as HHG gels pretty fast.
I used my hairdryer to heat it up a little.
When gluing I leave the lining abit proud of the sides to be shave away later and cater for the arc in the back.
The back is not perpendicular to the sides at the edges
 The lower bout done.
 Waist region
 Upper bout
 Glue the other side
 Done.
Done.
I have 5 on each side, 2 of them is there to support the UTB and LTB, and 3 more for the lower bout.
Well it's a bit overkill but after gluing the sides feels rigid.


When I was doing the notches in the reversed kerfed lining for the back, I made a terrible mistake.
I use the vanguard sheet to mark the position of the side struts
But I made a mistake the vanguard is outside the sides..
Due to the side curvature when transfer the markings to the linear lining, there is a position misplacement.
The notches are further apart...
Argh.. when fitted the lining only then I realise it... now I have wasted a good piece of lining material...

The curvature will cause enough discrepancy when notching..


Now gotta think what to do...
I discard that lining as there were too many notches in there.
But it didn't go wasted, I use is as reference for the notching correctly the next lining.
I used it for both sides and managed to get it done accurately.
The vanguard sheet on the inner circle also didn't work properly as there as some thickness in the side struts (2.5mm) which is enough to make the discrepancy.
This was why I used the 1st trial lining for reference.
It is able to go over the side struts and thus be able to mark the position accurately.


Have to worked fast as HHG gels pretty fast.
I used my hairdryer to heat it up a little.
When gluing I leave the lining abit proud of the sides to be shave away later and cater for the arc in the back.
The back is not perpendicular to the sides at the edges


2011-11-16
Assembly
It has been raining for the past few days.
So I was waiting for the rain to stop before I start the assembly process.
Although I had a dehumidifier, I didn't want it to overwork.
The RH went all the way into the 80s during the rainy season
So I began to assemble when it didn't rain too much today.
I drive the RH down to 60s 50s before I started gluing.
Before I glue the sides to the end block, I scrape the sides.
Though it's not perfect, but the surface was much better than before.
Then I heat up the hide glue began to glue the side to the end block.
I forgot the HHG will squeeze out of the gap so I last minute inserted a wax paper in between.
 Scrape the sides inner surface
 Preparing to glue the end block
 Glue up
Then before I work on the top to the neck, I carve the heel almost to finish.
I thought it would be hard to do the carving when it's all assembled.
The carving was quite done quickly and it feel just right in my LH.
I didn't smooth out alot just some rough smoothen by the rasp and file.
The touch up will be done once the top is assembled.
 Heel carved
Then I inserted the wedge noted mentally how to glue up the top to the neck.
The wedge will be used to clamp the top to the neck but the wedge will not be glued as yet.
As a result I had to insert a wax paper to prevent the wedge from being glued.
 Checking the alignment
 Heating up the parts
 Glue up
 Checking the alignment
 Wait for the glue to set
Well after some thoughts about it I started the actual assembly.
1st I glued the wedge in between the heel block and the top.
I thought this will make the whole thing more stable so gluing in is a better option.
Next I level the end block to make sure the surface is flat.
And apply glue to the end block and glue to the top.
But problem is I don't really have a good clamping option.
I held it down by hand 1st waiting for the glue to set.
Then I clamp a wooden block to the end block and clamp the wooden block to the side mould ends.
But since the pressure is applied only at 1 side, this might distort the start.
In the end I clamp 2 blocks to the end block and use my #4 Stanley as a weight to hold it in place.
This works much better.
Next I glue in the side wedges.
Now for this I just apply glue to the rear side of the wedge
The front wedge I didn't apply any glue.
This is to allow the side to expand contract
Romanillos did it this way too.
Following that, I did up 2 sticks to held down the sides before I glue in the linings.
The sticks have 2 slots to hold the sides to a the correct width.
This are held by 4 clamps.
Lastly I start gluing the lining.
I held by hand 1st then clamp some wooden block to the sides (not side mould).
Clamps to the side mould will distort the shape.
For the lower bout since the sides is perpendicular to the top there is no issue.
For the upper bout, it is tapered, so the lining bottom at the front edge will need to be taper as well.
I use the upper block cutoff of the solera to shoot plane the correct angle to the lining bottom.
Now my favourite plane is the shoulder rebate plane.
It's light and cuts very well.
For the oblique part I just change the angle abit.
I did the lining in sections of 3 blocks to facilitate this.
Finally after some work it was done :)
 The tops and neck glued nicely.
 Trimming the ends of the traverse brace
 Make sure there is a gap between the ends of the traverse brace and the sides
This is to ensure if the traverse brace expands it will not push against the sides.
 Checking the gap for the other ends.
 Trimming the frontal edge of the sides where it's going into the slot.
Once in the slot it will be very hard to trim down.
 Glue in the top wedge
 Note the gap in the front part.
Ensure the front wedge doesn't extend to block the side wedge.
 Glue in the end block
 At first I clamped it using 2 clamps to a wooden block and the side mould.
(The side mould is lifted from the solera, there is a gap of about 1.5 cm same height as the elevated neck part)
 But I was afraid that this will distort the end block's vertical geometry.
So I end up just held down by weights.
I clamp 2 wooden block for more surface area.
 Side wedges in. Glue is applied to the rear side (heel block side).
This is to allow the sides to move if it expands.
(But it's actually clamp very tight by the wedges I wonder if it can move or not)
Anyway Romanillos did it this way too.
 Top view.
 Glue in the lining. I held it down by hand until the HHG sets
 Next I clamp in some wooden blocks to hold it down.
Make sure only clamp to the sides not the side mould so that it won't distort the side shape.
The lining is tapered so by clamping down this face, both vertical and horizontal force will be applied clamping to the top and sides simultaneously
 Lower bout done
 Shooting the correct angle for the upper bout lining (the part just beside the heel.
The angle block is the removable section of the upper bout elevated part of the solera,
so it have the correct angle.
The lining fits nicely.
The curvature part after that I just use some scraper to change the angle gradually.
The perpendicular sides after that is ok as it will be square to the side too.
 Last part of the gluing
 Can see the 2 sticks holding down the sides.
 Close up of the lining. Looks good.
Clean up is always a problem for me... HHG is so sticky... but that's the good thing about HHG isn't it?
 My workbench full of the lining shave off, and HHG droplets...
After all the glue dried, I took it out and trim the edges.
As I didn't force the sides to conform to the mould exactly, there are some edges.
I easily parred it down with my favourite rebate plane and chisel.
Here are some pics
 Removing all the clamps
 Lower bout lining looks good
 The other side
 Waist region
 Upper bout
 Upper bout. This pic looks a lot like my first guitar :)
 Heel area
 The entire inner of the guitar looks good to me :)
 Some pics of the elevated neck region
 From the top
 From the side
 Notice how this side grain line follow the curvature of the dropped top?
Looks like the side is made just for this design.
I saw away the protruding part of the end block and side wedges.
After that I use my rebate plane to shape the profile of the back.
Although I drew the 15' radius of my Gutmeier (which was probably shaped using a radius dish),
I did not really follow that profile.
I choose a high lower bout end and taper toward the upper bout just like my 1st build.
The end is a bit higher than the mark shape.
The Spanish foot was also shaped according to the radius stick which I have made previously.
I noticed there is a seam at the front side at the heel region ... I wonder how to solve it.
Also I prepared the side struts to reinforce the sides.
 Cut the end block protruding part.
 Plane it smooth
 Done
Done
 Saw the wedges end
 Sawn. I didn't take pics of how I plane the Spanish foot part basically I use chisel and my rebate plane
 Shaping the side profile
 Using the sticks to see if the 2 sides are of the same height.
This is a very common method in woodworking to see if a twist has occurred
 Check the fit of the foot with the radius stick I made earlier
 Check the side height make sure it coincide with the foot shape.
The curve of the back brace should match the foot exactly.
 The foot.
The hard part is the wedge is end grain (different grain orientation with the foot).
When planing it I use chisel 1st followed by plane
 All the debris collected inside the top.
 The side struts prepared.
I sand the sides to make sure they fit.
I use the same method as I did for #1
A sanding board with sand paper attached.
The upper bout and lower bout will form 2 angles.
 Sanding board
 With sand paper clipped to it
 Sanding the rims
So I was waiting for the rain to stop before I start the assembly process.
Although I had a dehumidifier, I didn't want it to overwork.
The RH went all the way into the 80s during the rainy season
So I began to assemble when it didn't rain too much today.
I drive the RH down to 60s 50s before I started gluing.
Before I glue the sides to the end block, I scrape the sides.
Though it's not perfect, but the surface was much better than before.
Then I heat up the hide glue began to glue the side to the end block.
I forgot the HHG will squeeze out of the gap so I last minute inserted a wax paper in between.


Then before I work on the top to the neck, I carve the heel almost to finish.
I thought it would be hard to do the carving when it's all assembled.
The carving was quite done quickly and it feel just right in my LH.
I didn't smooth out alot just some rough smoothen by the rasp and file.
The touch up will be done once the top is assembled.

Then I inserted the wedge noted mentally how to glue up the top to the neck.
The wedge will be used to clamp the top to the neck but the wedge will not be glued as yet.
As a result I had to insert a wax paper to prevent the wedge from being glued.


Well after some thoughts about it I started the actual assembly.
1st I glued the wedge in between the heel block and the top.
I thought this will make the whole thing more stable so gluing in is a better option.
Next I level the end block to make sure the surface is flat.
And apply glue to the end block and glue to the top.
But problem is I don't really have a good clamping option.
I held it down by hand 1st waiting for the glue to set.
Then I clamp a wooden block to the end block and clamp the wooden block to the side mould ends.
But since the pressure is applied only at 1 side, this might distort the start.
In the end I clamp 2 blocks to the end block and use my #4 Stanley as a weight to hold it in place.
This works much better.
Next I glue in the side wedges.
Now for this I just apply glue to the rear side of the wedge
The front wedge I didn't apply any glue.
This is to allow the side to expand contract
Romanillos did it this way too.
Following that, I did up 2 sticks to held down the sides before I glue in the linings.
The sticks have 2 slots to hold the sides to a the correct width.
This are held by 4 clamps.
Lastly I start gluing the lining.
I held by hand 1st then clamp some wooden block to the sides (not side mould).
Clamps to the side mould will distort the shape.
For the lower bout since the sides is perpendicular to the top there is no issue.
For the upper bout, it is tapered, so the lining bottom at the front edge will need to be taper as well.
I use the upper block cutoff of the solera to shoot plane the correct angle to the lining bottom.
Now my favourite plane is the shoulder rebate plane.
It's light and cuts very well.
For the oblique part I just change the angle abit.
I did the lining in sections of 3 blocks to facilitate this.
Finally after some work it was done :)


This is to ensure if the traverse brace expands it will not push against the sides.


Once in the slot it will be very hard to trim down.


Ensure the front wedge doesn't extend to block the side wedge.


(The side mould is lifted from the solera, there is a gap of about 1.5 cm same height as the elevated neck part)

So I end up just held down by weights.
I clamp 2 wooden block for more surface area.

This is to allow the sides to move if it expands.
(But it's actually clamp very tight by the wedges I wonder if it can move or not)
Anyway Romanillos did it this way too.


Make sure only clamp to the sides not the side mould so that it won't distort the side shape.
The lining is tapered so by clamping down this face, both vertical and horizontal force will be applied clamping to the top and sides simultaneously


The angle block is the removable section of the upper bout elevated part of the solera,
so it have the correct angle.
The lining fits nicely.
The curvature part after that I just use some scraper to change the angle gradually.
The perpendicular sides after that is ok as it will be square to the side too.


Clean up is always a problem for me... HHG is so sticky... but that's the good thing about HHG isn't it?

After all the glue dried, I took it out and trim the edges.
As I didn't force the sides to conform to the mould exactly, there are some edges.
I easily parred it down with my favourite rebate plane and chisel.
Here are some pics


Looks like the side is made just for this design.
I saw away the protruding part of the end block and side wedges.
After that I use my rebate plane to shape the profile of the back.
Although I drew the 15' radius of my Gutmeier (which was probably shaped using a radius dish),
I did not really follow that profile.
I choose a high lower bout end and taper toward the upper bout just like my 1st build.
The end is a bit higher than the mark shape.
The Spanish foot was also shaped according to the radius stick which I have made previously.
I noticed there is a seam at the front side at the heel region ... I wonder how to solve it.
Also I prepared the side struts to reinforce the sides.


This is a very common method in woodworking to see if a twist has occurred


The curve of the back brace should match the foot exactly.

The hard part is the wedge is end grain (different grain orientation with the foot).
When planing it I use chisel 1st followed by plane


I sand the sides to make sure they fit.
I use the same method as I did for #1
A sanding board with sand paper attached.
The upper bout and lower bout will form 2 angles.


Subscribe to:
Posts (Atom)