
Some updates: My workshop apartment is undergoing some major upgrade, (changing of all the sewage pipes, water pipes etc...
So unfortunately, I won't be able to work on my guitar for a few months :(
Hope to work my guitar soon.
So unfortunately, I won't be able to work on my guitar for a few months :(
Hope to work my guitar soon.
I wanted to have a thick back strip for the guitar, and also possibly decorate the head-plate too.
So I thought of making a meander tile for it.
I originally thinking of a more complicated 2 fold meander pattern but settled for just one fold.
I started with the paper and calculated the width of each of the piece on the paper.
The centre strip was 15mm wide, and each piece thickness was 3mm.
So I add according and came out with a list of the width to cut.
I use Basswood for the white part and Indian Rosewood (double length head-plate) for the dark part.
To cut the strips from the head-plate I use my purfling cutter tool and it works like a charm.
I measure the width from the caliper (with some allowance) and set the tool width according.
Then when I cut the strips I just need to make sure the IRW / basswood edge is straight (by shooting on the shooting board) and then exert a constant pressure on the edge while i glide the purfling cutter on the head-plate.
I score on one side first and then flip on the reverse side and continue until it cuts completely.
Then I shoot both pieces to get a straight edge.
The main piece has to be shot to be straightened too, for the next cut.
Here are the pics:

Planning for the Meander pattern.
Nearly did a width calculation mistake for one of the piece (less 3mm)

A clearer picture of the design.
All dimensions in mm.
All dimensions in mm.

Measure the width setting on my purfling cutter.

Shooting to straighten the edge.

Cut the strips from the head-plate.

Dry assembly looks good.
The gluing part needs lots of clamp and clips.
Luckily I have lots of clamps around.
I use normal PVA white glue for the job because of the open time.
Anyway it dries clear and it's not structurally crucial, so PVA glue will suffice.

Gluing the 1st strip

Simple just use the clips

After some pieces. The meander is taking shape

More clamps are employed as the meander tiles gets thicker

S-shape formed

More clamping

Amost done.

Tada... Completed
Next to come is to cut up the tiles.
So in order to cut properly I made a miter box to be used with my douzuki saw.

Miter box for cutting up the tiles

Another view

Using the miter box.
The right block is thicker than the left.
It's meant as a stop to control the thickness of the tile slice.
The right block is thicker than the left.
It's meant as a stop to control the thickness of the tile slice.

Sawing the tile
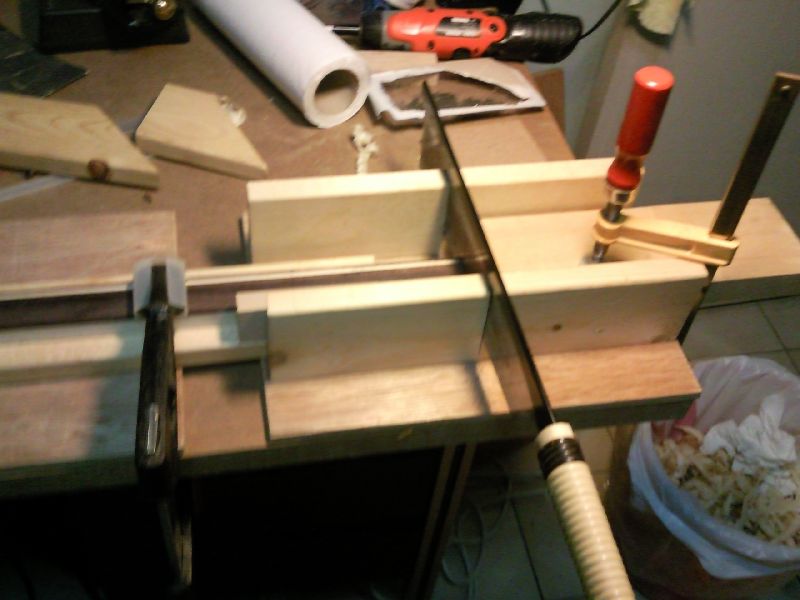
The full view of the set-up.

The 1st tile sawn. So far so far

The pattern forming up.

My meander back strip (dry assembly).
The 2 white lines are for the look and feel.
The actual one will be thinner.
The 2 white lines are for the look and feel.
The actual one will be thinner.

After a number of tiles sawn.
You can see the dust piling up.
You can see the dust piling up.

My collection of tiles ready for installation.
Should be able to inlay on 2 or 3 backs.
Should be able to inlay on 2 or 3 backs.


